Or paint it red so it can go faster. With enough boyz inside all believing as hard as they can, that thing should be zipping around the galaxy. Don't have to be sneaky if you're fast.
I'm just getting into bookbinding. It requires surprisingly few tools and not a ton of space (though like all hobbies it can always grow to consume whatever space is available). Its a good option if you have access to a printer with free or cheap prints.
Balcony gardening can be satisfying but might not be what you're looking for.
If you already have a project (or lots of them) in mind, a 3d printer can be great to have around. Depending on your fillaments of choice (determined by what you want the print to be able to do) you might need good ventilation or an enclosure. If you have a spare bedroom that's a good start.
Awhile back I posted that one of my cyberpunk short stories got picked up by an anarchist fiction zine. I was excited because I had this related-but-sort-of-mutually-non-canonical photobash comic ready to go, which played with the same concept but in a different tone.
I don't want to spam this community with my comic weekly or anything, so I figured I'd just share a few still panels, spaced out whenever I get to them in the posting schedule. They're just quiet bits of art between the jokes.
Hopefully that's all okay, and if you do want to read this silly webcomic about a stolen secret service protoptype and the endangered deer it thinks is the president I'm posting it weekly here or here
That's interesting! It definitely has some of the visuals often associated with solarpunk (I'm not really a fan of the sleek plastic metropolis look personally, I much prefer solarpunk to be punk and emphasize stuff like creative reuse, but the visual art in the genre is lousy with this stuff and the game makers executed it well from what the trailer shows). I think there's still room for this to be cyberpunk depending on how real or widely available this area is - if it's some company park or an enclave of the rich, and wealth disparity still exists, I could see it being cyberpunk in content if not aesthetics at least. It does look very cool, thanks for sharing it!
One of the things I really like about the 40k universe is the incredible scope of the setting. You really can tell just about any story and it fits somewhere in the setting.
I don't actually know much about necromunda, though I used to love the art and articles about it as a kid. I'm hoping someone else will kick in some recommendations
And seven years seems quite optimistic considering how effectively local governments and committees of concerned NIMBYS have been blocking any new nuclear construction for like, my entire lifetime, at least in the US. Apparently nobody wants a nuclear power plant going up near them and they find a lot of creative ways to jam up the works. I'm not sure we have the time to try to ram dozens of nuclear power plants through those folks while the world is burning.
This is really cool! I'd always thought this was done with molten gold, I had no idea that it was mostly done with resins. I might give this a try someday.
I'm thinking about it - I have access to a laser cutter that can do steel etching. If I planned it carefully I could get it to match to inches between the points of the jaws to each tick or something. But I think I'm leaning towards leaving it origional-ish for now, since this setup still allows you to open and close them without losing your place, so you can measure the opening accurately and that's probably how they'll be used.
I haven't been over to the other zerowaste communities, so I appreciate the heads-up! I mod this one (though the community here is great and has needed no input from me!) so I want to make sure it continues to be a nice place to share projects and ways to avoid waste.
Yeah I generally don't love these extension cord / splitter combination because they make it too easy to casually plug in lots of stuff. I've been using this one but just for a box fan (old building, retrofitted for electricity with the absolute minimum number of outlets). When I do hook multiple things to one extension cord, I make sure it's something like power tools, where I know I can only use one at a time anyways, and that I'll always be there when its in use. I also check my cords for heat when they've been in use for awhile (I once found a daisy chained set of rack-mount power strips in a server room, where one of the plugs had melted to the socket it was plugged into, fusing them together. Pulling them apart broke the plastic outlet. I've been a little cautious ever since).
That's a cool idea - I might pick this up again sometime, it really was a very workable material.
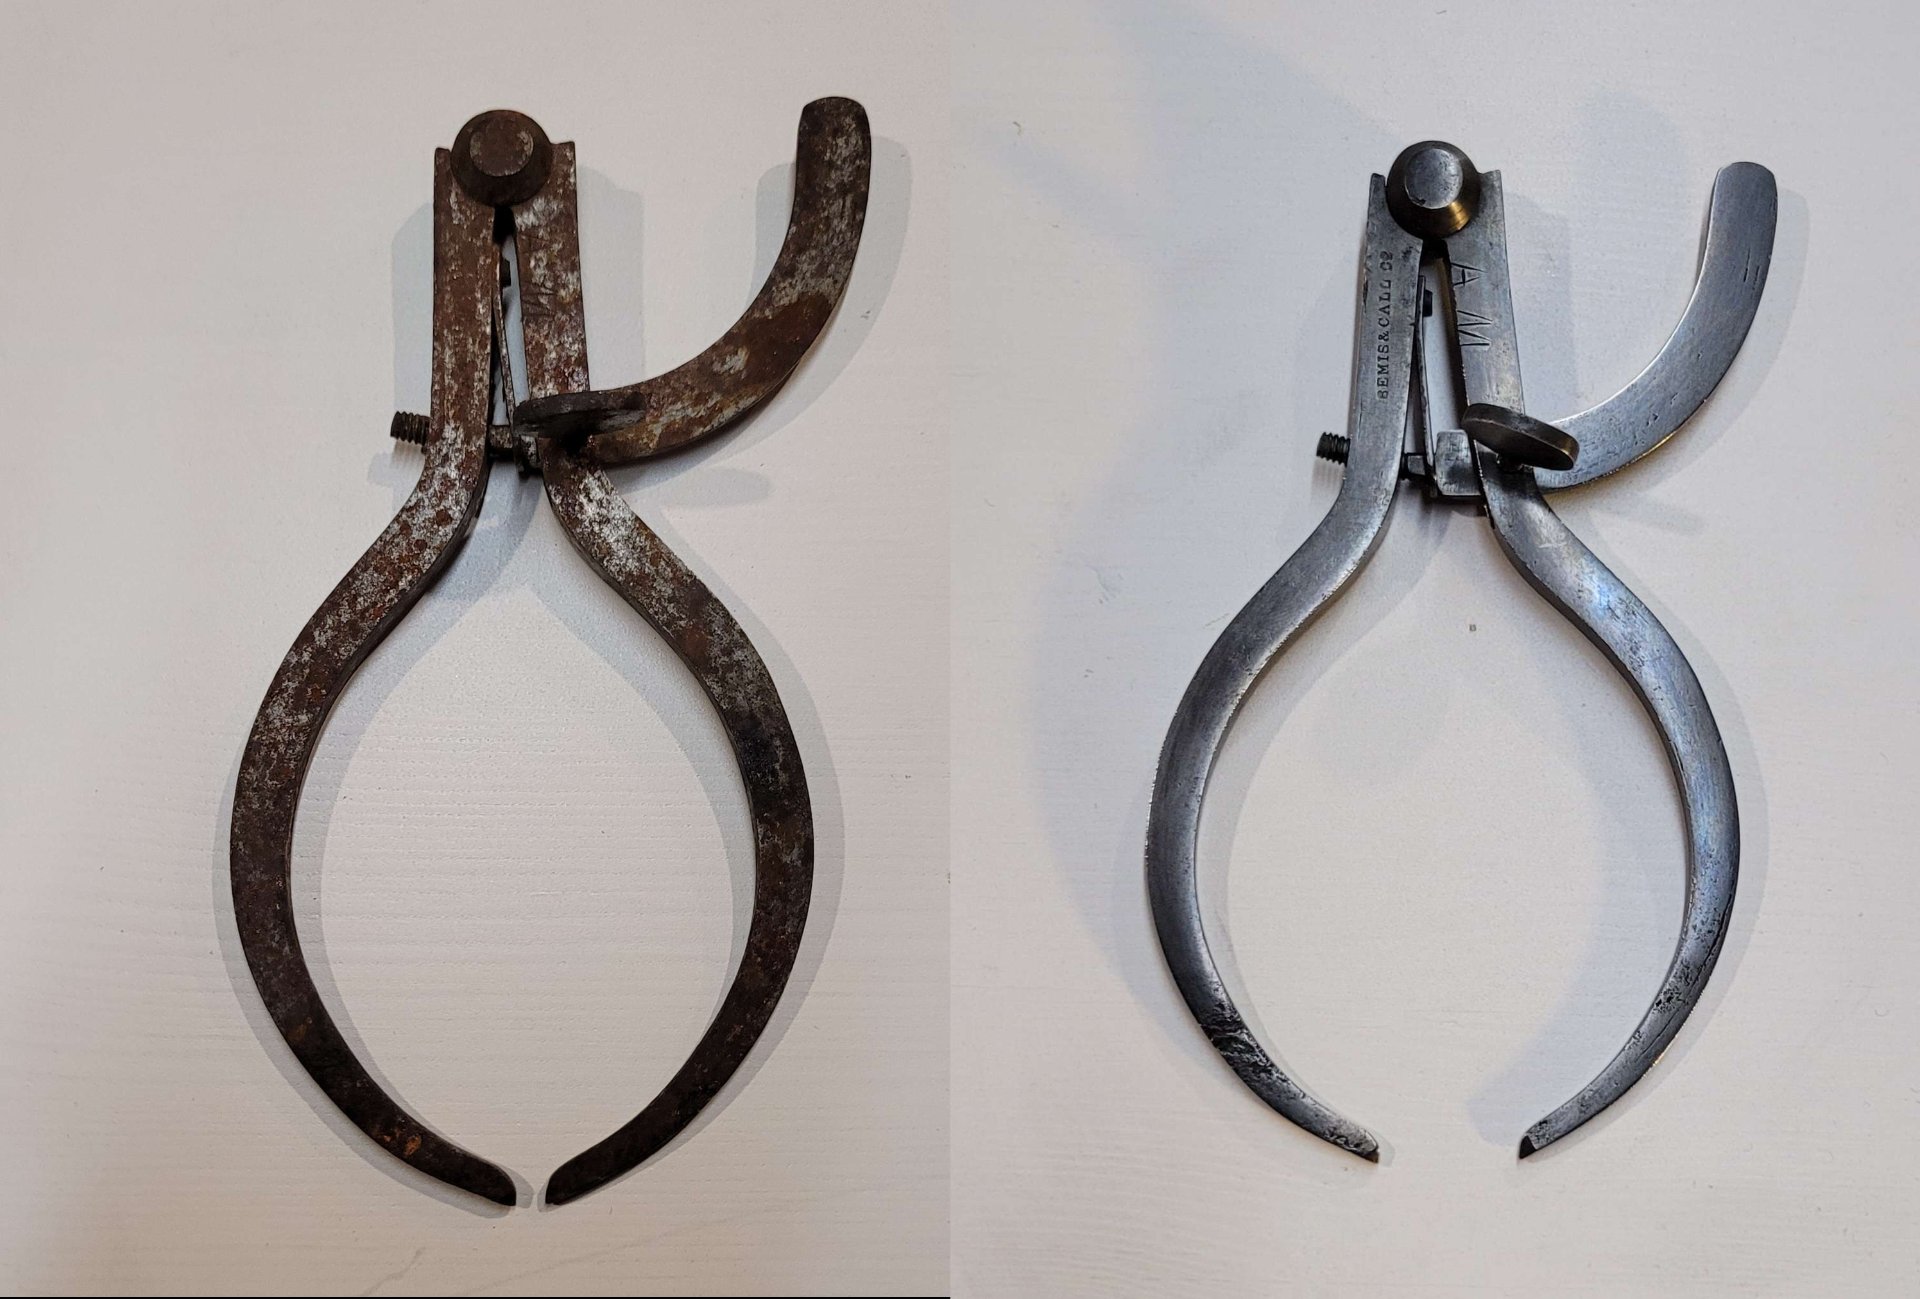
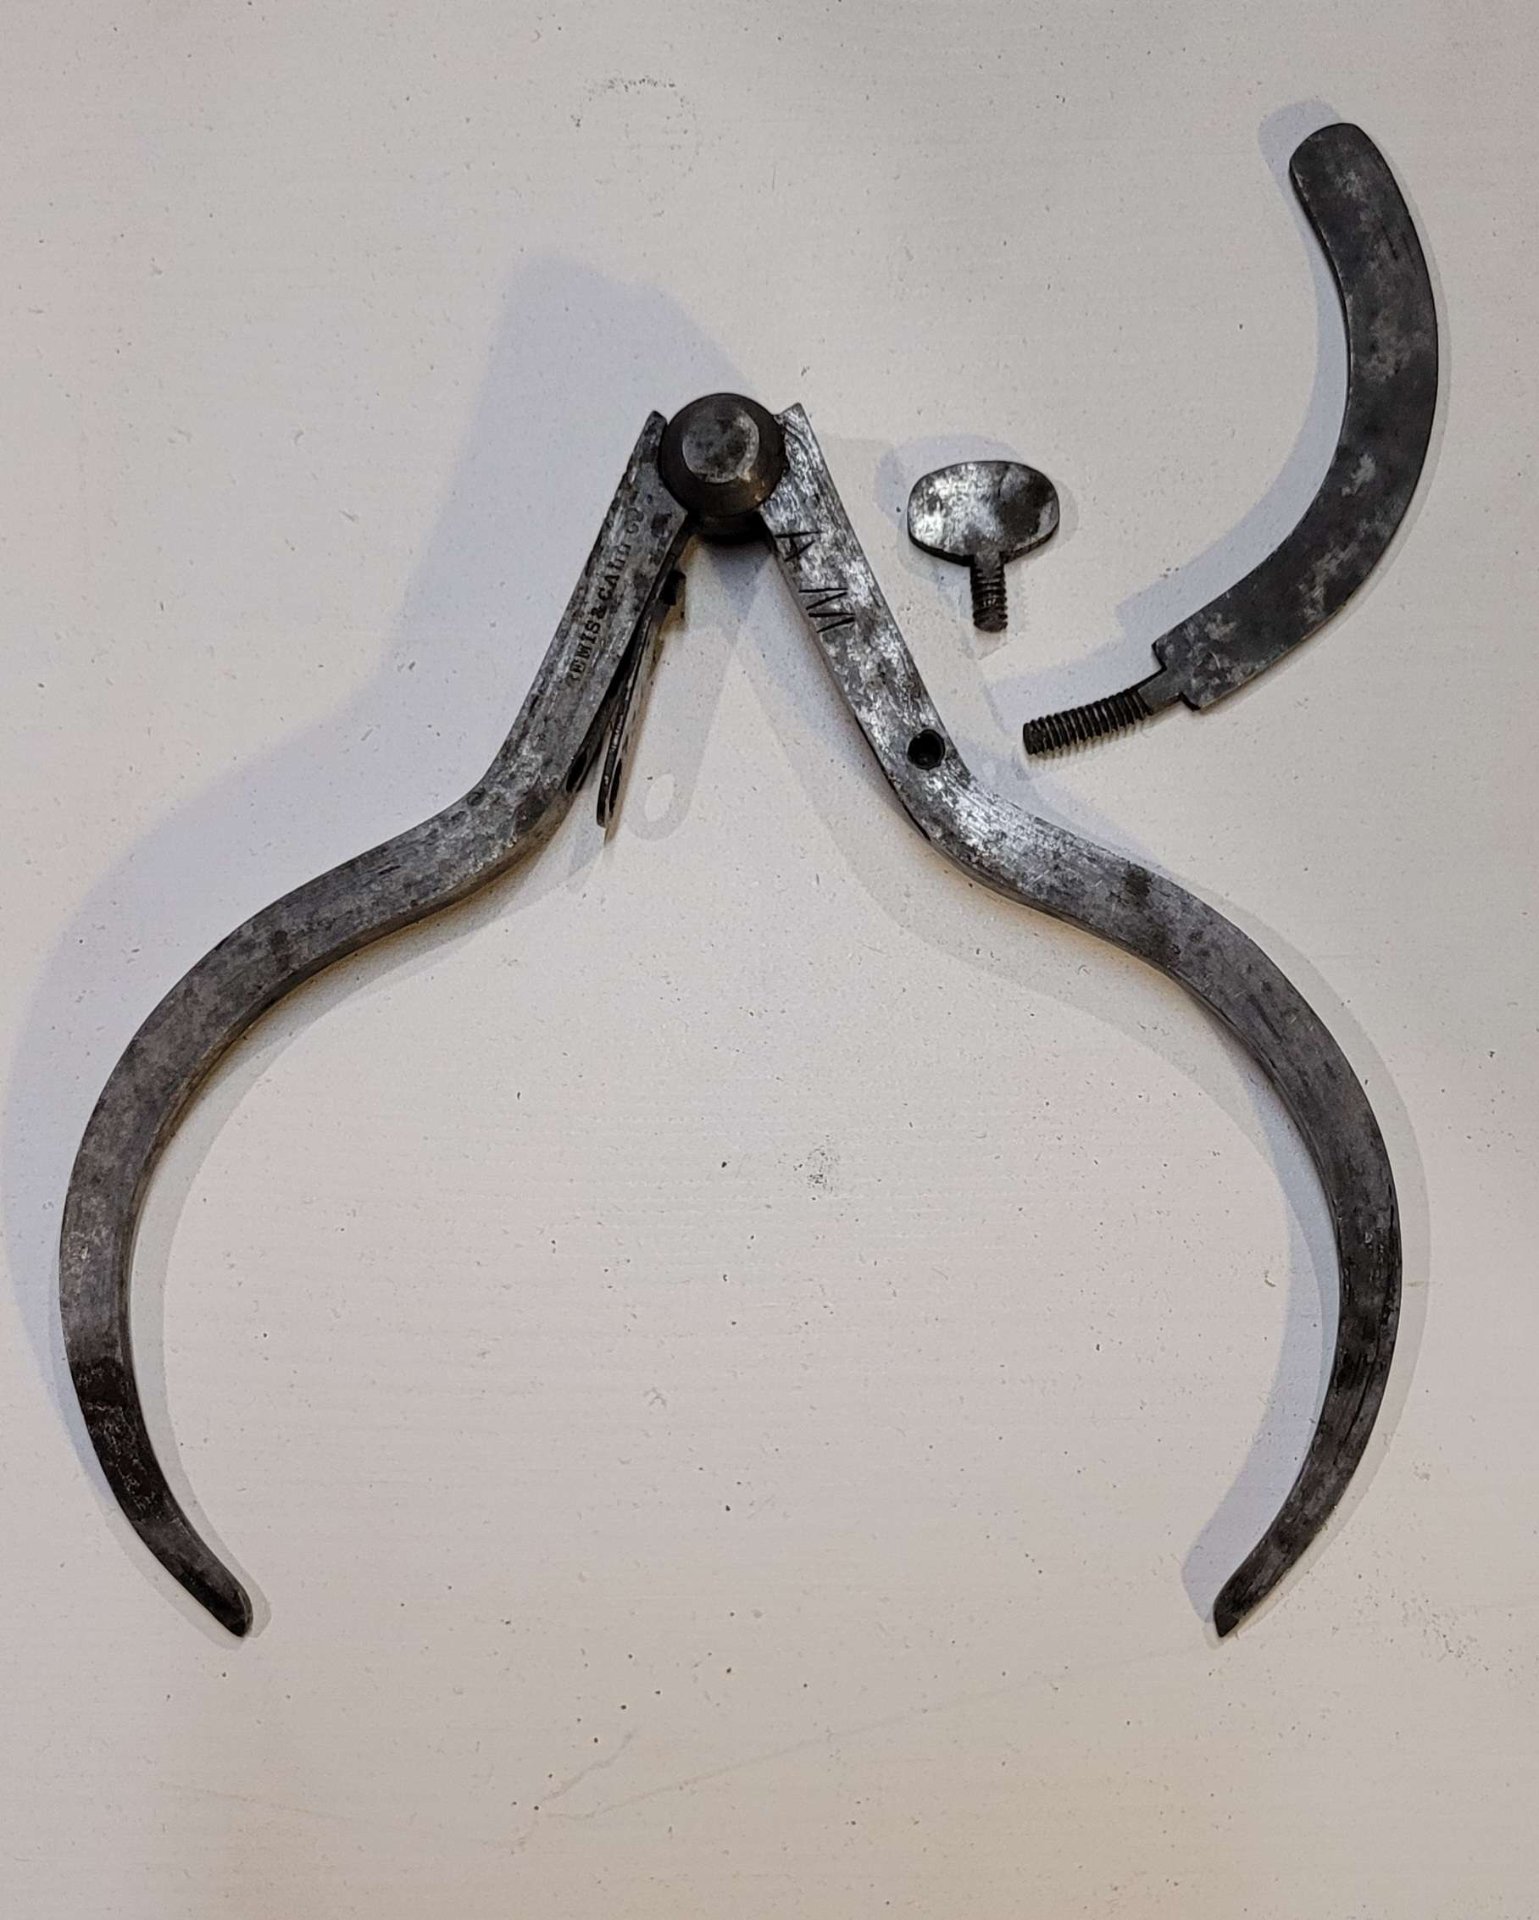
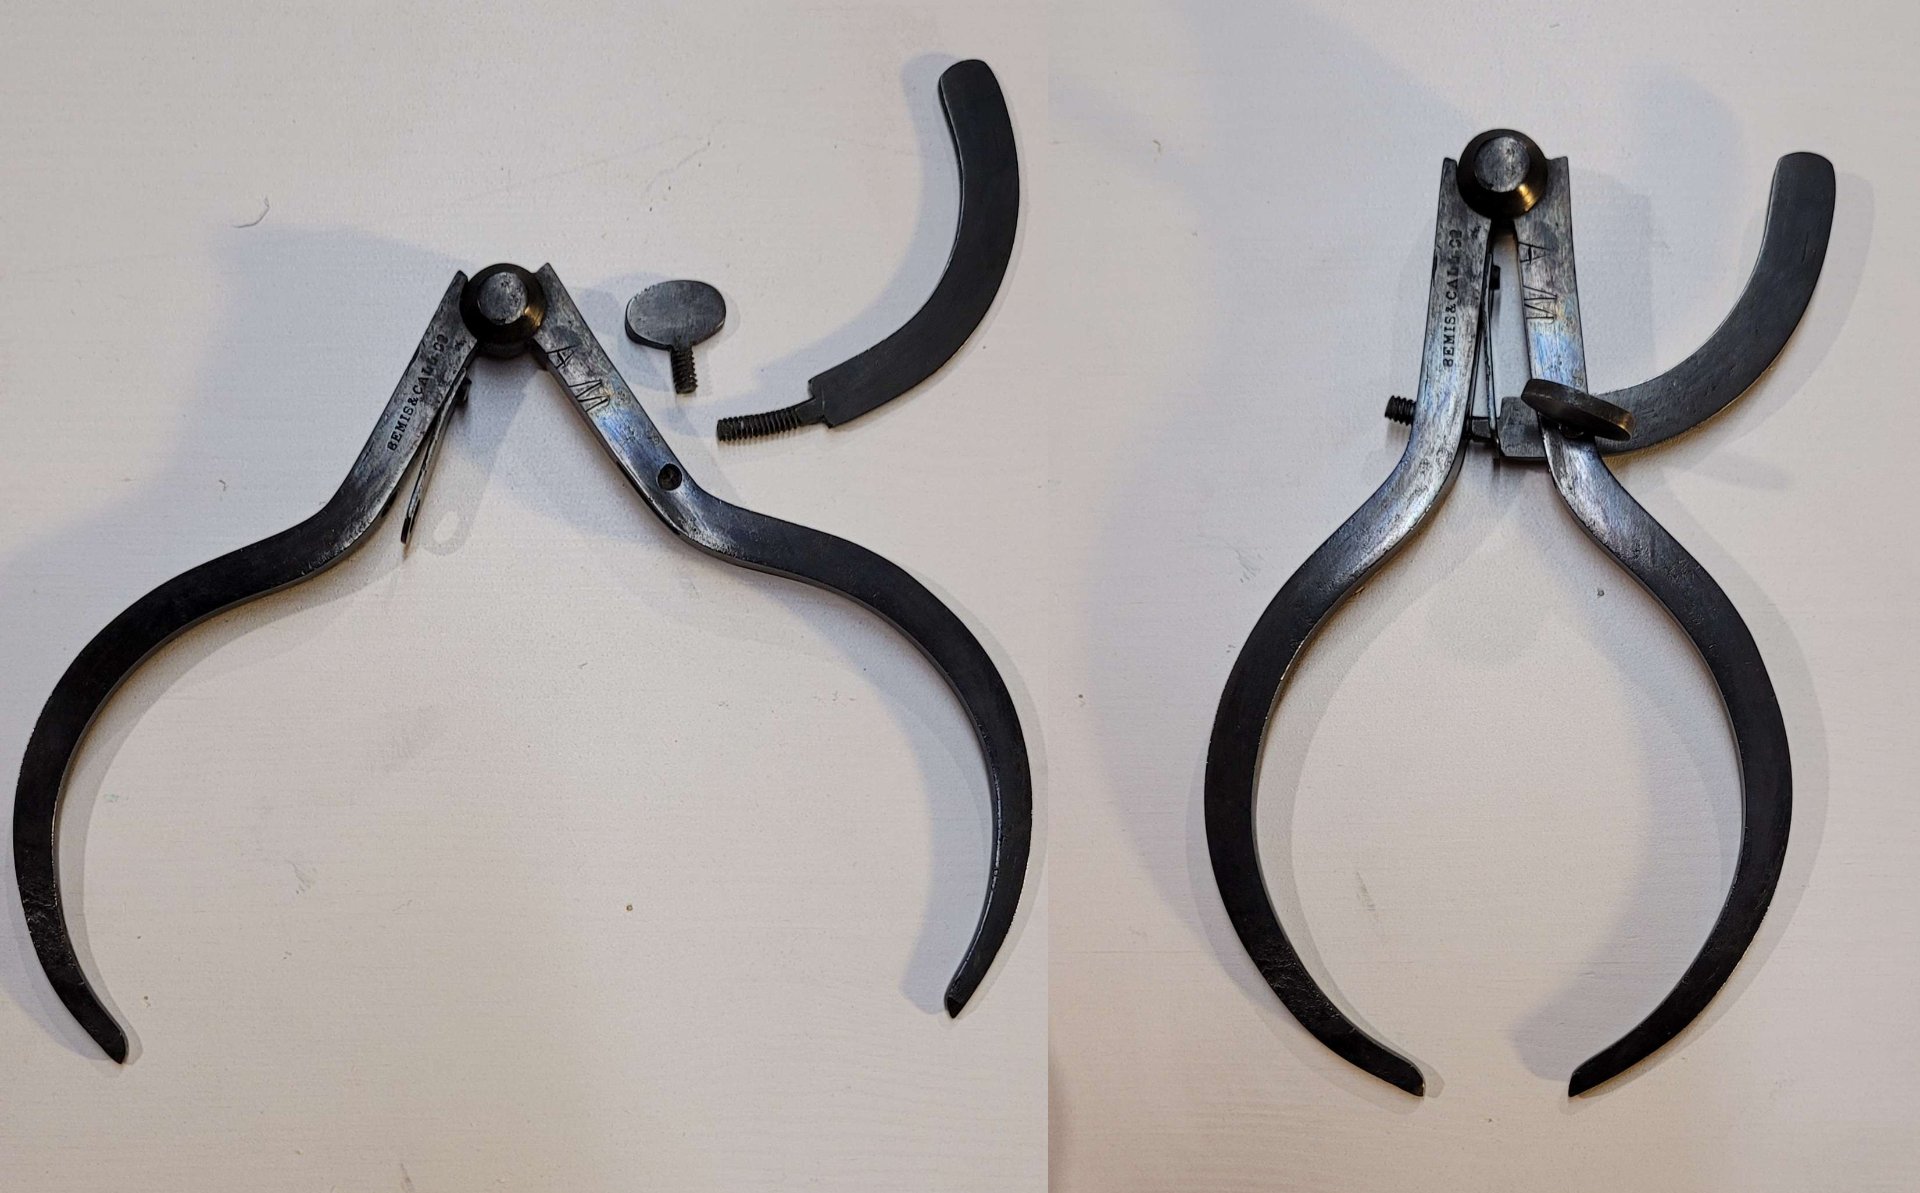
I bought this set of outside calipers at a junk store in my hometown (sort of a consignment, thrift store deal, with lots of old furniture, and the contents of like half a dozen garages right down to the old jars of mismatched screws. I sort of use it like a hardware store).
I like this design a lot, I like the lack of a spring on the jaws, and that you can fasten the little distance measuring arm to the side it measures on, so you can close the calipers around something, tighten that wing screw, then open the calipers to get them back.
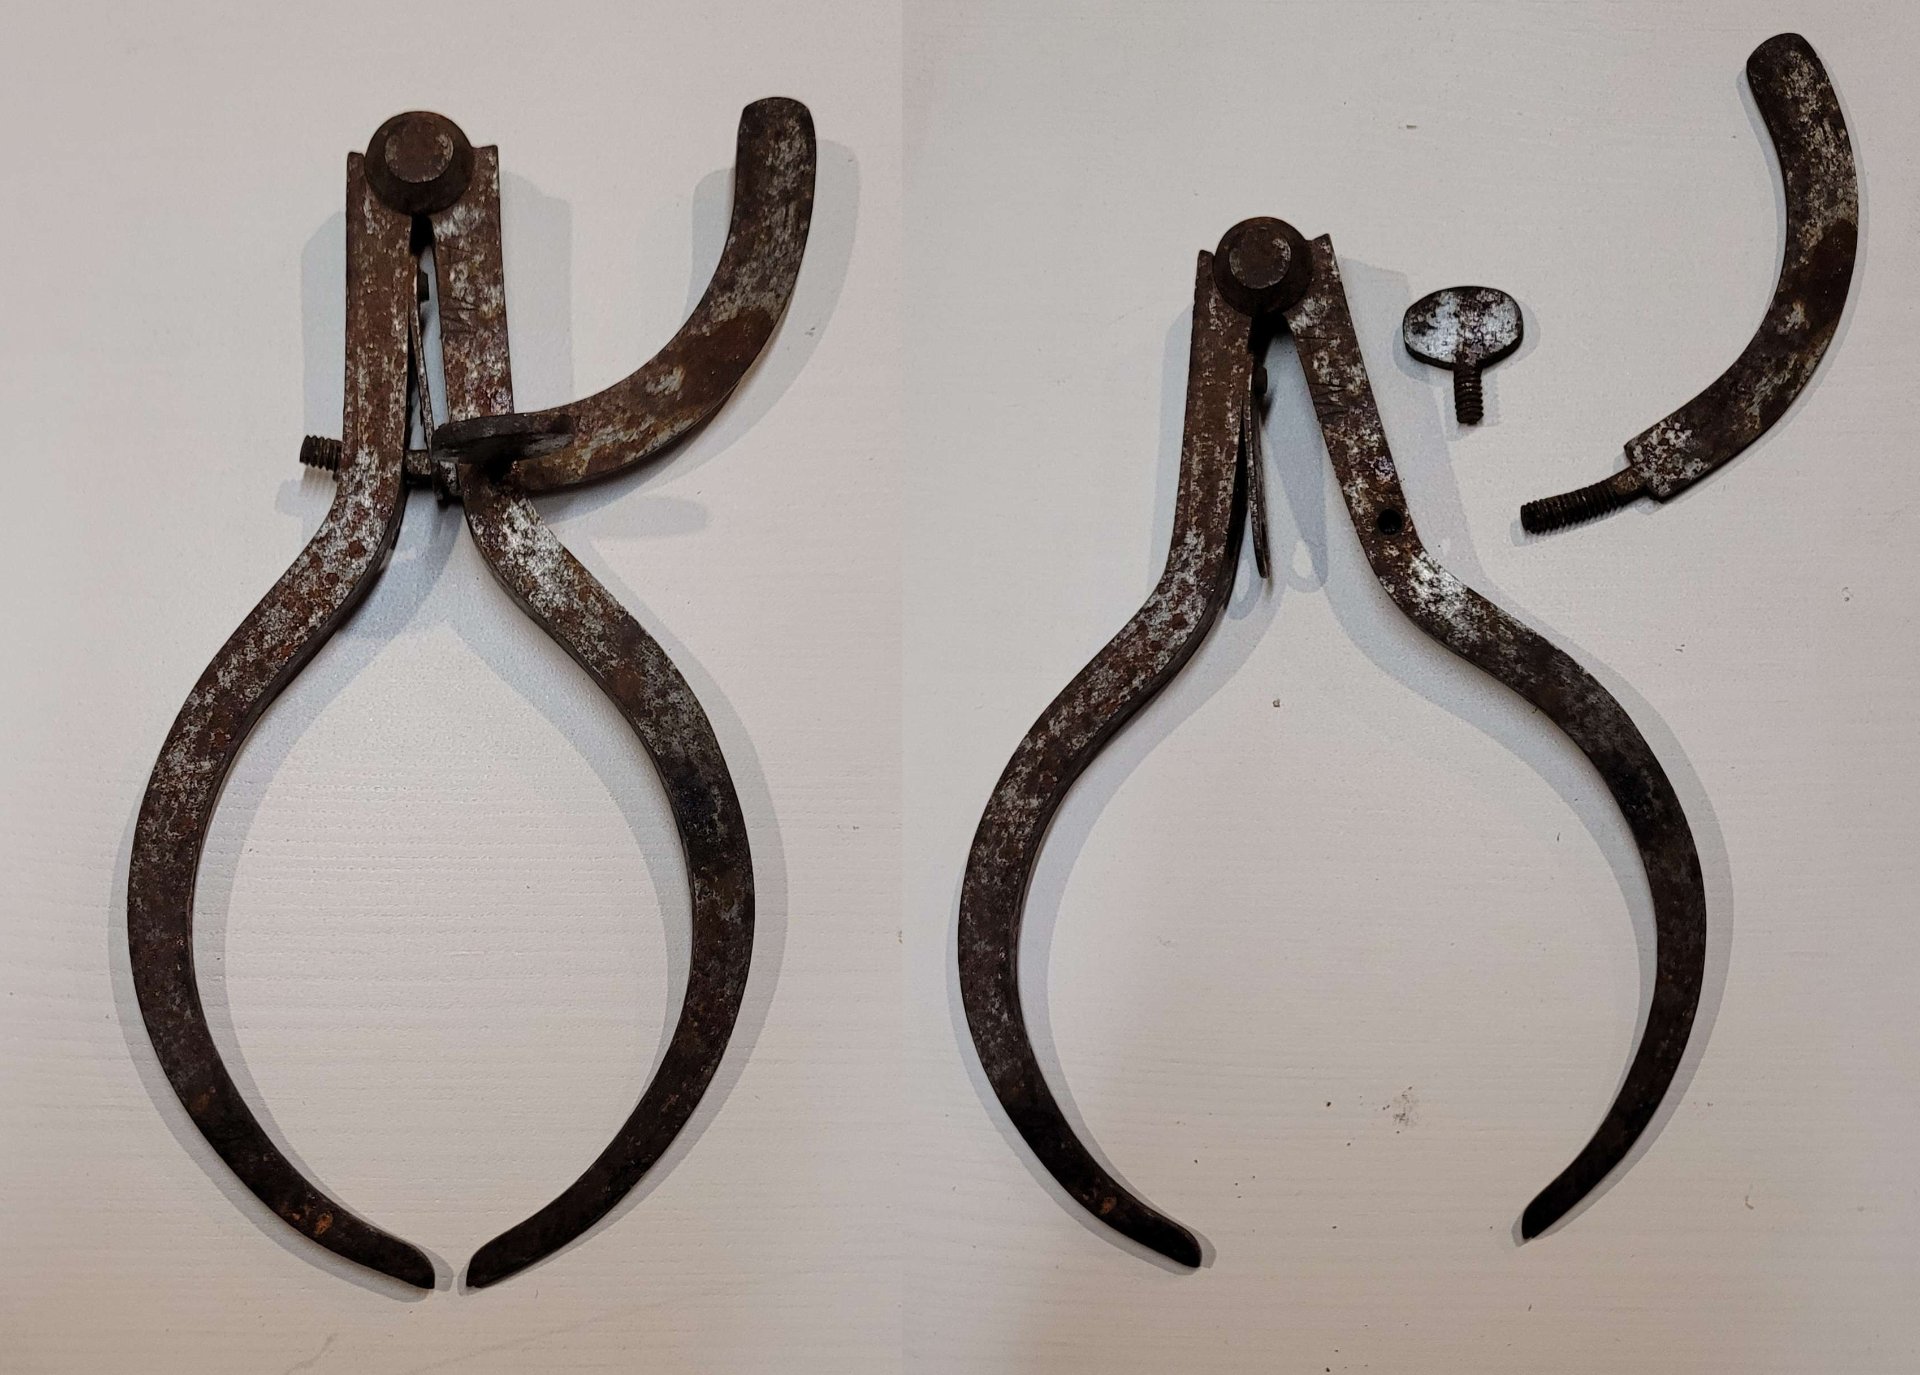
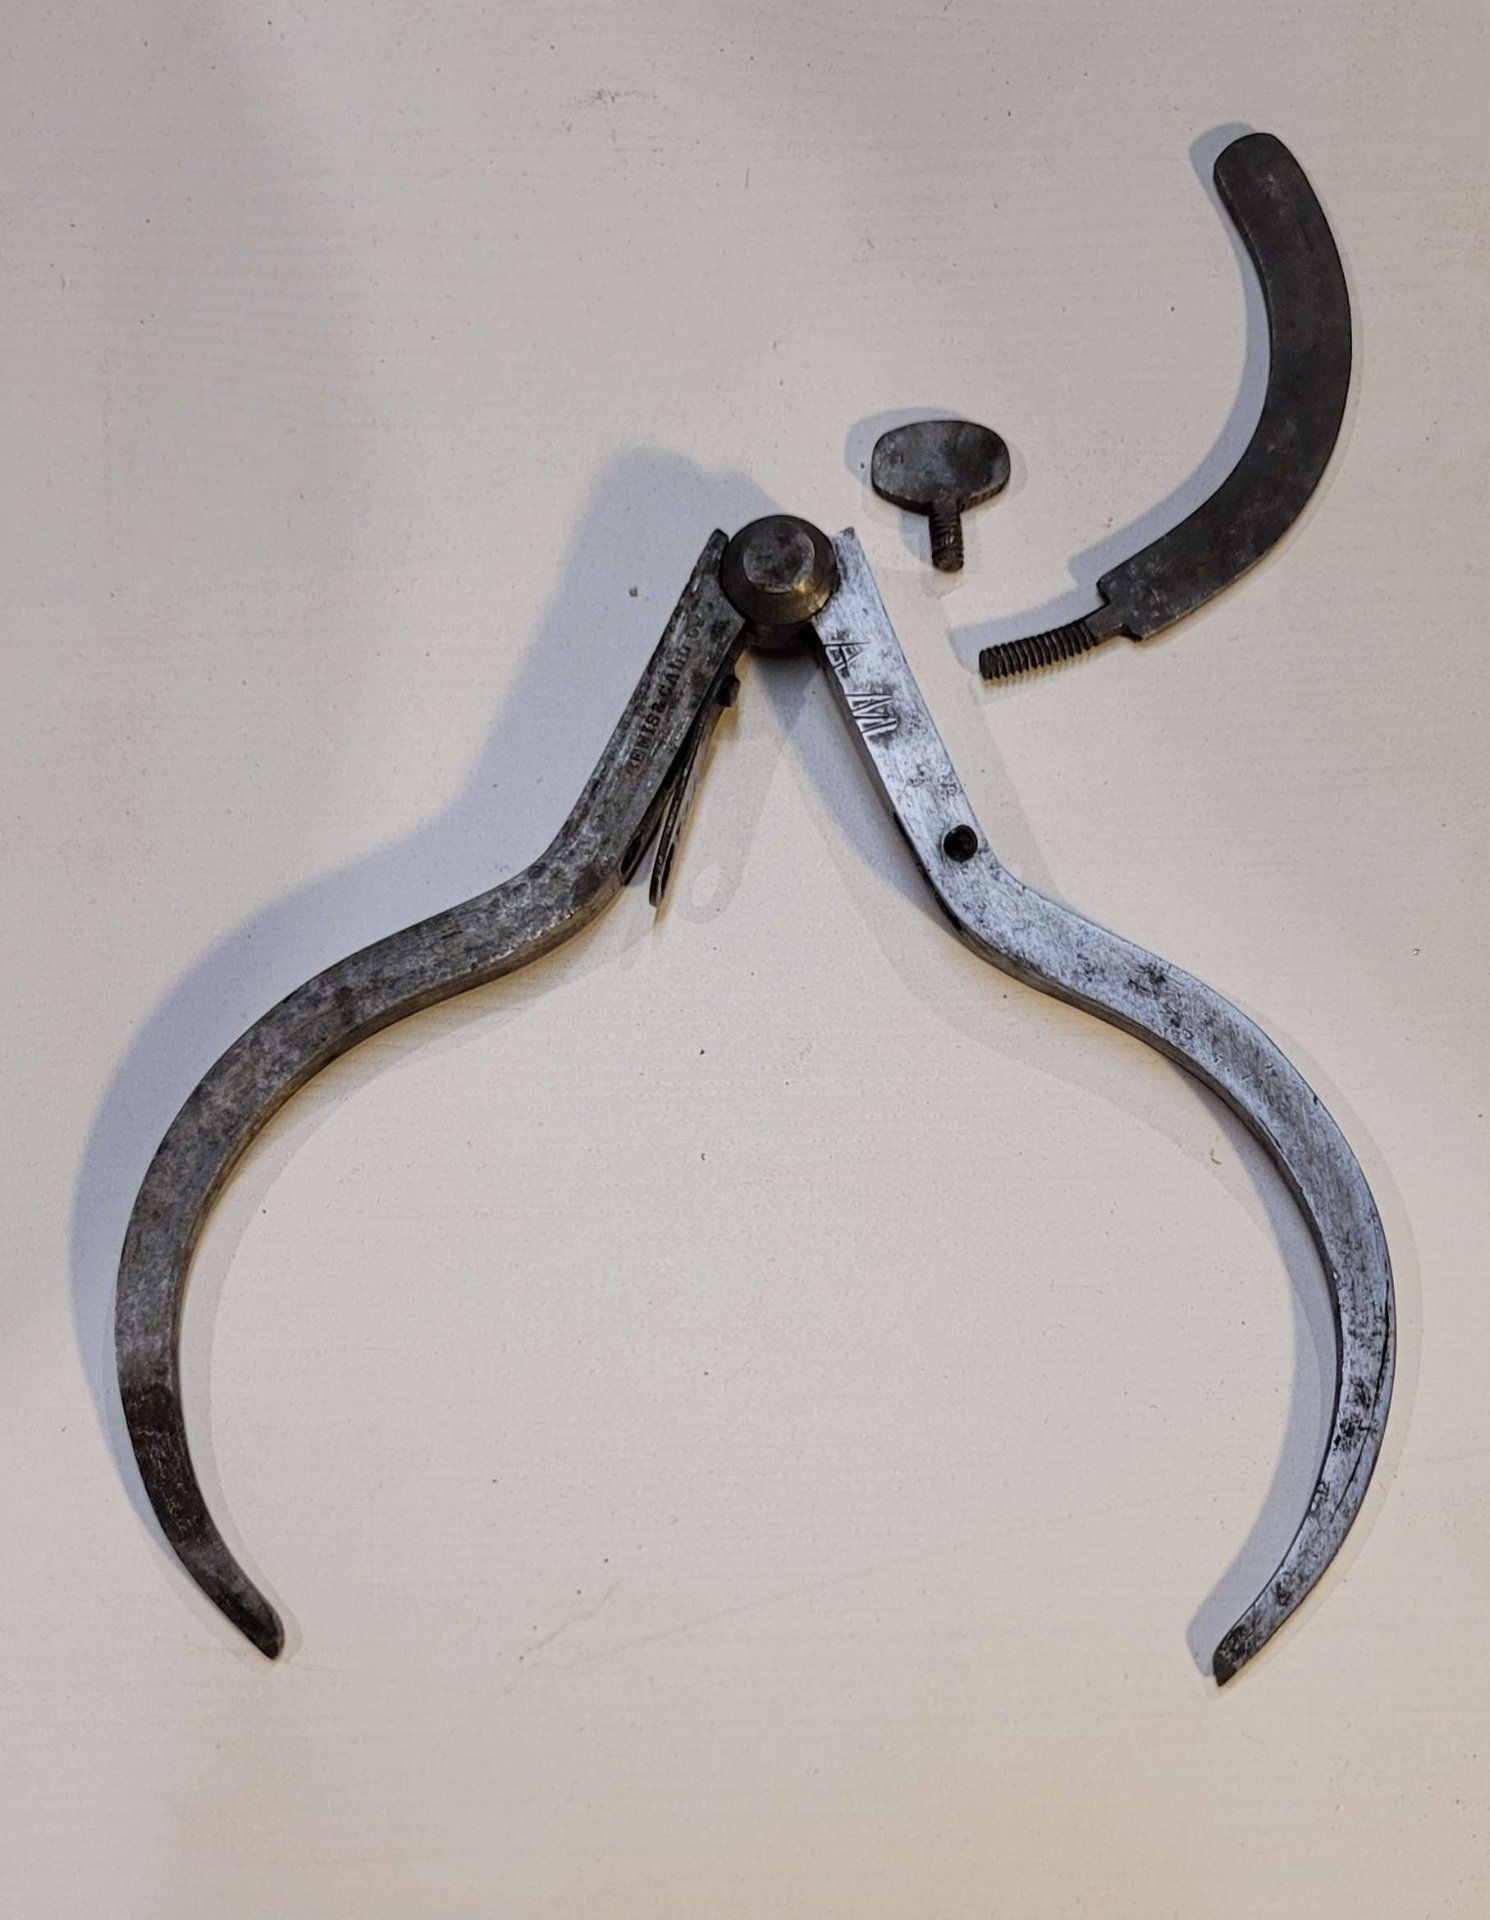
They had some surface rust, so I decided to clean them up. The first step was to disassemble them. Not difficult when there's only three pieces involved.
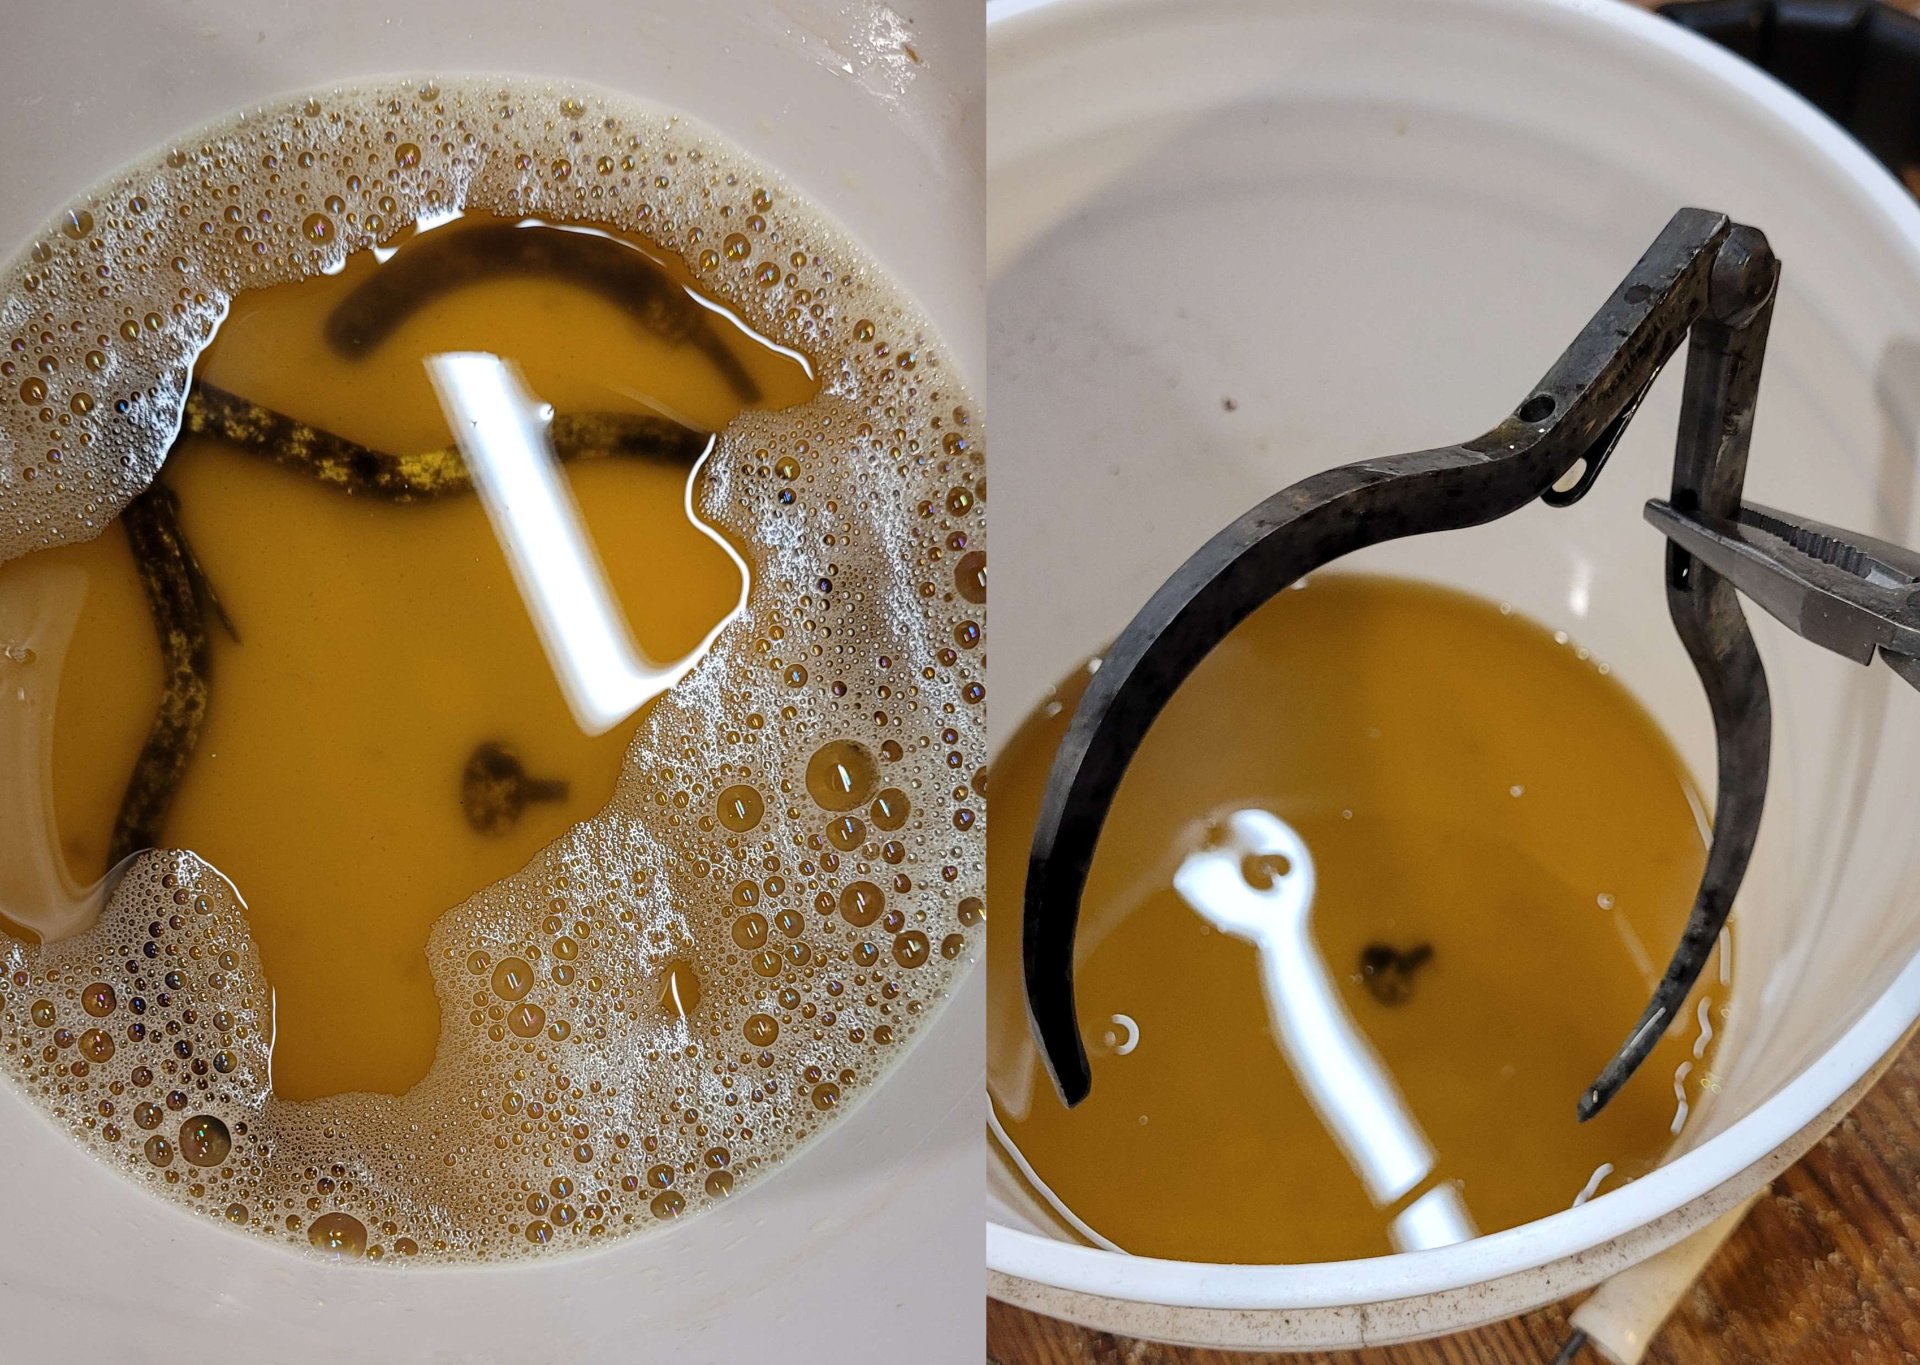
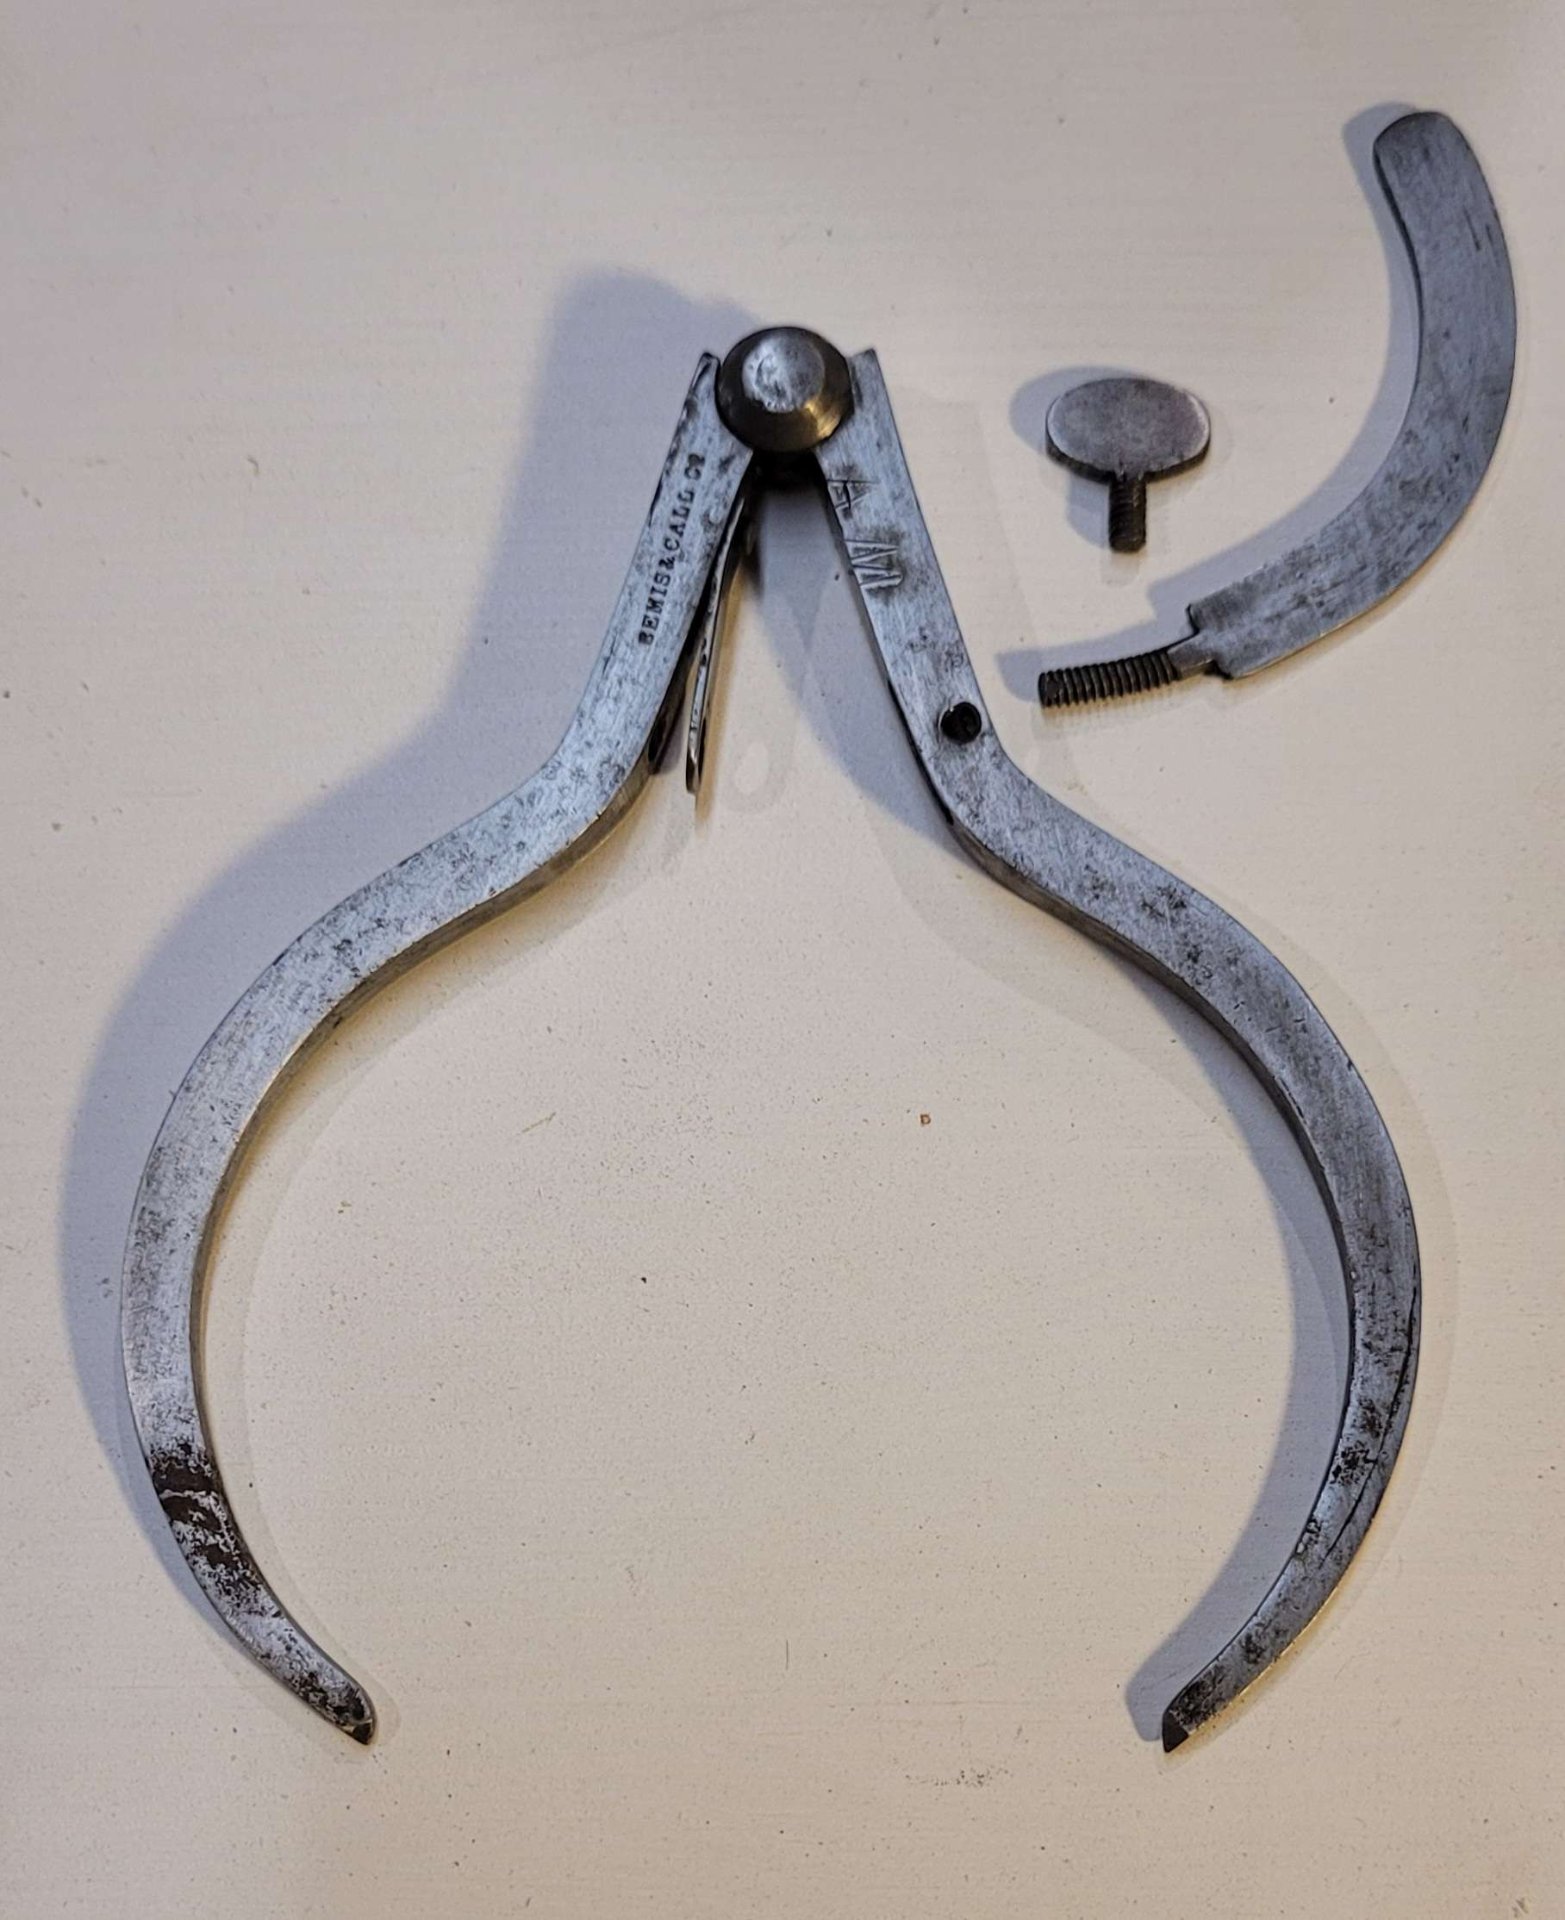
I let them soak in some evaporust for about 8 hours. I really like this stuff, it hits the sweet spot between very effective and not especially dangerous, and it's reusable! They do overestimate how effective it is in their instructions though, so it often takes longer.
! The calipers, straight out of the evaporust. You can already see some text which was hidden before, along with the initials AM from a previous owner.
Now that the worst of the rust had been dissolved, it was time to switch from chemical to mechanical cleaning. I sanded it down with 400 grit emery cloth.
! The calipers with only one side sanded.
As I cleaned up the sides, I found a few neat bits of history:
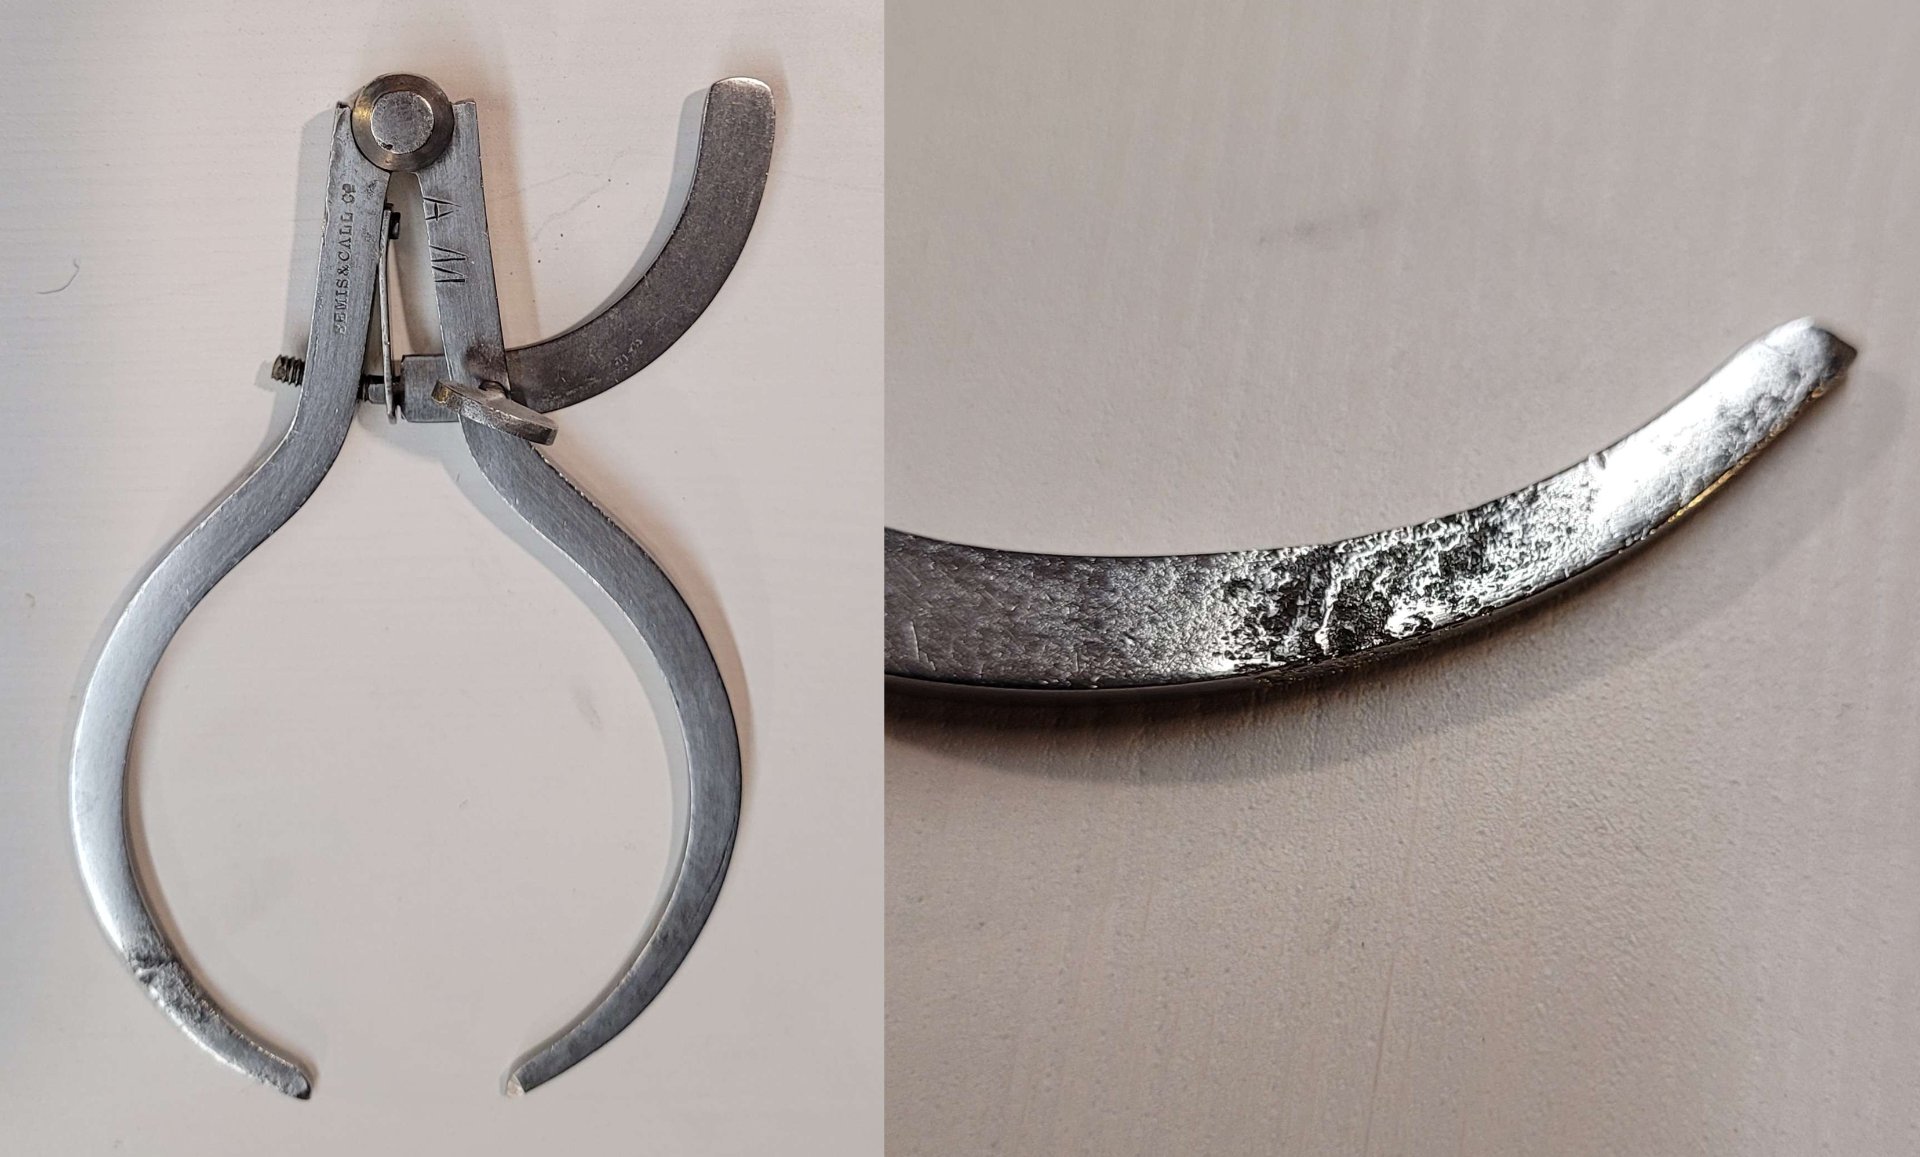
! Here's some funny nicks up near the joint on one side. I wonder what caused them. And the previous owner's mark on the right side, AM. This is a big part of why I love old tools. I love the history they carry with them, even if I don't know all of it.
! Looking better, but still a ways to go. I was surprised to find that there weren't any markings on the little distance arm. I'd been expecting to find little angle tickmarks or something, maybe even printed numbers, but there weren't any to be seen after the evaporust, or once I started gently sanding off the remaining rust and the black crud evaporust leaves behind.
Once I had most of the rust gone, I switched to steel wool. I didn't want to take too much material off the surfaces, and I felt the more flexible steel wool would hit inside the pitting from the rust better.
The steel wool shined it up quite nicely. And here's a closeup of some of the surface pitting left over by the rust on the left side. The back of these calipers didn't have this kind of damage.
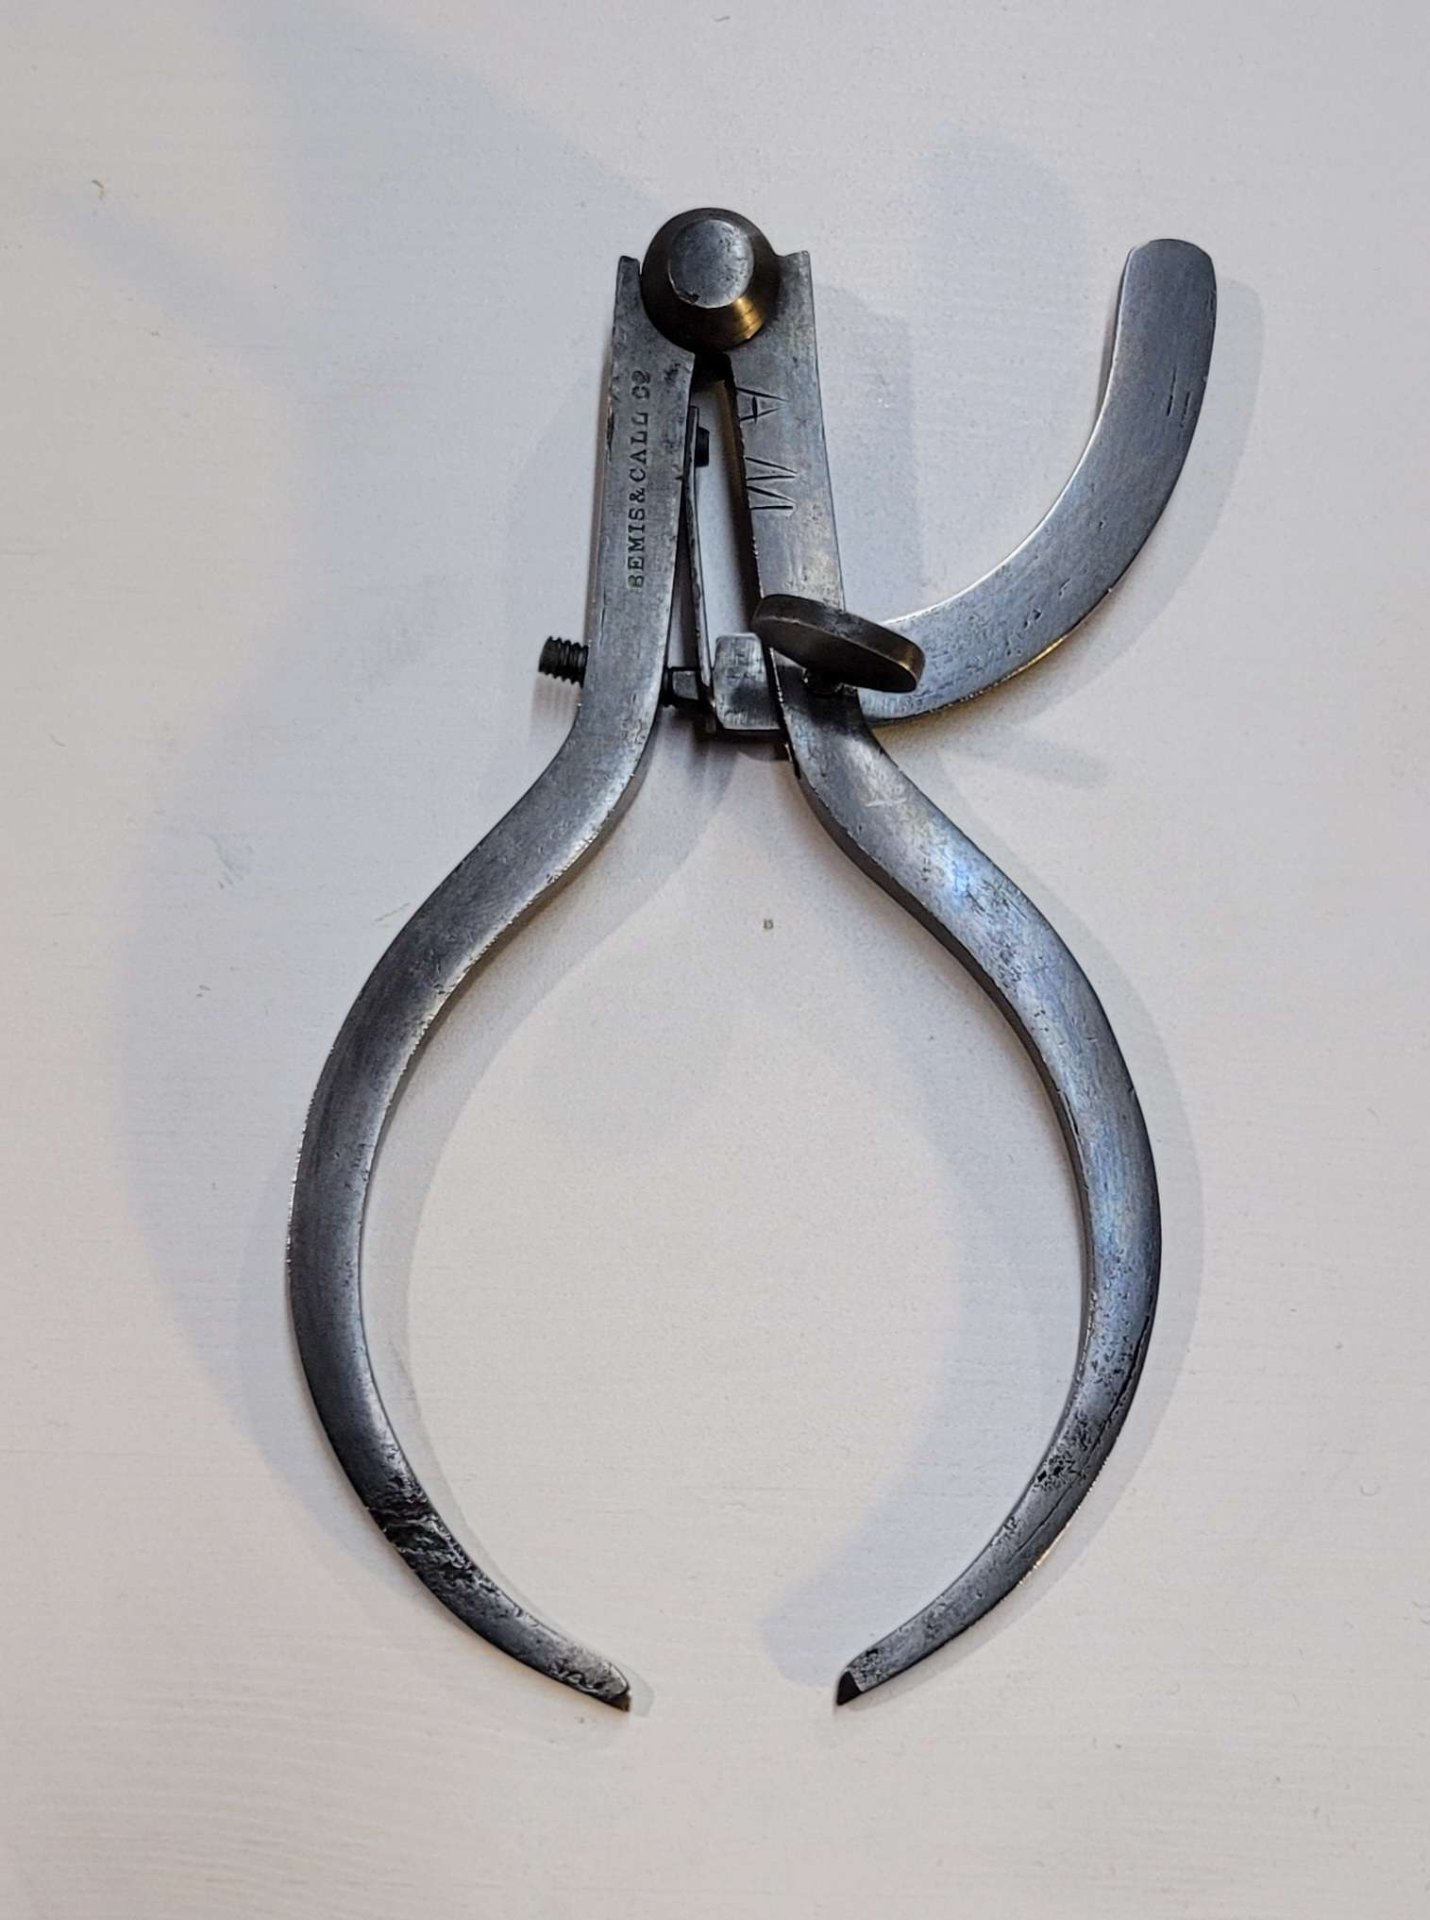
It was tempting to leave it here, but I didn't want the rust to return, so I decided to treat the calipers with cold blue, to provide some protection against oxidation. There are other ways to protect steel, but I like the look and it seems to hold up well enough.
Cold blue always looks a little rough when it first goes on (this stuff is a gel you don't want to get on your hands. You wipe it on, leave it to darken the metal for 60 seconds, and wipe it off again) but a little burnishing with 0000 steel wool will tidy it up:
There we go, still pretty shiny, but not as likely to rust again. Not bad considering how it looked in the beginning. Hope you'd approve, AM.
(I wrote this post for the making/fixing things blog I have on our local movim instance. If you're a slrpnk.net local, your credentials will work on movim automatically!)
I wonder if all that airborne grit effects the windmills. Just the same, I'm glad for any green energy progress
It's a tabletop role playing game - like a solarpunk scifi version of DnD (or the TTRPG of your pick). The rulebook and other resources available there enable people to play it. Specifically it helps one individual (the GM) run their own campaigns/games, by giving them a suggested set of rules and a vibrant setting they can use all or some of (or just take inspiration from), and it helps the rest of a group of players to create characters and interact with the setting. Together they do a sort of collective storytelling.
In the broader scope of what it does, hopefully it helps people who aren't super familiar with solarpunk and it's associated philosophies and movements to imagine a better world, other ways we could do things as a society.
Lots of folk punk type music, stuff drawing it's roots from old protest songs, union songs, revolutionary stuff.
This is one I’ve had on my list for months now, and I finally decided to just go ahead and make it. Back when I was researching solar cookers, solar concentrator, and solar furnaces, I ran into a few really interesting ideas around fresnel lenses. Look them up on youtube and you can find all kinds videos of people melting glass or burning skillsaw blades in half, but the ones that kind of showed me how useful a really-concentrated point of heat could be was this 3D printer for sintering sand into glass objects and this solar rig for smelting zinc or aluminum. Both used fresnel lenses, but were limited by the size of their portable builds.
So here’s my take on something bigger and more permanent, though hopefully still flexible enough to do multiple jobs using concentrated sunlight. The building’s tower houses an observatory-style dome with an irising shutter around a very large fresnel lens. This lens is meant to gather light, but deliberately doesn’t focus it too much, just directs it to another lens, which aims the light straight down. There, on a motorized rig which allows for some adjustment up and down, is the third lens which actually brings it to a searing focal point.
With that focal point reliable and known, the people at the workshop could move several different tools underneath it as necessary, from a crucible for smelting, to a firepot for solar forging, perhaps a glassblowing oven, a 3D sinterer, or the large CNC plasma cutter-style rig shown in the scene.
A set of computers would be set up with light sensors and control over the rotation of the dome, to allow it to track the sun, and the width of the aperture in the shutters, to allow it to regulate the amount of light. The upper limit on the light would be based on how bright the day is, but if they need anything less than full sun, then the opening and closing of the shutters should help with providing consistency. If it starts around half open in full sun and a cloud moves in front of the dome, it might open all the way, then close partially as the cloud leaves. With many minute adjustments, the overall amount of light could remain very consistent down on the ground.
As for the level of focus, I suspect the kerf while cutting would almost definitely be wider than with a modern plasma cutter, but like I said before, people have cut through skillsaw blades with just a lens from a rear-projection TV. So it's possible a larger lens could concentrate even more heat, allowing it to burn through much faster, with less damage to the surrounding material. The tightness of the point would mostly come down to the quality of the lens, as far as I know.
I’ve tried to include a number of controls, caution markings, and red emergency stop buttons, but the one thing I really don’t like about the design as drawn is that it’s not obviously fail-safe. I think ideally there’d be some kind of hanging weight or other mechanism so that when power is lost (not just to the building, as that probably happens fairly often on a less-reliable grid, but to the system’s control unit) the shutters or another light-blocking mechanism slams into place.
Other notes about the scene, I’ve tried to include a diversity of ways to use the sun, the photovoltaic panels for powering the electronics and perhaps some of the tools, a set of fiberoptic solar daylighting systems, which track the sun and pipe light down to the shop floor, along with the simplest version, large windows. This emphasis on daylight should help avoid the risk of electric lights strobing in sync with moving items (such as on a lathe or milling machine) which can cause them to appear stationary and safe to grab onto, though they likely have two sources of light on each just in case. I’ve also included a water wheel, either for power generation, or for the direct motion, to be connected to certain tools or machinery via axles and belts.
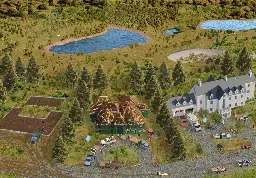
Deconstruction crew disassembling abandoned McMansions so the material can be reused - Postcard from a Solarpunk Future Full post here: https://jacobcoffinwrites.wordpress.com/2024/05/02/deconstruction-crew-disassembling-abandoned-mcmansions-so-the-material-can-be-reused/ #solarpunk #deconstructio...
Houses require maintenance. How much and how often depends on the design and its surroundings. They also require occupants - in my brief experience at least, they degrade much faster when they’re left cold and empty than when someone lives there, even if that someone doesn’t fix things. Weather, encroaching water, mold, ice, and animals can all cause compounding damage surprisingly fast.
I think of the solarpunk society I've been depicting as being post-postapoclyptic. They’ve been through the worst of the climate crisis, wars, plagues, and all kinds of shortages, and they’re trying to rebuild better. In some of my previous postcards, I’ve tried to imagine what the rural communities I grew up in would look like transformed into a modern version of how they looked a hundred years ago, with denser villages, trains, and wide stretches of forests and farmland in between. They were set up this way back when because it was practical for people who walked or relied on horse carts to get around day-to-day, and who traveled to use a boat or a steam train for a longer trip. A solarpunk society that doesn’t want to rebuild the infrastructure(s) to produce and maintain personal vehicles, fuel them, and to drive them on, might have to look pretty similar out here.
But what happens to the houses and developments spattered across the land between those villages? Every road with a house a quarter mile from its nearest neighbor, now miles from those hubs of public transit? In a society where public transit is effective, and cars are rare, I think a lot of roads will degrade pretty quickly. They already need tons of maintenance, and that’s with people using them every day, totally dependent on them, grudgingly agreeing to pay for it. It’s not uncommon to live thirty minutes or an hour from your grocery store today, but on badly broken roads, that kind of travel is going to be more difficult and costly. Some people will do it, heck, some will have held out through all the bad times and will stay no matter what else changes. But I suspect a lot of houses will have been abandoned a long time ago.
There’s tons of embodied carbon stored in those structures. In their carefully-refined materials, their transportation, and in the act of construction. Some of those materials might be very difficult to produce for a society that carefully watches its externalities and seeks to do as little harm as possible. And the longer they’re left abandoned, the more they’ll degrade. The structures will become unsafe, the materials will rot or break, or become inaccessible, and in some cases, they’ll pose environmental risks as fuel tanks rust out, chemicals escape their storage, or damaged structures catch fire (even with the powerlines cut upstream, abandoned solar panels or poorly-isolated generators backfeeding into the grid might allow for damage to an abandoned house to cause a fire). This is especially true with modern buildings, particularly the kind of McMansion featured in the scene, with their heavy reliance on petro-products like “structural” foam columns and facades, which will go up like a struck match in the next wildfire.
In some cases, old buildings could be put back into use. Perhaps they’re nearby something the rebuilding society needs. Maybe one development will make for a good farming community, and another the barracks of a logging camp. Maybe one near a river can support trade or fishing. But there will be others that are simply not very useful. They were practical enough for semi-suburban life when gas was cheap, cars were plentiful, and roads were maintained. But in a world where most people have other priorities, live in closer communities, use public transportation, and aren’t interested in rebuilding a car-centric world, these houses don’t make sense. And of course there's the ones in unsafe locations (flood plain, unstable/eroding cliff, etc) where they won’t last no matter what. To that society, deconstruction might be a very practical answer to both the long term threat posed by these structures and to their own building material needs.
Deconstruction is an alternative to home demolition. It means carefully dismantling the constructed components of a house so the materials can be salvaged and reused. Materials are typically removed in the opposite order in which they were installed, to maximize reuse.
By carefully disassembling these structures and hauling the materials back to their communities, they can build and expand for a much lower overall cost (both environmentally and in resources harvested from the world) while removing potential toxin or fire threats. And by filling in their cellarholes and replanting, they can rewild developed land, build better habitats, and restore their local ecosystems.
On top of that, even buildings picked over by looters may be full of usable stuff - furniture, dishes, cooking tools, hardware - which a society with an interconnected library economy could use to meet its needs without producing new items.
So that’s what I’ve tried to depict here, a deconstruction crew carefully disassembling old world structures so that everything, from the windows to the metal roof panels, to the cabinets to the stick framing itself, can be reused elsewhere rather than produced new.
They’ve been working from left to right in this scene, taking each house apart in reverse order to how it was built. Much as with construction, this would require different crews of specialists: inspectors, roofers, carpenters, electricians, plumbers, and others who can safely remove resources without doing unnecessary damage. Once a crew finishes their part of a building, they’d hopefully be able to move on to another one nearby.
They’re also replanting/rewilding the old backfilled foundations, something that would certainly help with breaking up the concrete (eventually). Roots are great at that.
I’m not sure if it’d be worthwhile to use concrete saws to cut at least some of the concrete foundations into construction blocks. It’d certainly help with restoring the site quicker, and it’d be a low-ish carbon source for concrete blocks, but the tradeoffs in labor, transportation, and power for the saw might not be worth it. In that case, they’d probably crack it up with a jackhammer before filling it back in.
There’s a lot of vehicles in this scene, so I should emphasize that these aren’t daily drivers. These are equipment used to haul work crews and construction materials on fairly short trips.
All the big trucks in the scene are old internal combustion engine vehicles converted to run on woodgas. I imagine they burn a lot of the wooden construction debris which were otherwise too small or damaged to be worth salvaging. Perhaps some trucks are even set up with plastic de-refineries and are able to use astroturf lawns, broken plastic siding, or “structural” foam facades as fuel on their trips. This isn’t perfect: it still produces pollution and releases CO2, but if the goal is to salvage as much material as possible, and to prevent it from burning pointlessly in the next wildfire, I could still see an aspirational society accepting that use of it.
As a bonus, woodgas vehicles are often used as generators, so they may be able to serve that role part-time on-site, powering lights and air pumps for confined spaces like basements, and even certain tools. Otherwise they’d probably use portable solar panels.
The other (smaller) vehicles are electric minitrucks and rickshaws.
I imagine that the workers are a mix of specialized crews brought in by the larger community for the scheduled deconstruction, and local volunteers who are working for trade in recovered materials. I imagine a lot of the cargo bikes, Chinese wheelbarrows, rickshaws, and minitrucks belong to them. I figure in place of real roads, the really small villages and isolated homesteads maintain a surprisingly dense web of rough trails suitable for mountain bikes or snowmobiles, which connect to all their neighbors.
Last art thoughts: I have another scene of a golf course and its surrounding McMansions turned into a solarpunk intentional community that I’d like to do, but the scope on that one is big enough it’ll be awhile before I can get to it. At this point, I’m confident I’ll make it though. McMansions, with their pointless, wasteful scale, their cheap construction, their reliance on petro-product materials, and their often vain attempt to spend their way to classiness, seem kind of like the antithesis of solarpunk design to me. Golf courses with their endless, expensive-to-maintain grass monocrop hold a similar, though less severe place in my mind.
If you read all that, thank you! And if you’re a person who owns a building in real life, and you’re thinking about doing some renovations, please consider reaching out to your local chapter of Habitat for Humanity or another group who will do deconstruction, rather than just smashing everything up and throwing it away.
The last webcomic I recommended was Black and Blue. This one has a lighter tone, and has got some superhero influences, though I think it still falls under cyberpunk.
I've caught up to 2022 and have enjoyed it so far. Apologies if it's better known than I realized, I just stumbled onto it a day ago.
This might be a bit of a reach but I’m wondering if anyone here knows enough about concrete production to help me plan the layout of my next photobash. I’d like to do a scene of a solar-thermal concrete factory – there are several supposedly in the works, like Synhelion’s new partnership with Cemex, funded by the US DoE, or the french company Solpart (whose prototype involved a rotary kiln), or Heliogen. Unfortunately I’ve had a lot of trouble finding decent photos of their setups, and even though Synhelion is apparently working on a pilot industrial-scale solar concrete plant, I haven’t found any plans to work from.
I’ve been doing some reading about existing concrete factories, and plan to keep as much as possible the same, while mostly modifying the kiln to include at least one structure similar to a solar falling particle receiver, and adding some onsite algae farms or greenhouses for capturing CO2 released by the burning of the lime, and a trainyard (either electric trains or fireless steam locomotives, given that it’s a solar plant) for moving material into and out of the plant.
I’ll say upfront I know very little about concrete production, and I’m struggling to come up with a kiln design that’ll hit the required temps for long enough, without burning the lime and messing it up.. Originally I’d pictured basically a rotating kiln feeding into a falling particle receiver, linked up so heat from the sunlight hitting the falling concrete could still travel up the tube and eventually up into the cyclones where the mix is dried. But it seems like the concrete needs a longer, slower firing time than whatever heat it gets wafting up from the aperture, and then a blast of light and heat as it goes past. The diagrams I could find seems to just be a rotary kiln with sunlight being blasted into the open lower end, but I’m not sure if that’s just the design they went with because it was a proof of concept prototype.
I also know that temperature changes are bad for lining of rotary kilns, which are normally run pretty constantly IRL, so it seems like they’d need some changes anyways to cope with the day night cycle?
In case you’re reading this and wondering why make concrete this way, the concrete industry is a huge portion of human CO2 production (around 8% total), due both to the release of CO2 from the chemical process of baking the limestone, and from the tremendous amounts of heat necessary for doing that. A more solarpunk society would hopefully use much less concrete overall, especially with changes in building design and priorities that allow for weaker materials like hempcrete and mycocrete, but for some things we’re still going to need modern concrete. Solar furnaces can hit temps well above what a rotary kiln uses, and heliostat systems aren’t far behind, and it’s a pretty direct use of heat from the sun, which would minimize conversion losses. It’s not a great fit for every current concrete plant, but it seems like it could help.
Scrappy Capy Distro has released the first issue of Harbour, an anarchist literary journal. It has 7 pieces from 6 authors, poets, and artists. You can download it for free online, or get it on paper if you happen to live in Berlin and know the anarchist scene there.
Full Disclosure: one of those authors is me! My story Fair Game is the first prose story in this edition (on page 3 on both versions of the PDF). I'm very excited that they accepted it, especially because that means I can start posting a related comic/art project I’ve been working on in the background for several months.
In the beginning of the journal the editors say this on the subject of fiction:
> Traveling to some anarchist book fairs, we noticed that most of the tables were filled with theory and there was very little fiction. This edition, and future ones, is an attempt to remedy this. > > Theory is often placed above fiction as more important and serious, but we believe that fiction deserves just as much space. Not all critique of the world has to offer a complete or even partial alternative to the existent, but when we fail to tell a narrative of what possible anarchist futures could look like, it can be very hard to entice others away from the pull of capitalism. > > If there ever were some collapse or successful insurrection, ideologies whose ideas were most digestible or had been most widely spread would win out. Following such change, we don’t want things to return to the way they were. We want anarchist ideas to ripple out across the populace, for them to be something easy for others to play with and understand. Stories are one way to do this. > > We want to make a space — a space to imagine, a space to vent, where ideas from many different places can come together, a place where we can then leave with these ideas, to pass them on. > > A harbour is a place from which to venture out.
I think there's a ton of overlap between that and solarpunk in general, and the ability to show positive, attainable futures, and to demonstrate the lived experience of those better worlds, how they work, is a big part of what draws me to the genre. Hopefully I'll have a more solarpunk story for them in the future.
Speaking of which, if you have a vision of the future you want to share, they're already planning for their Fall 2024 (Issue 2). Submissions will be open from September 1st to 30th: https://en.scrappycapydistro.info/submissions
I hope this is okay - normally when I post here I write up little book reports for cyberpunk stories and movies rather than post my own stuff. But one of my cyberpunk stories (told from the perspective of an AI weapons platform) just went live in a brand new anarchist zine called Harbour https://en.scrappycapydistro.info/harbour (it’s the first fiction story in the first edition, page 3) and I'm pretty excited about that.
I’m especially excited because that means I can start posting a comic/art project I’ve been working on in the background for several months. I won't spam this place up with it, but I might share a few of the still panels once its done.
Discover the magic of the internet at Imgur, a community powered entertainment destination. Lift your spirits with funny jokes, trending memes, entertaining gifs, inspiring stories, viral videos, and so much more from users like jacobcoffinwrites.

cross-posted from: https://slrpnk.net/post/847900
A few years ago, while we were cooking, my SO showed me a blog post about common spices and their substitutions. I thought it'd be cool to use that to make a chart we could hang on the wall.
It turned into a fun light research project, then a fun art project.
I started reading various blogs and realized that while many covered the same core spices, there were a lot of others that only one blog or another mentioned. So I started gathering them all up.
As I read about them on Wikipedia I'd stumble into their histories, and scope creep hit. I decided to add a column for interesting facts about each. (While gathering those, I was kind of struck at the disparity between them - some spices, have centuries of warfare, murder, and espionage wrapped around them, while others are so common or easy to grow that nobody seems to have stabbed anyone at all for it.)
I built it first as a spreadsheet in Google sheets while I was researching, pasted it into a poster-size libre office writer document for layout and font changes, exported that as a pdf so I could import it into GIMP. That let me make more detailed changes and add the flourishes that hopefully make it look like something that might've hung on the wall in your grandparents' kitchen.
This was a pretty casual project spread over seven months. It's got forty-some spices with descriptions, fun facts, and substitutions shamelessly plagiarized from cooking blogs and Wikipedia.
I've learned since that several spices are actually really unspecific, like what’s sold as oregano apparently may come from several different plants. So I'll say it's useful for cooking and accurate to the best of my ability, but I wouldn't reference it as a historical or scientific resources.
If you want to print it out, I uploaded the PDF here: https://jacobcoffinwrites.files.wordpress.com/2023/07/spice_list_printable.pdf
This was a pretty quick little project - some of my friends recently bought a house, it came with…

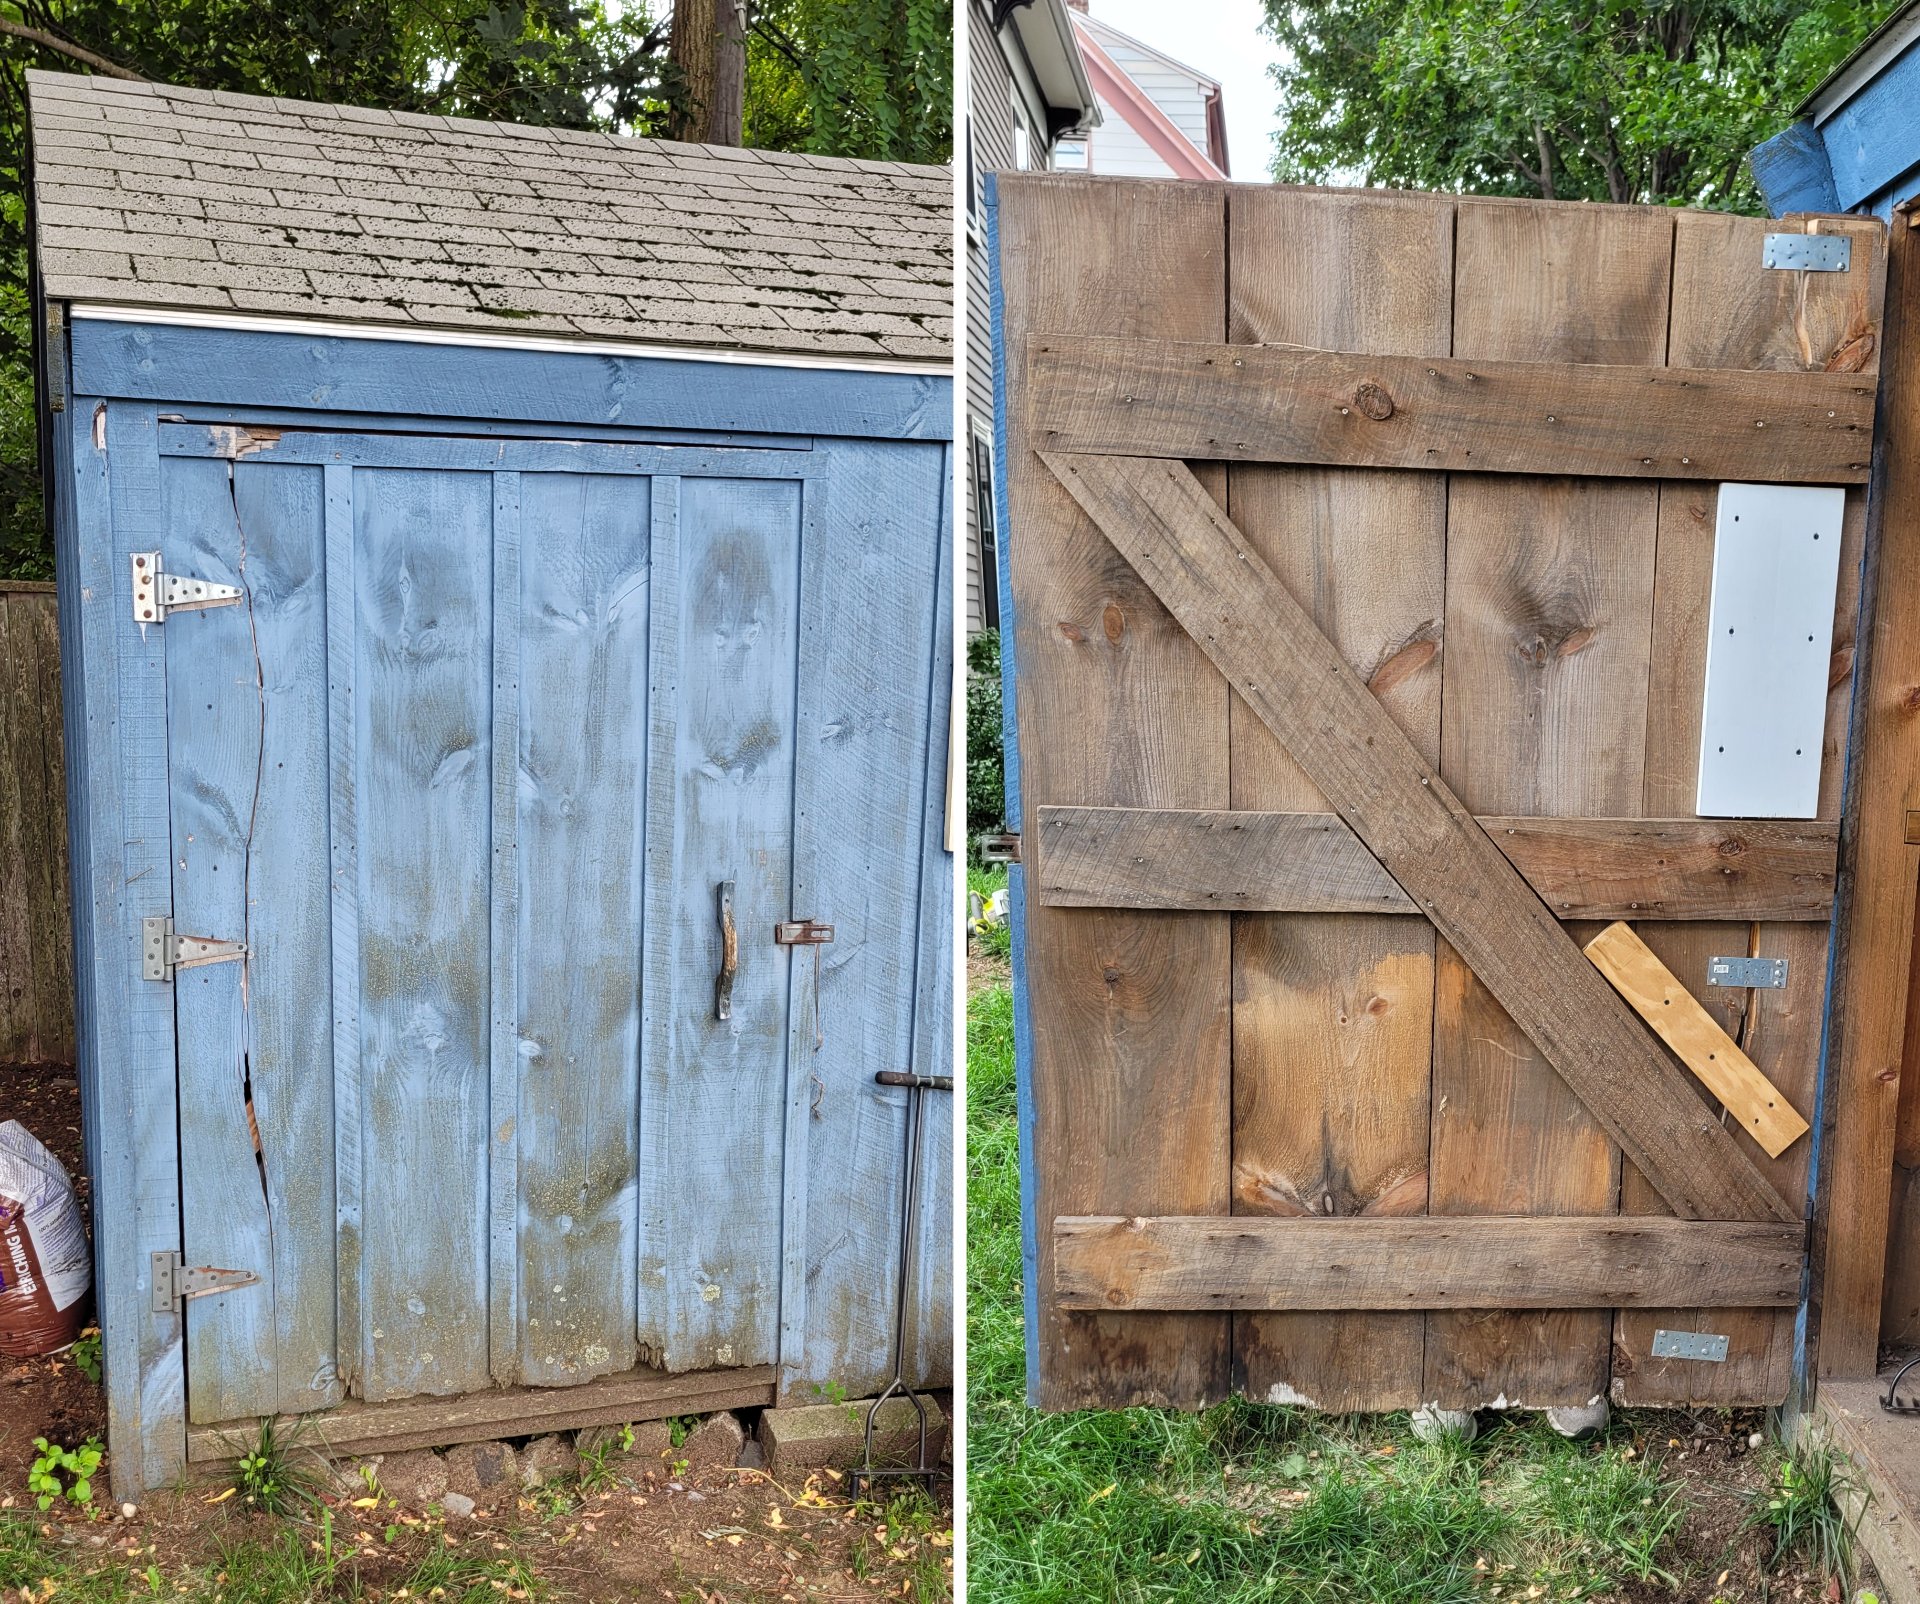
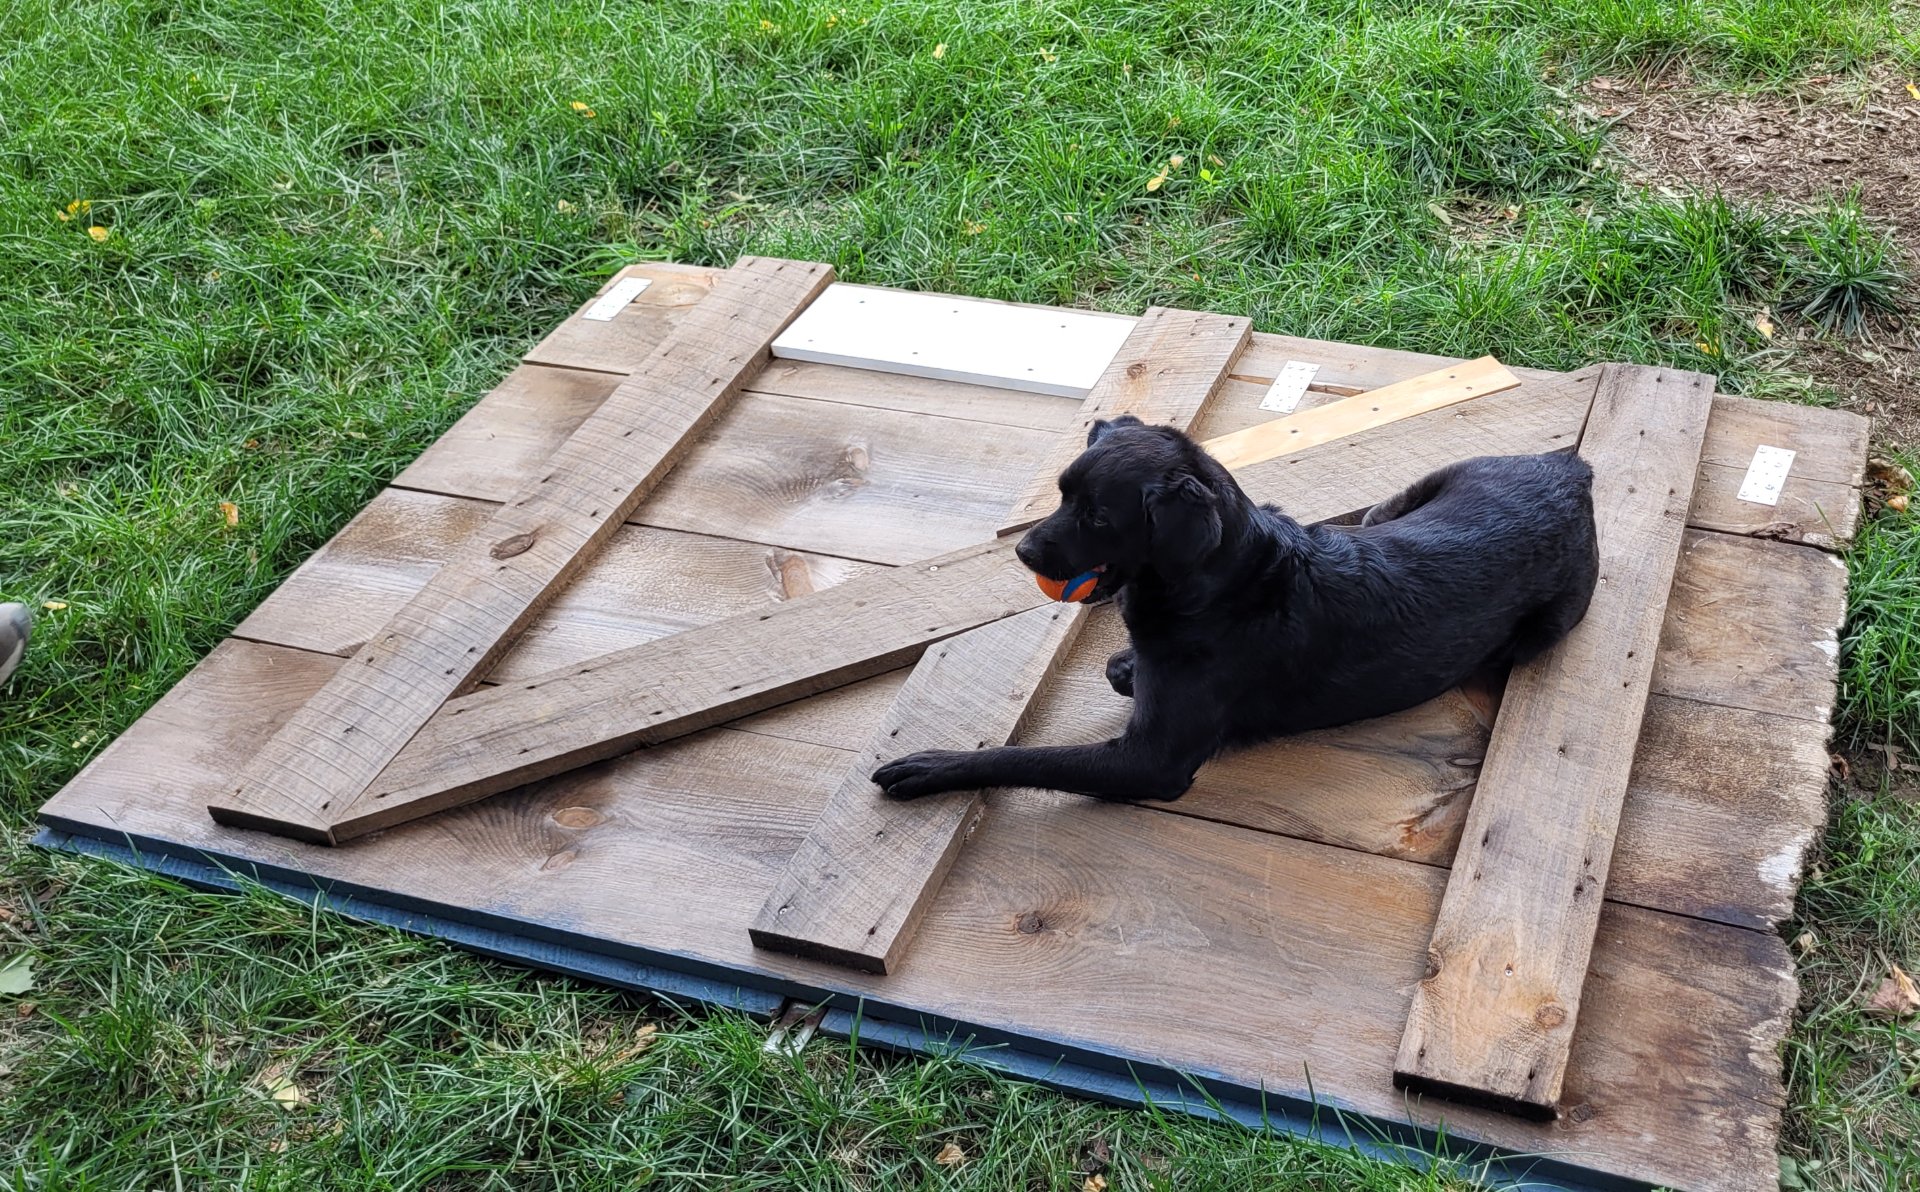
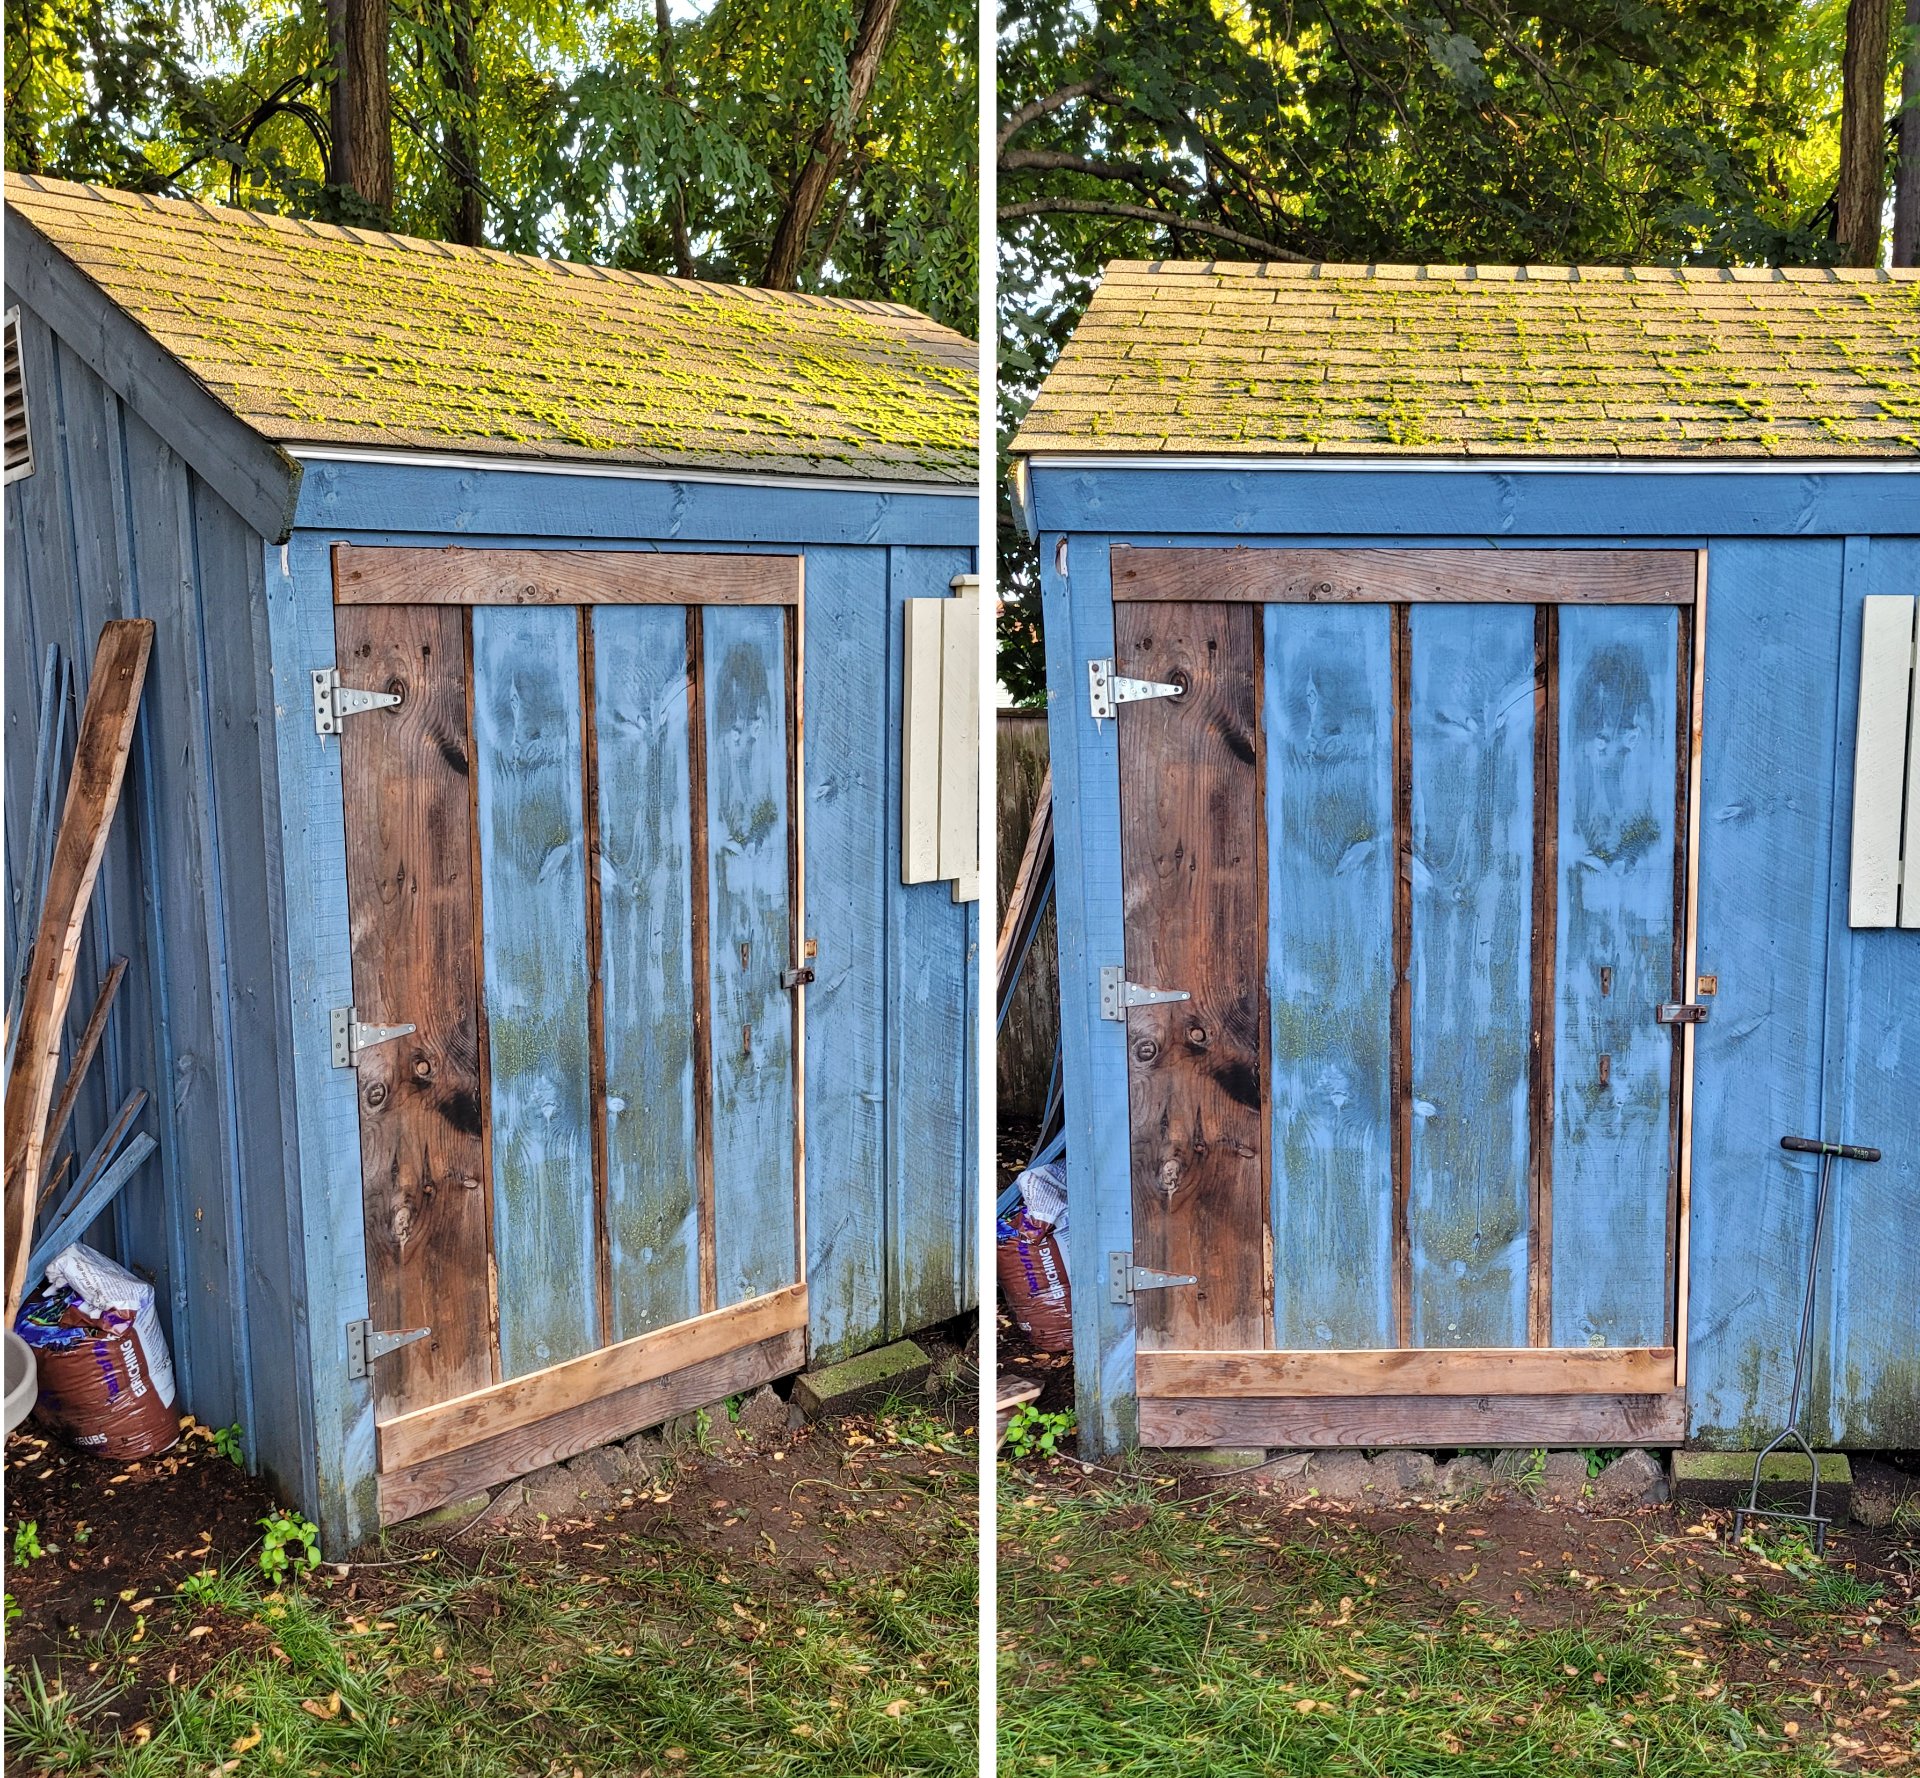
This was a pretty quick little project - some of my friends recently bought a house, it came with a shed, and the door of that shed was broken. The design of the door allowed it to swing open about 180 degrees, at which point it'd hit its own frame.The wind must have caught it one day and swung it open hard. When that big wide door hit the frame so close to its fulcrum, it just snapped right down the line. It also bent all the hinges.
The previous owners tried to fix it, it looks like by lifting the door back in place and driving some mismatched screws through some wood scraps and metal plates. That left the door drooping, hanging crooked in the frame, and flexing kind of alarmingly when it opened.
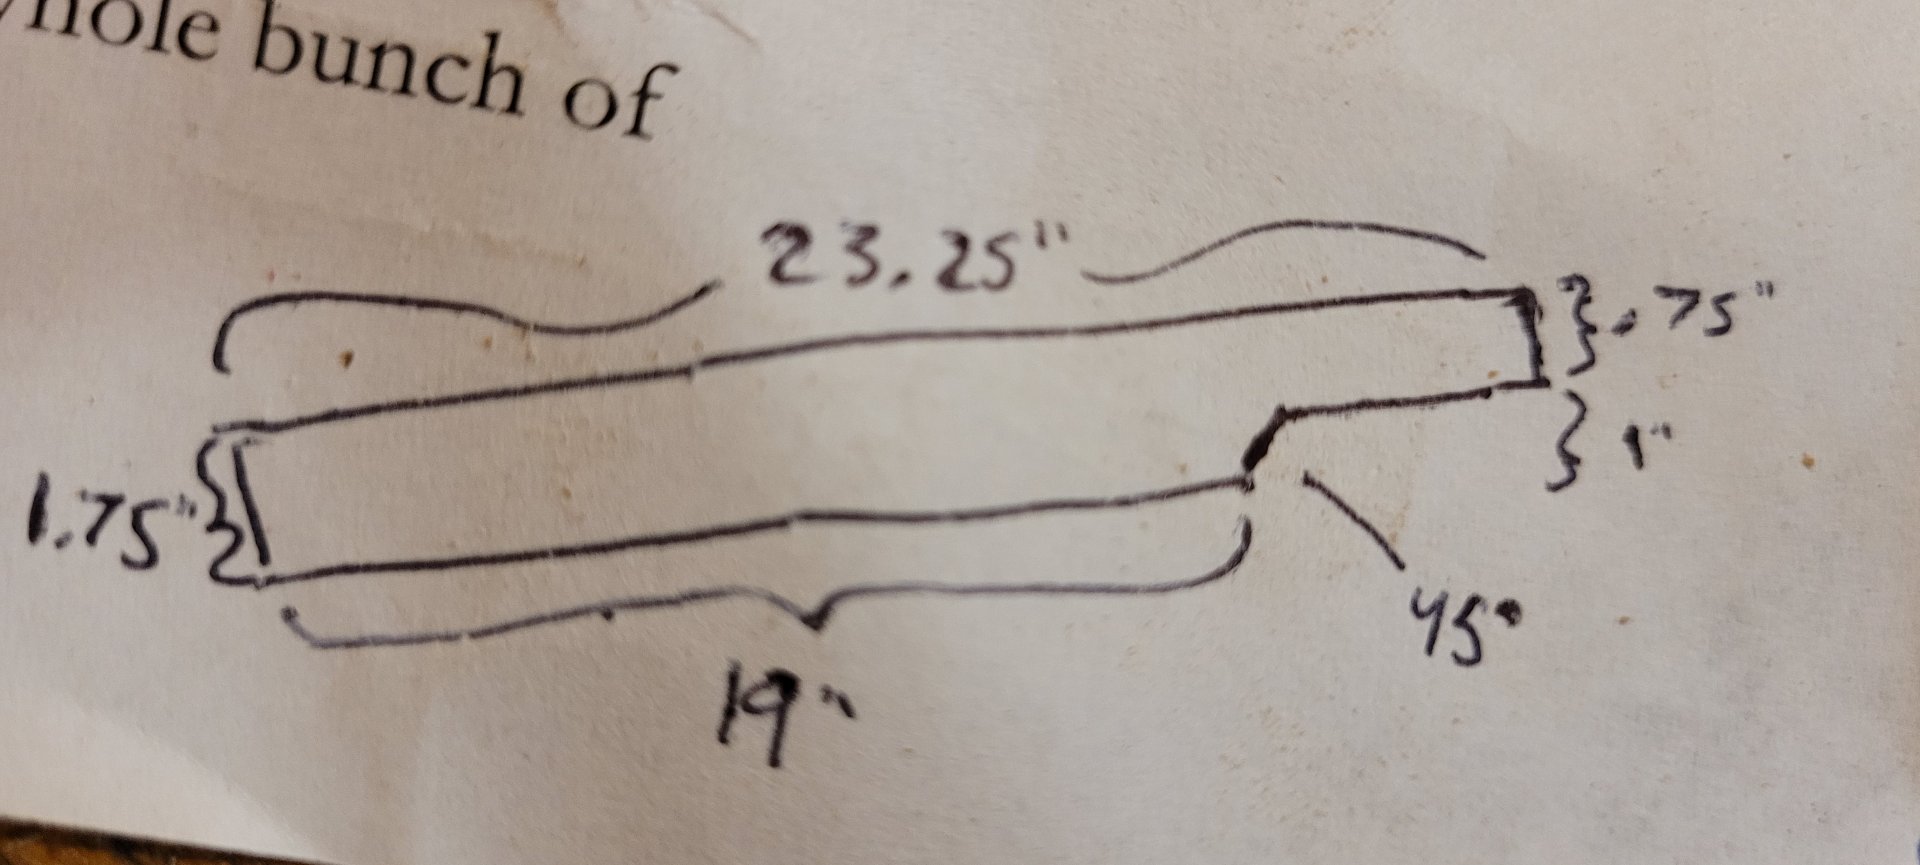
We'd talked about taking it down and fixing it properly, I even took some measurements.
Then one morning I got lucky, I saw a post on our local Buy Nothing -type page where someone was offering up some 1"x12" boards they'd been using as shelves in a shed. They were a bit weathered but otherwise in good shape (no cracks, warp, or rot). It was trash day in that neighborhood so I hustled out there and claimed the whole pile. 1"x12"s ain't cheap.
On the way back I picked up a shovel with a cracked handle which I fixed with a hose clamp and have been using for a couple years now.
We set a day, I packed the lumber and tools, and we started in on the shed. I think we also planted a peach tree (using my new shovel) that day.
We started by taking the door off the shed and setting it on some sawhorses I brought.
! (Dog helping hold down the door)
This was where we made our first unfortunate discovery. The shed was older than we'd realized. The 1"x12"s the door had been made from were rough cut, not dimensional, so the boards I'd brought were about half an inch narrower, and a quarter inch thinner than the originals.
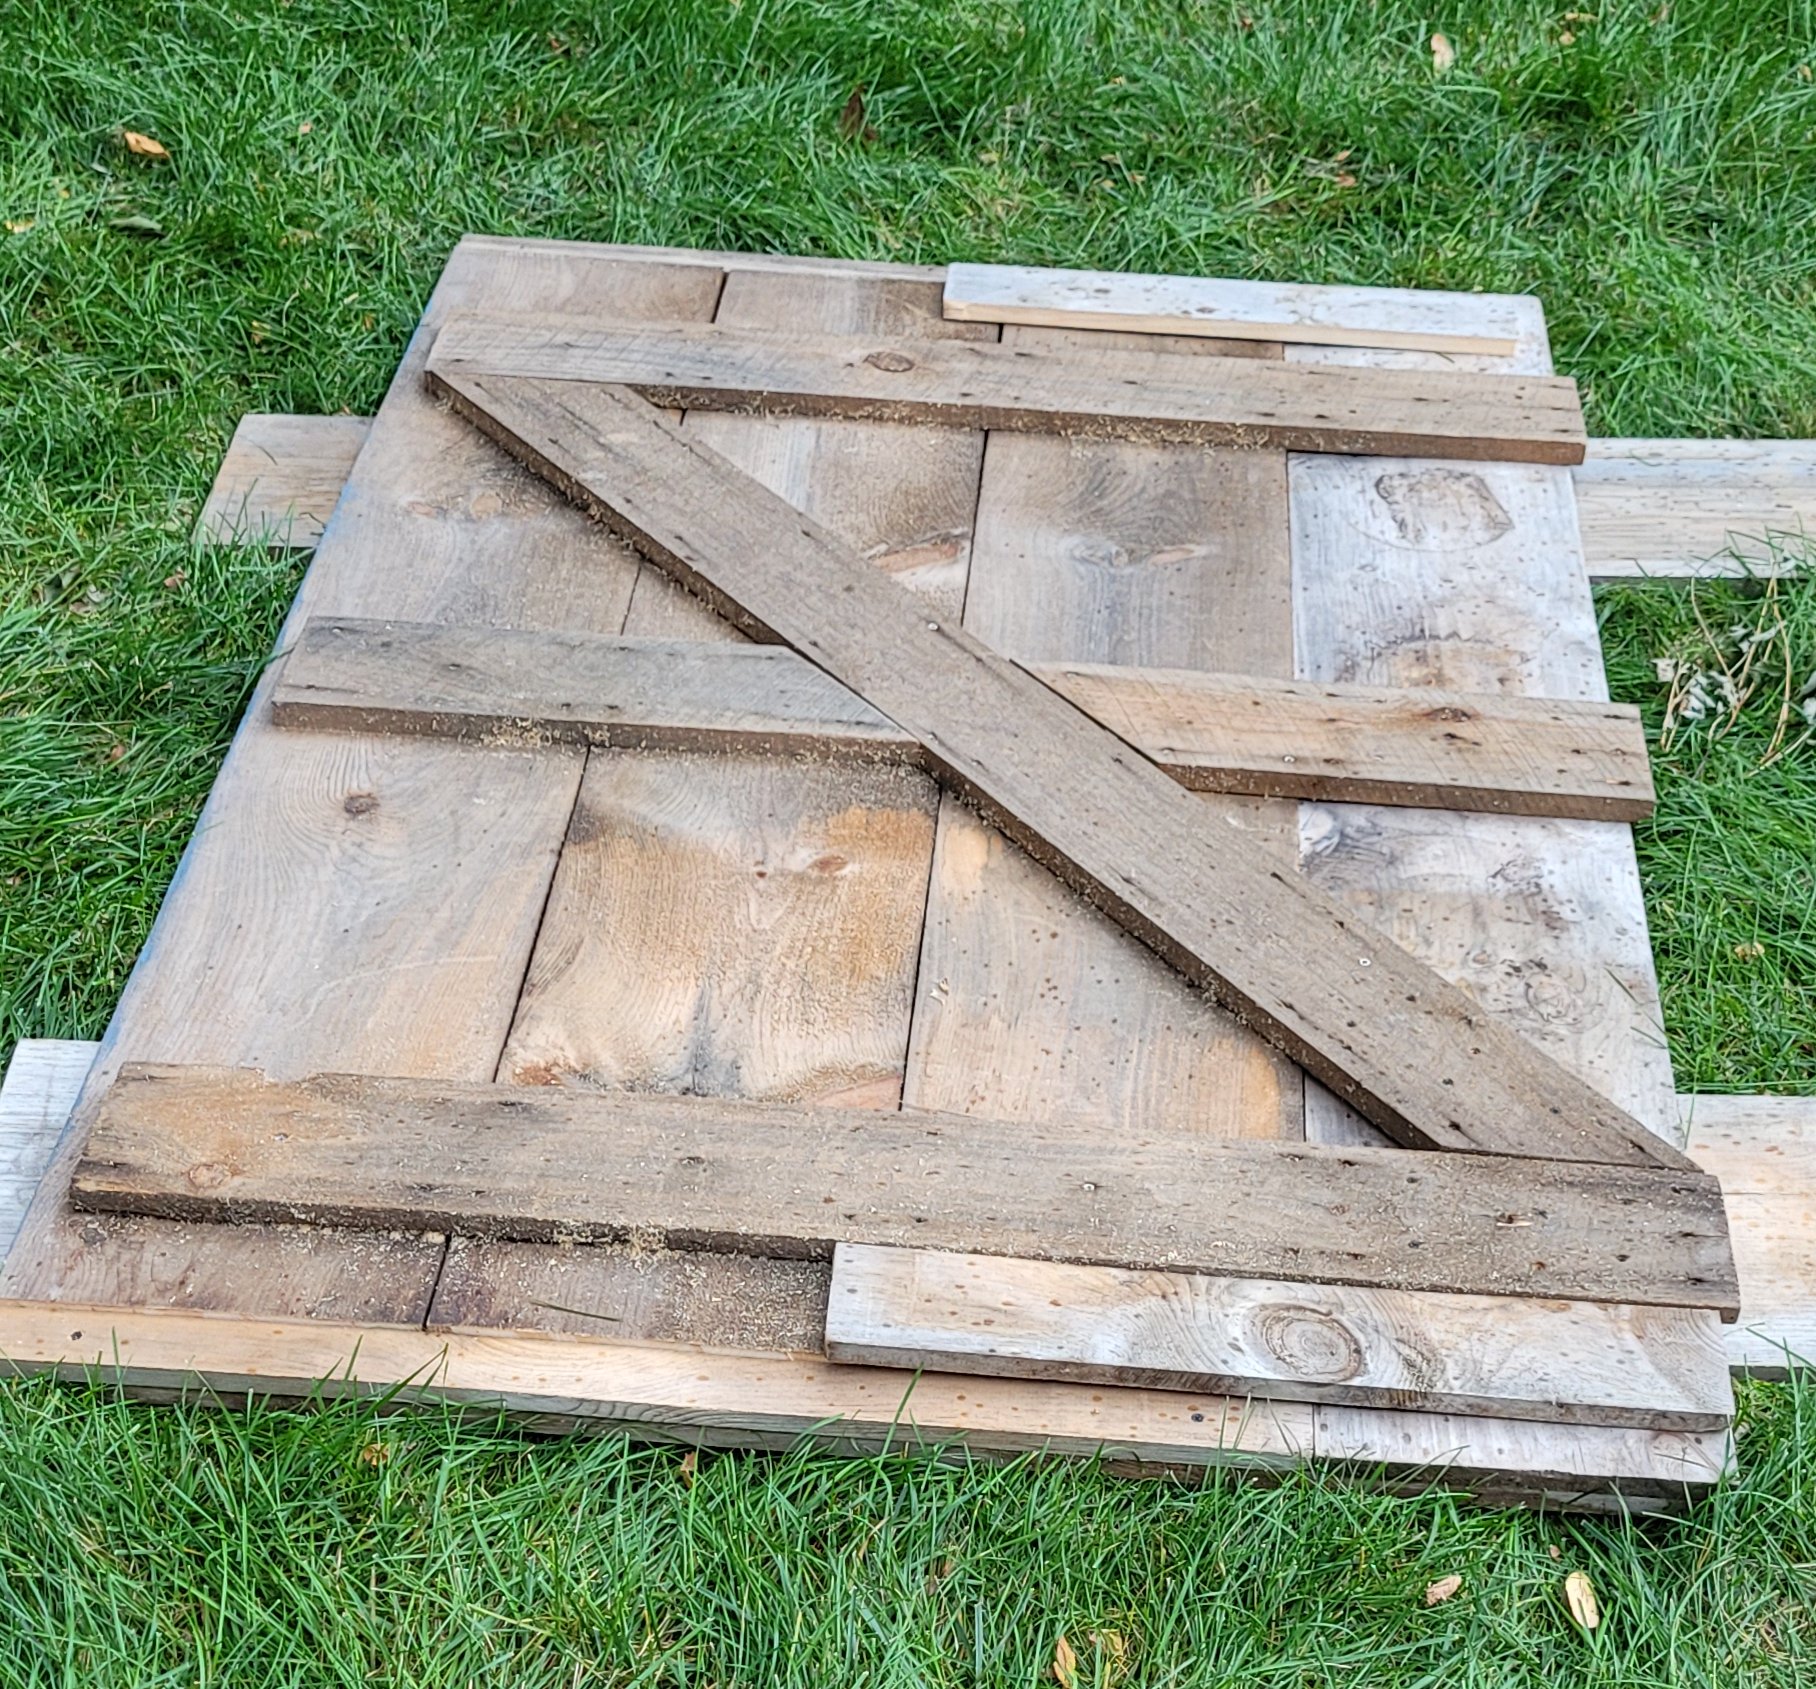
So we had a couple options here - all the boards were rotten for a few inches of the bottom. We could replace all of them with the new ones, which would be a close fit of all our materials, and would lose us a couple inches of width unless we added another board, or we could save lumber all around and change the design to keep most of the existing door but make it a little janky. They were good with that, so we did a kind of strange design.
First we removed the split board and it's support scraps and set them aside. Then we cut one of the new boards to the original/final height of the door.
Next we measured far enough up to catch all the rot, and we cut the door that much shorter.
We attached the new vertical board so it extended a couple inches at the top and bottom (it's on the right in the picture above). Then we added two braces across the face of the door, so they went across at the final height of the door/the long new board, leaving a bit of space above and below the old boards. These would add some extra ridigidity, by having pieces going across on the front and the back, and they'd hide the difference in length. Then we cut some pieces to go behind them, fitting flush above and below the old boards. These weren't structural, they just took up space so critters and weather wouldn't get in.
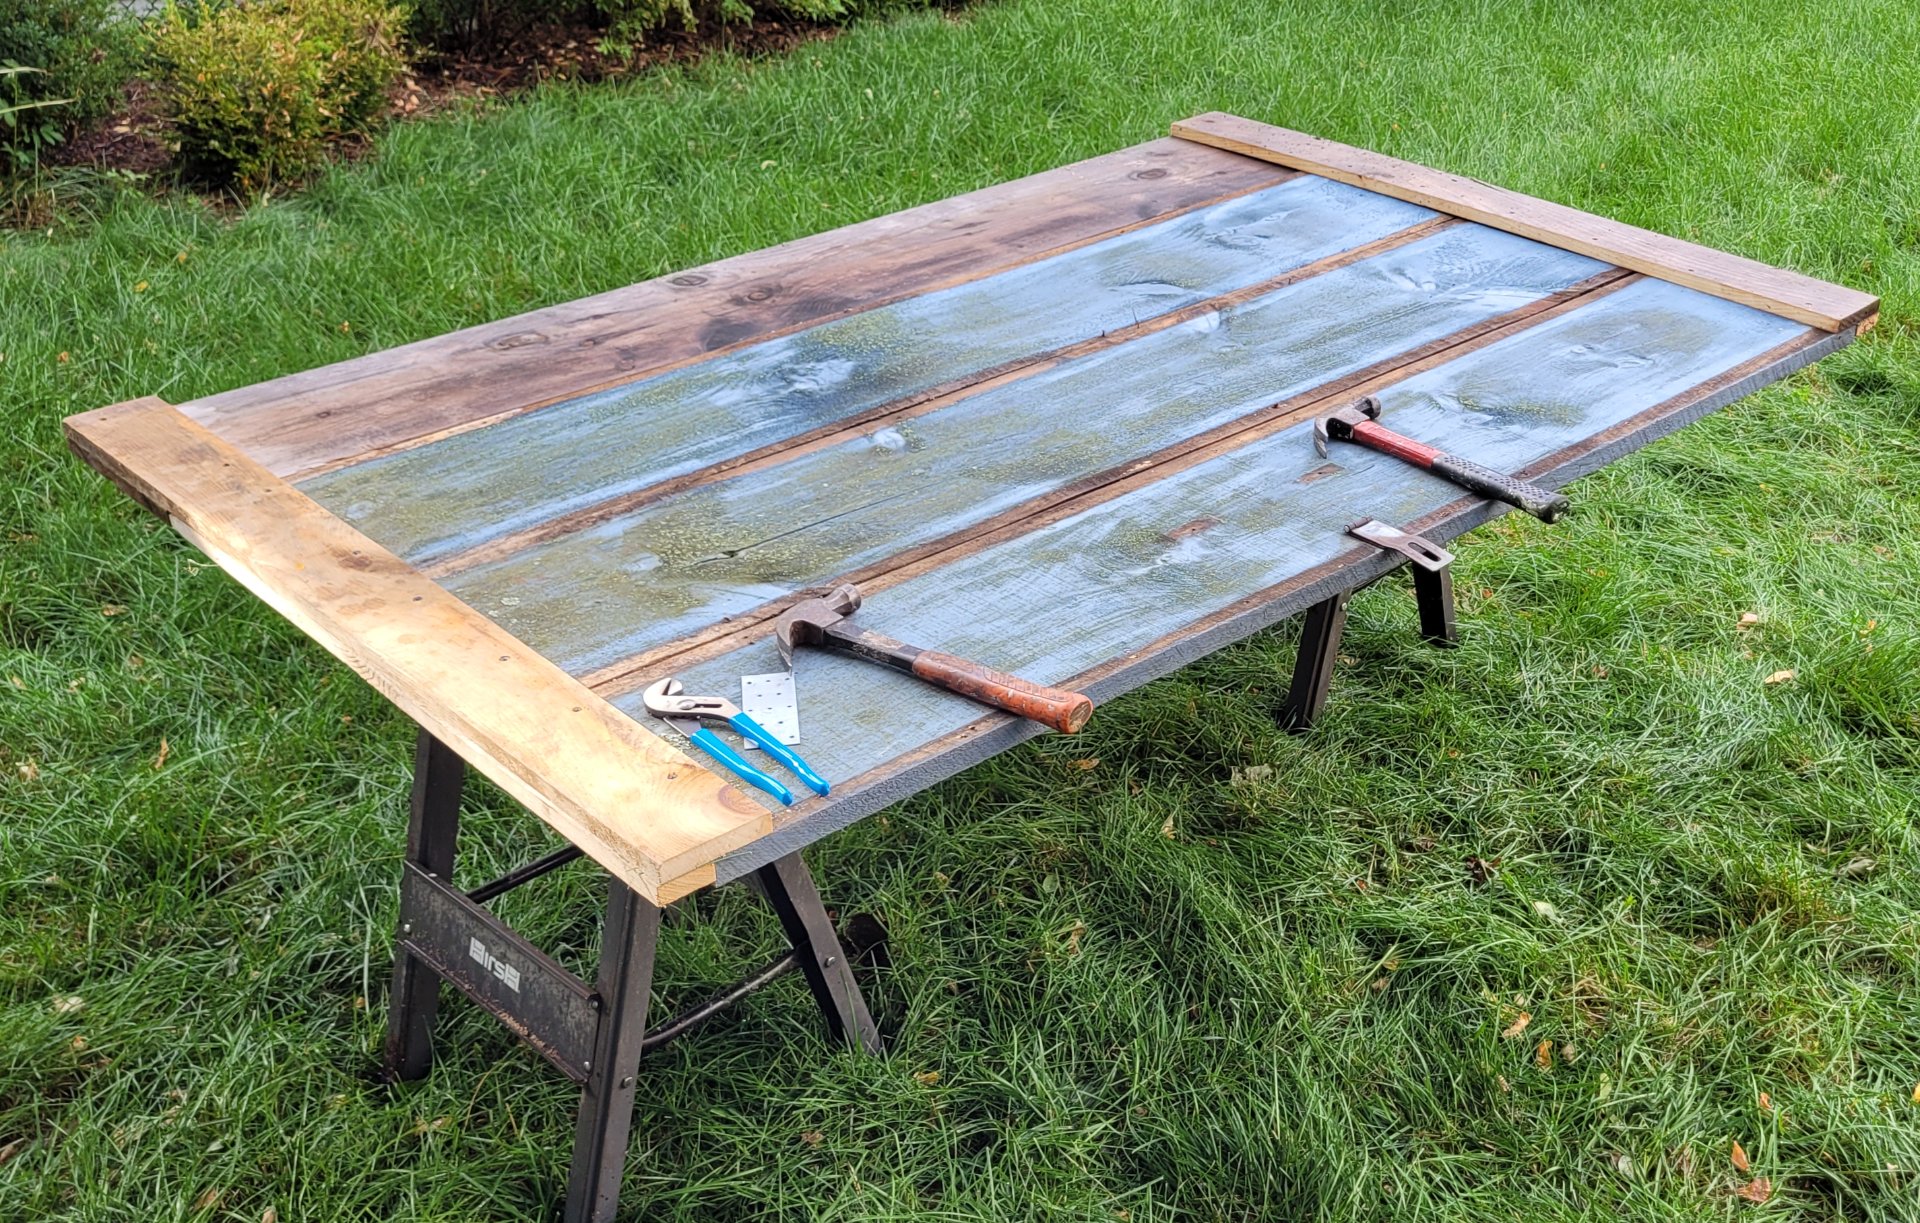
Once the door was made, we started looking at hanging it again.
Unfortunate discovery two: the doorway was crooked. Part of that was the fault of the badly rotted board which crossed the doorway under the door. It didn't seem to be doing anything but catching rain and soaking it up, so we pried it off and replaced it. Luckily it only crossed the doorway, it wasn't actually part of the building frame, which seemed to be in okay shape. The top of the doorway was also out of square, but not enough to be a major problem. As they reminded me a few times, it's a shed, not a house.
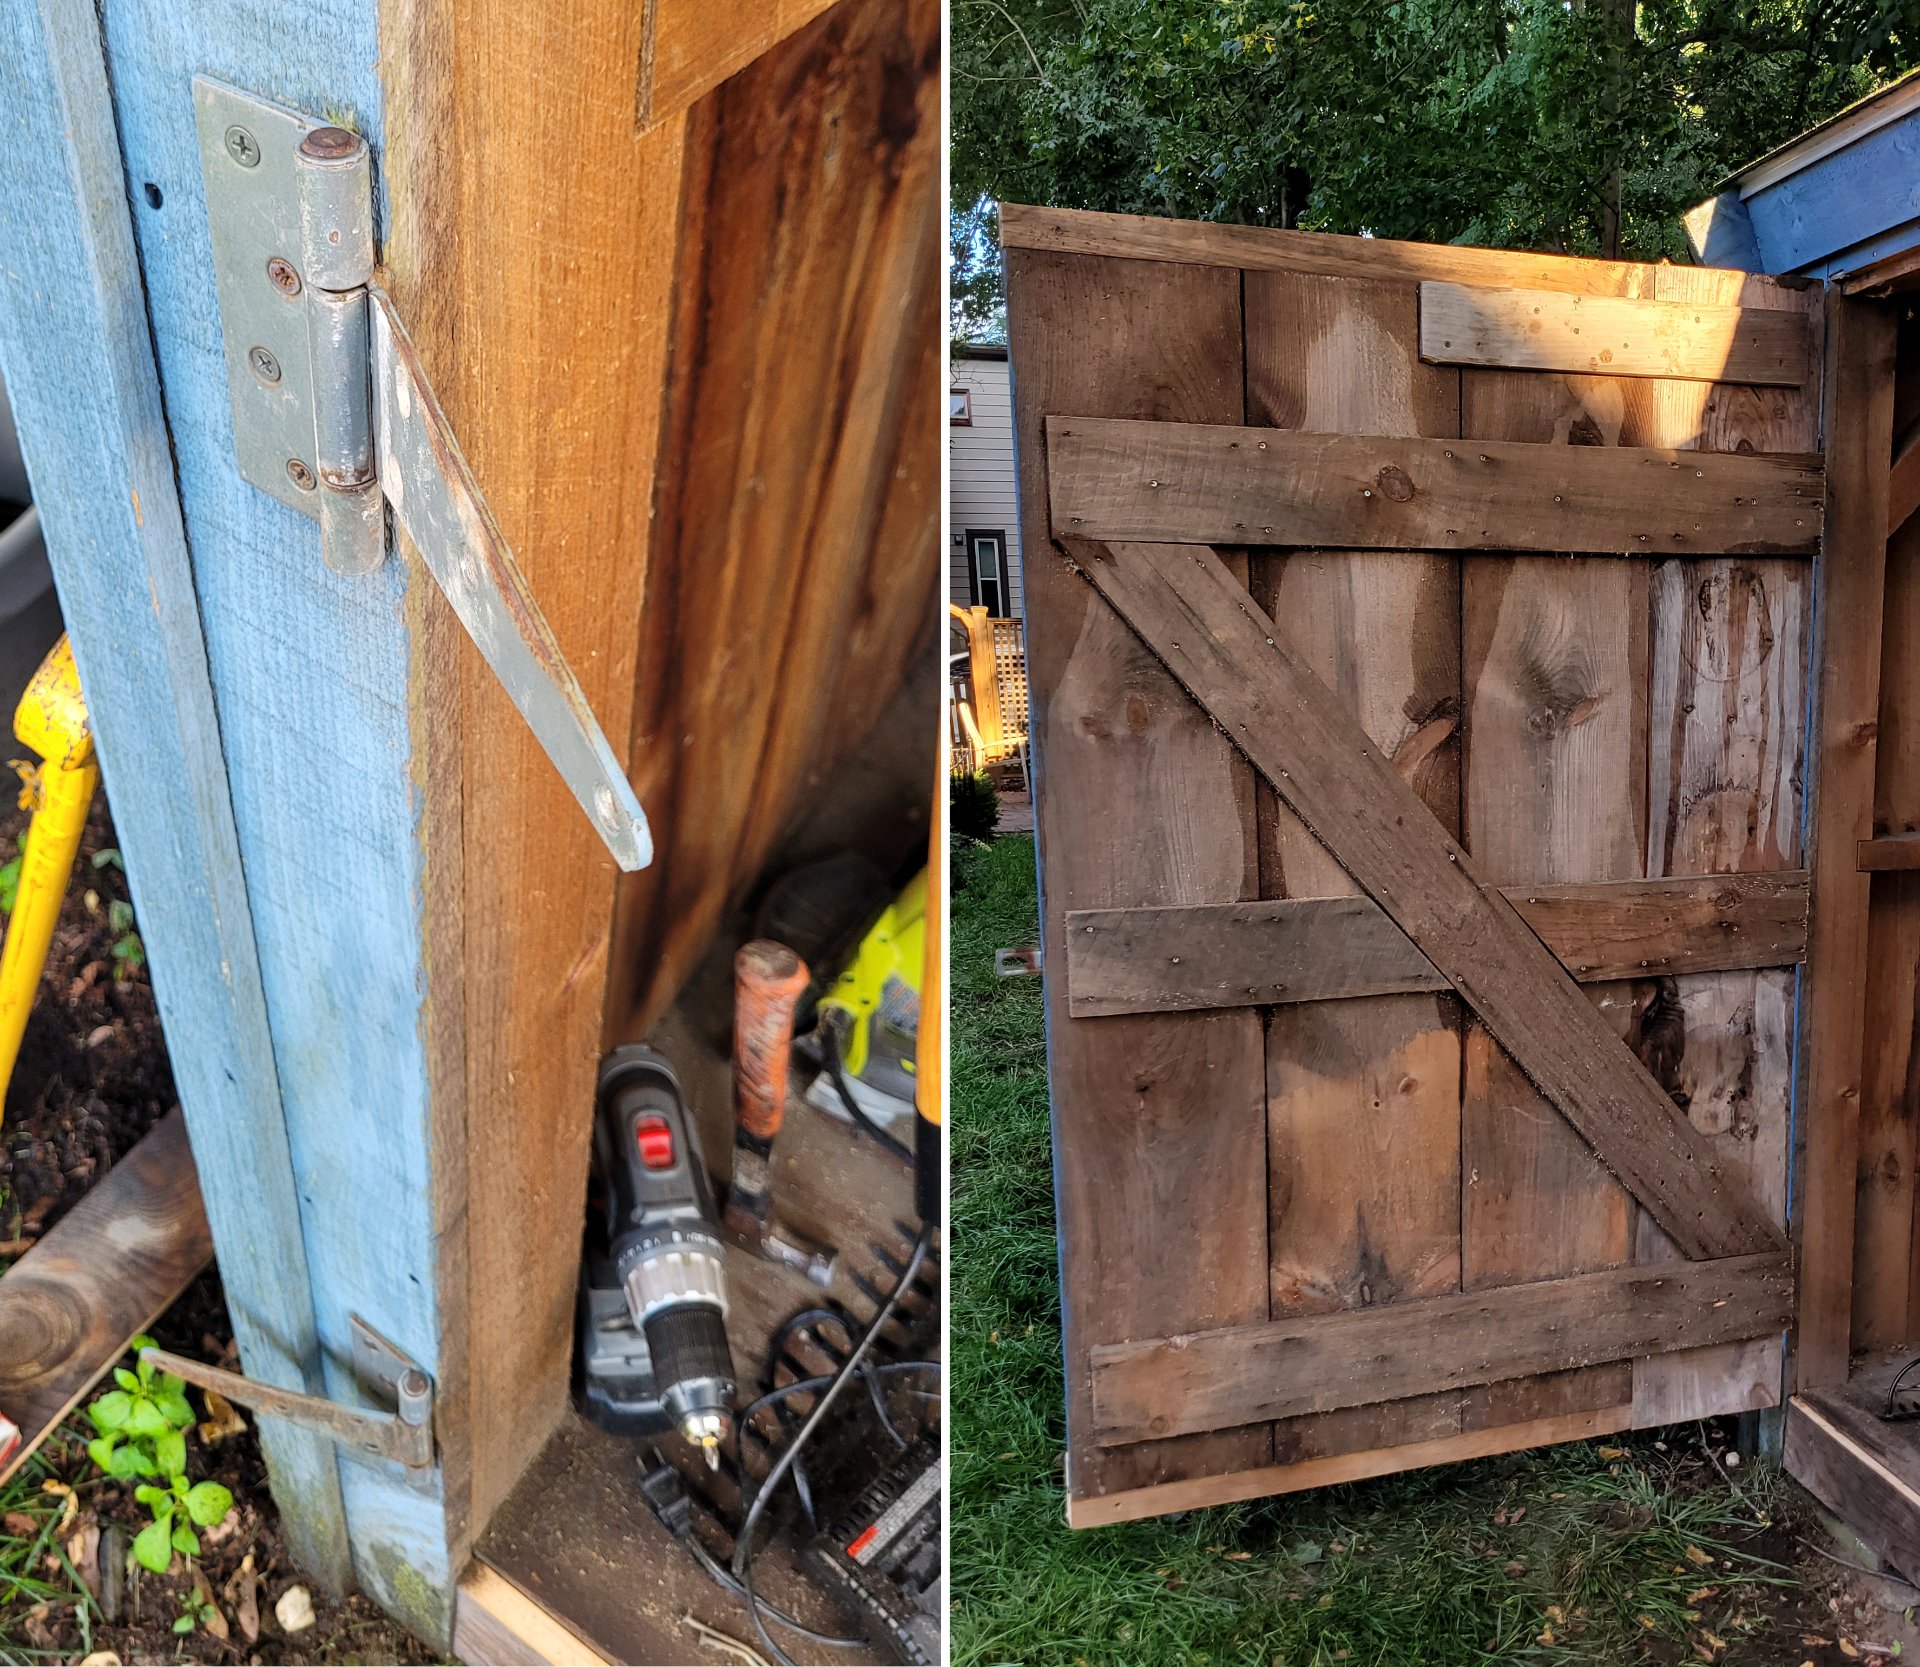
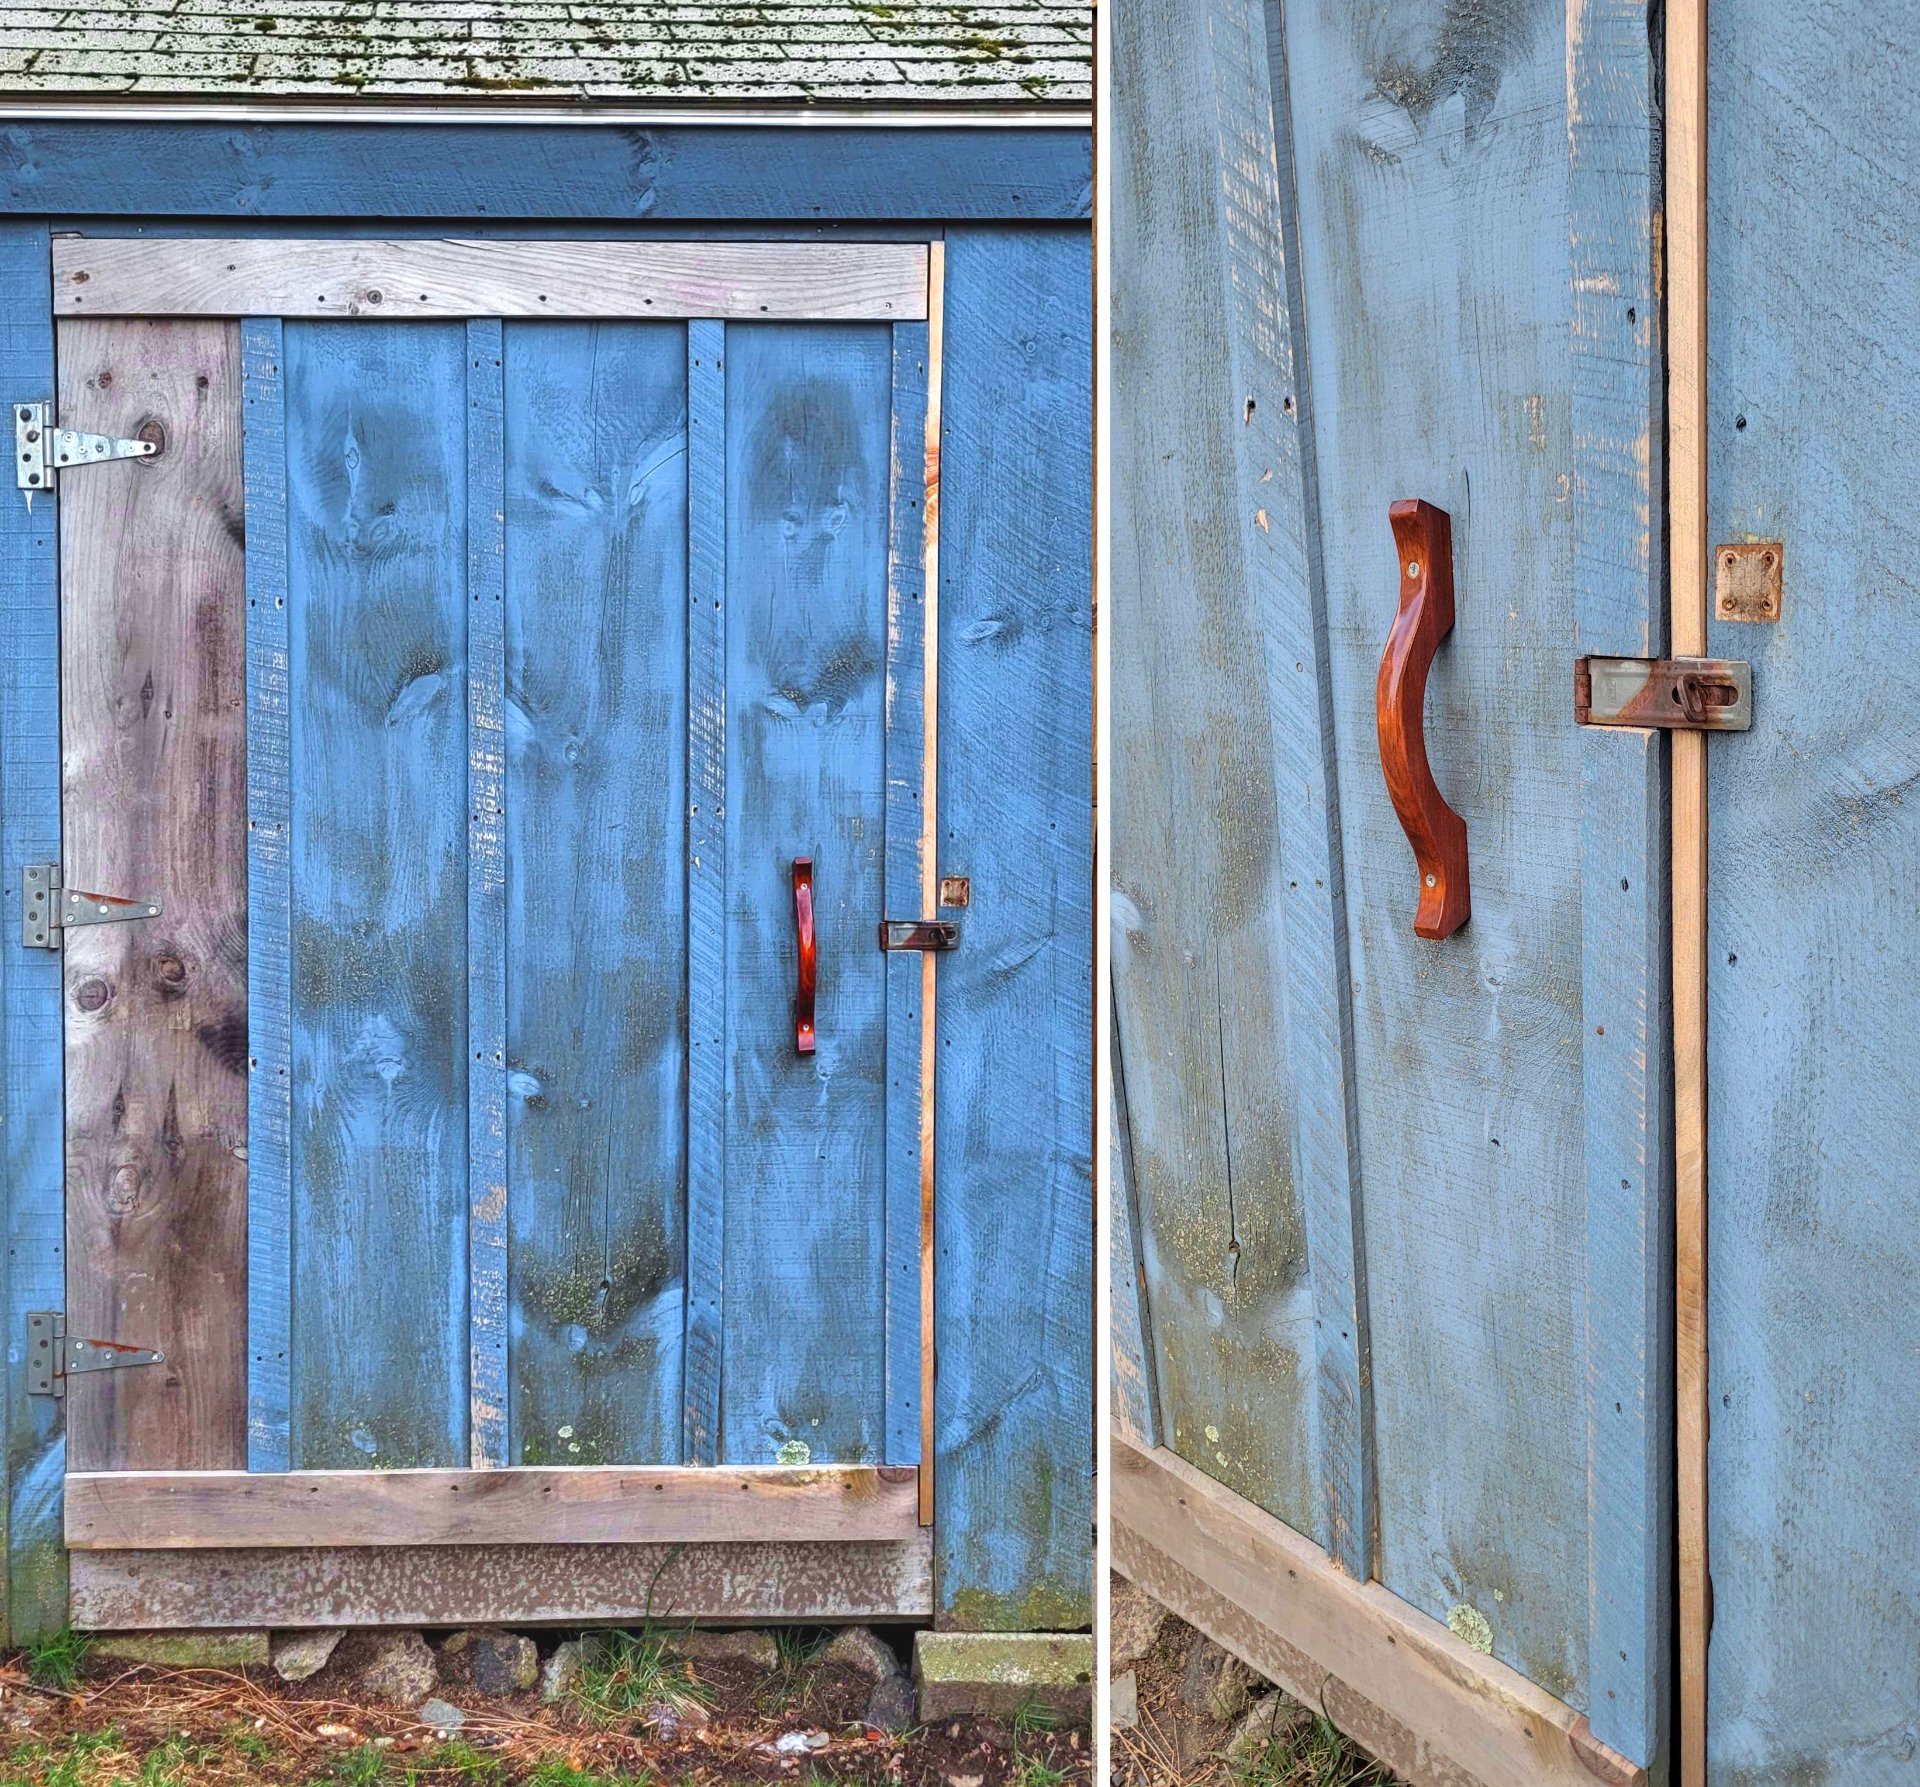
We straightened out the hinges by putting them on a brick and pounding on the high points with a small sledge (not ideal but it worked). Then we hung them back up and attached the door. From what I remember, it sat just above the new lower plate when it was closed, might have rested on it but I don't remember.
The last step was to cut a thin piece to attach to the inside of the door frame to make up for the width lost by replacing a roughcut board with dimensional.
From there, I think we called it good. It had rained on and off during the project, and we didn't want to re-attach the trim while it was wet for fear of trapping water between the boards.
We cleaned up the tools and had some pizza.
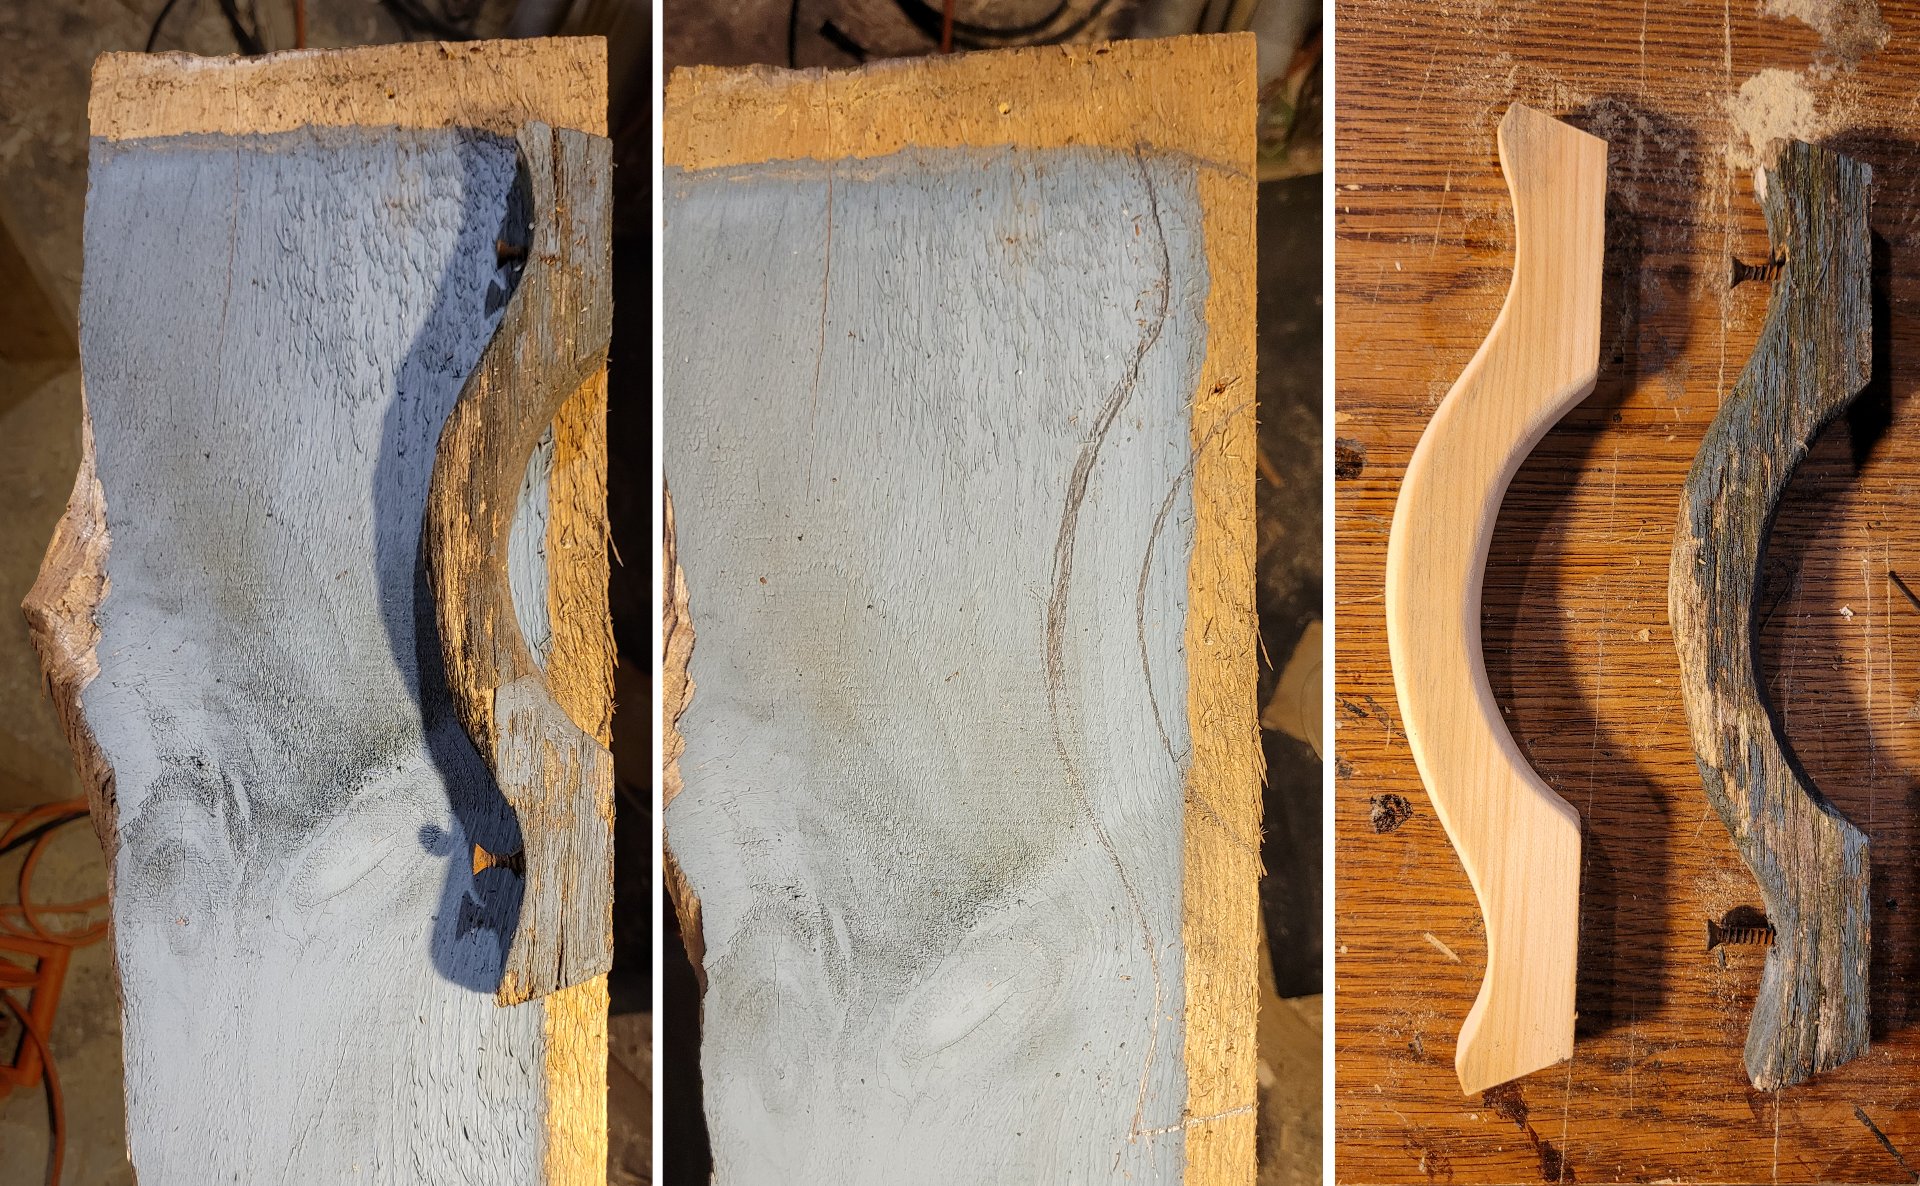
As a side project, I took the original, very rotted wooden door handle, and the scraps of the split board. From the dimensions of the original and the look of the wood, I figured they cut the original from scraps of the same roughcut 1x12s they built the rest of the shed out of, so I wanted to make the replacement the same way.
I traced the original onto the wood, flipped it end for end, and traced it again, and sort of averaged the two. The original wasn't actually symmetrical but my replacement would be much closer. Then I started sanding it down until it was comfortable to hold. I pre-drilled the holes for the screws, including space for the heads, so they wouldn't split the handle when it was attached.
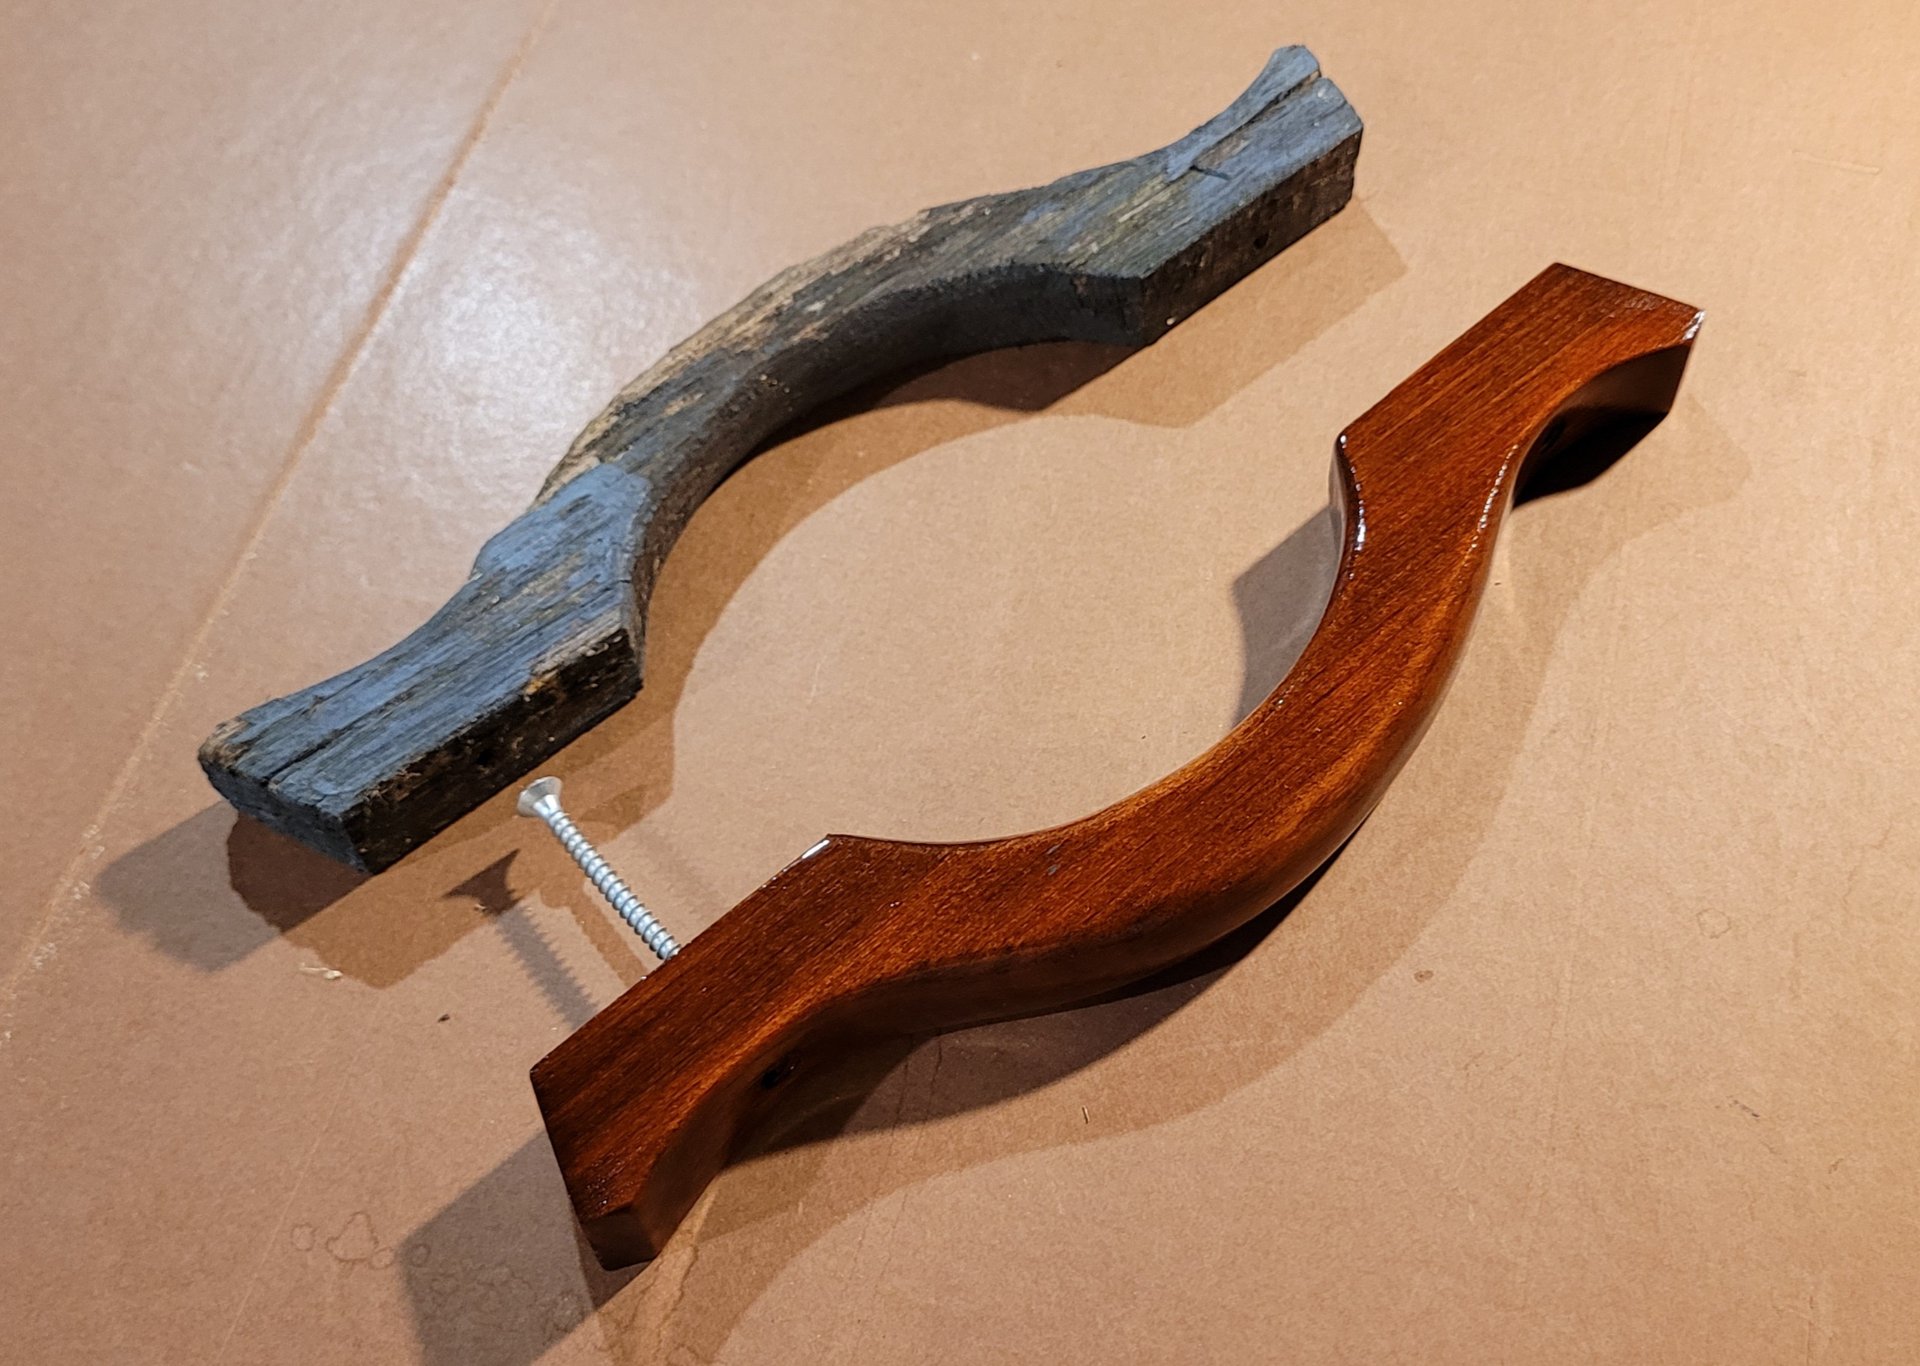
I stained it, I think my usual mix of Gunstock and Red Oak, then applied a few coats of urethane, sanding lightly between coats. I even got the back, where it'd touch the door, and the holes for the screws. I figured they could paint it whatever color they painted the door, like the original, or leave it as-is, either way it'd be very waterproof and last a long long time.
All it needs now is a new coat of paint.
Last one for now, I think I'm done with trains for a bit, thanks for letting me share these here!
cross-posted from: https://slrpnk.net/post/8581002
> Another (very quick) take on the caustic soda locomotive concept based on this comment on my last postcard about what a version with swappable boilers might look like. > > The idea is that instead of pumping out the caustic soda to dry it, they would instead unbolt and lift off the boiler, probably using an overhead or gantry crane, and replace it with an already-dry one. The dilute one would be inspected, and placed on a concrete containment pad where it could be connected to a solar steam generator, so the superheated steam could dry the caustic soda. This is actually pretty similar to how they apparently did it historically, except using a coal boiler and obviously without removing the boiler from the locomotive. > > Ideally, this would be a bit safer as the boiling hot caustic soda would remain contained for the majority of the time, with less risk of spills during the drying process, and the extra boilers and frequent inspections could help prevent corroded parts from disabling a locomotive and stopping a train line. It might even be faster, depending on how complex the hookup process is. > > In the end, it’s probably not a whole lot more practical, but I really liked the idea (suggested first by Carrier\_Indomitable over on r/trains, and then with some cool visual details by @WaterWaiver@aussie.zone on the last post.
Discover the magic of the internet at Imgur, a community powered entertainment destination. Lift your spirits with funny jokes, trending memes, entertaining gifs, inspiring stories, viral videos, and so much more from users like jacobcoffinwrites.
This is the only other train art I've done that would fit this community, but I'm hoping to make one more somewhat soon. I hope it fits okay!
cross-posted from: https://slrpnk.net/post/1997731
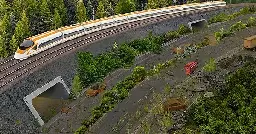
> The second photobash in what I hope will be a series; a bit larger and more visually interesting than the first. I've started thinking of these as 'postcards from a solarpunk future.’ They might not show the width and breadth of this world, but nice scenes of what this fictional solarpunk society would consider aspirational, or values worth showing off. > > I feel that for a genre/movement with such a focus on intentionality, there's a lot of AI art setting the tone online, along with a tendency to accept anything that looks partway futuristic and green, even if it's a massive cityscape or sort of generically utopian. I want to try to pull the visual aspect towards a more lived-in, human future that sets out to show possibilities/options. > > My goals for this one were pretty simple: I wanted to show a setting where cars are no longer the priority, and to show that a solarpunk society will embrace new technology and infrastructure where it's a good use of limited resources (in contrast to the focus on reusing what’s here that I'm trying to include in other images). I also wanted to show that there’s room for more than one solution (and more than one kind of lifestyle) as with the bicyclist towing a kind of traditional-looking wagon. > > As with the other photobashes, there are ruins in this scene. One of my overarching goals is to keep these pictures from looking utopian or like some kind of scratch-built future. Things will be messy, resources will be scarce, and tasks will go undone. As in our world, the debris of abandoned projects will pile up around human society, no matter how good its intentions are. I’m pessimistic enough to see bad times ahead, but I want to emphasize in these that that doesn’t mean giving up. For me, that’s a big part of the appeal of solarpunk, that the people in it keep working to mitigate the damage at any level they can access, and will try to rebuild more deliberately, carefully when they can. So these scenes are a little postapoclyptic, with hopefully a more inclusive, vibrant, and colorful society on the other side.
cross-posted from: https://slrpnk.net/post/8409948
> One of my goals for my postcard series is to show a rebuilding society that prioritizes reducing waste and externalities, and examining what weird technologies might appeal to them because of those goals/limitations. So I've been wanting to do a scene of a caustic soda locomotive ever since I first heard about them. > > Soda locomotives were a type of fireless steam locomotive that barely made it out of the prototype phase, where the boiler is surrounded by a tank of ‘caustic soda’ (usually one of several possible chemicals), which generates heat when mixed with water. The heat produces steam in the boiler, which is used to drive the pistons, but instead of being released, its condensed and added to the soda to create more heat. This goes on until the soda gets too dilute to produce more heat, but it can be 'recharged' by drying it out again. > > These never really took off because it took more coal to dry the soda at the station than to just run a conventional steam locomotive, and electric trains quickly came into their own and filled the niche of quiet, low-pollution trains for inside cities and tunnels. > > But I feel like these could pair well with solar steam generators (another late-1800’s design) stationed along the tracks, to create analogue, solar-powered trains. These could run on existing unpowered tracks, without requiring any new electrical infrastructure, just the isolated drying stations. > > The train crew would just exchange wet soda for dry and start again (looks like that took about 45 minutes). The cool thing is that this arrangement could be asyncronous - the station can dry out the caustic soda, then store it for when the train shows up. The train can run on cloudy days or at night, as long as they get enough sunny days to dry out big batches of soda at the stops along the way. And the solar concentrators can be huge and optimized for their location because they don’t have to move. > > The focus of these postcards isn’t on technological utopias so much as on societies that are reexamining how to do things as they rebuild, anachronistically combining all kinds of tech. So trains and solar concentrators built with 1800’s technology seem like an easier starting place. > > The concentrators require fairly simple materials (mirrors or polished metal) and math to make (plus some simple mechanical timing or basic motors/electronics to get them to follow the sun without a human turning a crank). > > Most of the descriptions I've seen of drying the caustic soda mention pumping superheated steam through the dilute mix from another (coal) boiler, so it seems like you could use almost any design from the earliest solar steam generators to something like these modern ones depending on the society’s manufacturing capabilities. The solar concentrator/boiler I referenced for the art is a design from 1901. > > (The most common modern design for solar steam generation I've seen is that sort of mirrored-trough-and-vaccum-lined-tube system. I mostly went with the big round reflector because I was worried the trough design wouldn't read as distinct from photovoltaic panels in this art style.) > > The trains could run with minimal pollution using these simple technologies, and even if their range is lower, or they're not as fast, that might be a trade off this society would accept. > > Ideally they would use existing tracks and passenger or freight cars, and only need new infrastructure around whatever station fueled them up on their route (or at a destination). I think this applies to the compressed air locomotives just as well as the caustic soda ones. > > (If you don’t like the idea of caustic soda locomotives, but you still want this idea to work, another option with a shorter range is compressed air locomotives. Instead of drying the soda, the station would be using a solar steam engine or windmill or water wheel to run an air compressor, steadily filling a tank which would be used to top up locomotives on their route. This would still allow for isolated infrastructure to power a train along unpowered rails. IRL these mostly saw use in mines.) > > The locomotive in the scene is based on a real-life fireless locomotive. They’re similar, but filled with super-hot steam by external sources. They seemed like a good reference for what a caustic soda locomotive might have looked like had the concept reached a more polished, production format. But they don’t really fit my goal for tolerating intermittency as they’d need the heat source to be going when they stopped for a refill.
One of my goals for my postcard series is to show a rebuilding society that prioritizes reducing waste and externalities, and examining what weird technologies might appeal to them because of those goals/limitations. So I've been wanting to do a scene of a caustic soda locomotive ever since I first heard about them.
Soda locomotives were a type of fireless steam locomotive that barely made it out of the prototype phase, where the boiler is surrounded by a tank of ‘caustic soda’ (usually one of several possible chemicals), which generates heat when mixed with water. The heat produces steam in the boiler, which is used to drive the pistons, but instead of being released, its condensed and added to the soda to create more heat. This goes on until the soda gets too dilute to produce more heat, but it can be 'recharged' by drying it out again.
These never really took off because it took more coal to dry the soda at the station than to just run a conventional steam locomotive, and electric trains quickly came into their own and filled the niche of quiet, low-pollution trains for inside cities and tunnels.
But I feel like these could pair well with solar steam generators (another late-1800’s design) stationed along the tracks, to create analogue, solar-powered trains. These could run on existing unpowered tracks, without requiring any new electrical infrastructure, just the isolated drying stations.
The train crew would just exchange wet soda for dry and start again (looks like that took about 45 minutes). The cool thing is that this arrangement could be asyncronous - the station can dry out the caustic soda, then store it for when the train shows up. The train can run on cloudy days or at night, as long as they get enough sunny days to dry out big batches of soda at the stops along the way. And the solar concentrators can be huge and optimized for their location because they don’t have to move.
The focus of these postcards isn’t on technological utopias so much as on societies that are reexamining how to do things as they rebuild, anachronistically combining all kinds of tech. So trains and solar concentrators built with 1800’s technology seem like an easier starting place.
The concentrators require fairly simple materials (mirrors or polished metal) and math to make (plus some simple mechanical timing or basic motors/electronics to get them to follow the sun without a human turning a crank).
Most of the descriptions I've seen of drying the caustic soda mention pumping superheated steam through the dilute mix from another (coal) boiler, so it seems like you could use almost any design from the earliest solar steam generators to something like these modern ones depending on the society’s manufacturing capabilities. The solar concentrator/boiler I referenced for the art is a design from 1901.
(The most common modern design for solar steam generation I've seen is that sort of mirrored-trough-and-vaccum-lined-tube system. I mostly went with the big round reflector because I was worried the trough design wouldn't read as distinct from photovoltaic panels in this art style.)
The trains could run with minimal pollution using these simple technologies, and even if their range is lower, or they're not as fast, that might be a trade off this society would accept.
Ideally they would use existing tracks and passenger or freight cars, and only need new infrastructure around whatever station fueled them up on their route (or at a destination). I think this applies to the compressed air locomotives just as well as the caustic soda ones.
(If you don’t like the idea of caustic soda locomotives, but you still want this idea to work, another option with a shorter range is compressed air locomotives. Instead of drying the soda, the station would be using a solar steam engine or windmill or water wheel to run an air compressor, steadily filling a tank which would be used to top up locomotives on their route. This would still allow for isolated infrastructure to power a train along unpowered rails. IRL these mostly saw use in mines.)
The locomotive in the scene is based on a real-life fireless locomotive. They’re similar, but filled with super-hot steam by external sources. They seemed like a good reference for what a caustic soda locomotive might have looked like had the concept reached a more polished, production format. But they don’t really fit my goal for tolerating intermittency as they’d need the heat source to be going when they stopped for a refill.
Apologies if this doesn't fit the community
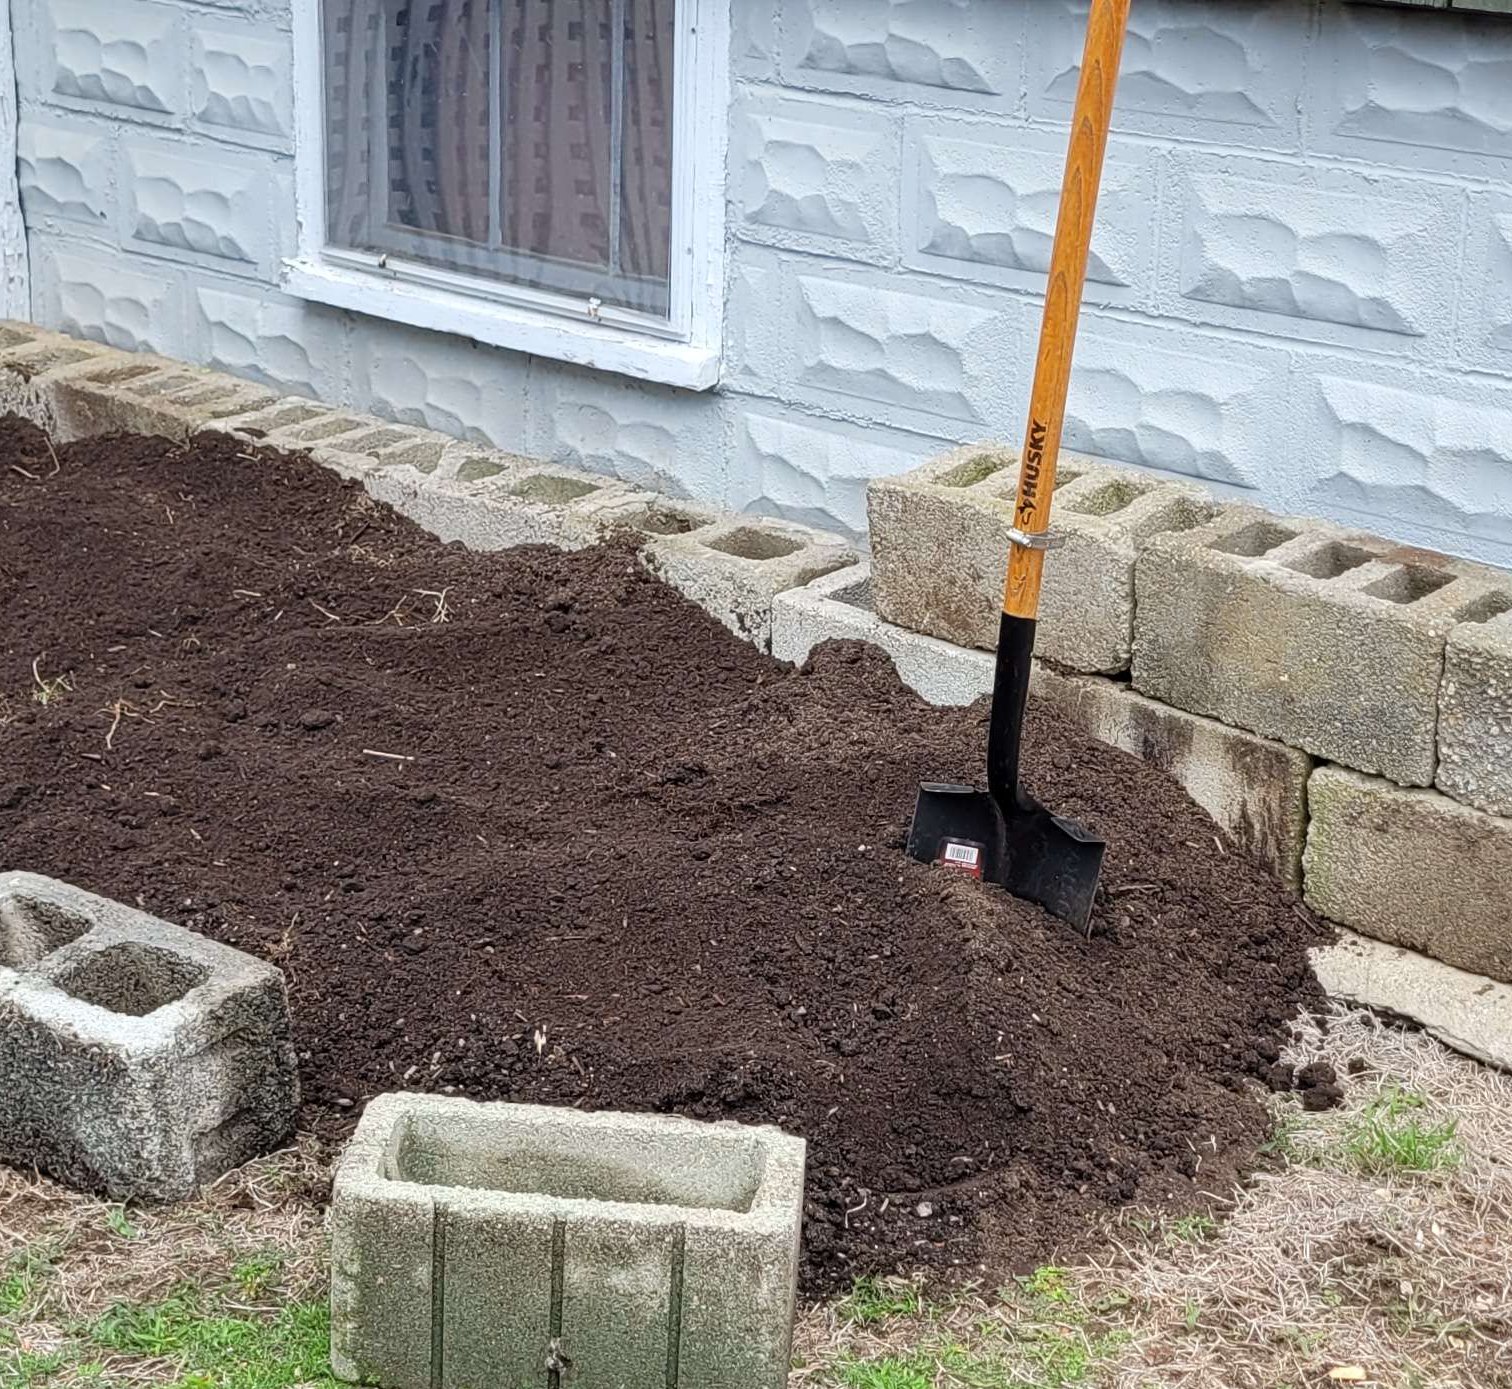
I've been helping my neighbor replace his lawn with a garden - last summer our project was building a terraced raised bed thing with secondhand soil and secondhand cinder blocks, and some new pavers in the front. I'd very much like to set up a water feature on that raised bed. He spends most days sitting on his porch, reading scifi novels and talking to folks walking by, so he could hear it while he's out there. I know it's kind of a silly luxury so I'm trying to use used components and I'd really like to set it up using a solar panel to power the pump.
I can handle the wiring and electronics with some guidance, but I know very little about pumps and solar panels for finding something that'll fit our use case. I think ideally it'd be a secondhand panel a few feet in size and a pump that can handle a varying amount of power based on the time of day. I'd like to move more than a trickle of water, and I'll make sure there's some shade plants so we don't lose much water to evaporation, though we don't get many droughts where we are.
Petrovitch Trilogy by Simon Morden, 2013, Orbit edition, in English

These books (the first three, at least, skip the bonus fourth one) are a lot of fun. I come back to them now and then when I want a comfortable read and I’m always surprised by how good they are.
The trilogy is one of those larger-than-life, everything-including-the-kitchen-sink sort of cyberpunk stories that somehow manages to Gish Gallop right past its sillier parts as it careens through some absolutely great intrigue and action. Its perhaps not as intentionally silly as Snowcrash, but I think they’re somewhat in the same neighborhood and I’d feel comfortable recommending them to a similar crowd.
Its got just about all the big elements at one time or another – a surveillance state, yakuza/corporate conglomerations complete with company ninjas, a rogue artificial intelligence, nuclear terrorism, soviet-inspired organized crime, armed nuns, CIA assassins, an army of self-driving cars, a bunch of hacking. As it goes on, it does become clear that governments/states still play a fairly significant role in this setting, certainly still larger than corporations, but they do some cool stuff with it, especially with how things have changed in this postapocalyptic world.
One thing to say for them, status quo isn’t really a thing in the books. The Metrozone setting changes pretty drastically throughout the series from a fairly standard cyberpunk London, to a warzone under siege, to a rebuilding independent state, but it always fits, has a wonderful sense of place, and I don’t think it loses its qualification as cyberpunk just because some of the neon lights stop working partway through.
The individual characters and the larger organizations tend to be painted in pretty broad-strokes sometimes veering into being caricatures and yet they’re legitimately loveable, easy to remember, and you get a good sense of who they are immediately. Looking back on three books I read in two days, the characters are what most stand out to me, and in a good way. The protagonist has some Mary Sue traits – I think they feel earned enough to give them a pass, some readers may feel otherwise. I do appreciate his growth and arc throughout the books.
(The writer/characters sometimes use some memes which aren’t super fresh here around the same year as the book is set.)
The one place where it perhaps edges away from cyberpunk is in the themes of hope. Throughout the series the main characters strive for and make real change in the world. There’s a sense that there’s still a messy, winding path towards utopia, that everything they need is there if only they can arrange it all just right, and keep society from imploding in the meanwhile. They’re not resigned, giving up, or accepting of the fucked up world as it stands. They’re not just trying to make their way or get by. In this one way, it feels almost closer to solarpunk than cyberpunk with its noir themes of apathy.
I'm not sure if all those qualifiers wreck the case I'm trying to make - these books are interesting and most of all they're fun, and how they do that, I think, is mostly in the delivery. All in all, I’d definitely recommend them.
This was an earlier project on my make-everything-from-junk adventure. I've actually built two…
Something neat I've discovered - you can repost the content of your movim blog straight into a lemmy post and it's all compatible, uses the same markup. I'll repost all this to imgur as a backup at some point but for now this is awesome.
This was an earlier project on my make-everything-from-junk adventure. I've actually built two arcade cabinets - the first with the goal of using only secondhand stuff, sort of sequestering various junk into something that would be around for awhile, and eventually gave it away on our local Buy Nothing -type group. It was unfortunately very poorly documented, I don't have many pictures of it.
This second one was a gift/reason to hang around in the workshop building something with a friend. They'd seen the first one, and we got talking about building an arcade cabinet custom for them. I like projects that cross a few domains, woodworking, painting, electrical, etc, and I really like reusing materials. Ad I love having a reason to hang around working on projects with friends, so I was excited.
I really like the archival efforts around old arcade cabs, but I generally think of new custom-built arcade cabinets as being kinda wasteful. They use lots of new material, particle board, etc, and take up lots of space, often for a luxury item that doesn't end up getting used very much.
But playing retro games was actually already a big part of this friend's mental health routine so I knew they'd use it - and I was confident I could find most if not all the material secondhand, which would save them a lot of money. (In the end, we did use one panel of storebought particleboard for the front plate/door just to get it finished. Otherwise, aside from the buttons and raspberry pi, we still managed to make it all from old stuff.)
I started with what we already had: various 2"x4" and 1"x2" boards, some particleboard and plywood cut to the dimensions of the previous cabinet which could work as shelves, and most of the particleboard from a big upright storage cabinet which would be perfect for the sides.
A year or two earlier, I'd spotted it disassembled on trash day on my way to work. I hate to pass up good material so I quickly hauled it home before getting back into my routine. When a different friend really wanted to carve pumpkins during the COVID times, I took the sides of the cabinet, screwed on four table legs I got from metal recycling and set it up as a long table on our porch.
We used that table for quite awhile, as a simple workbench, and a side table at friendsgiving.
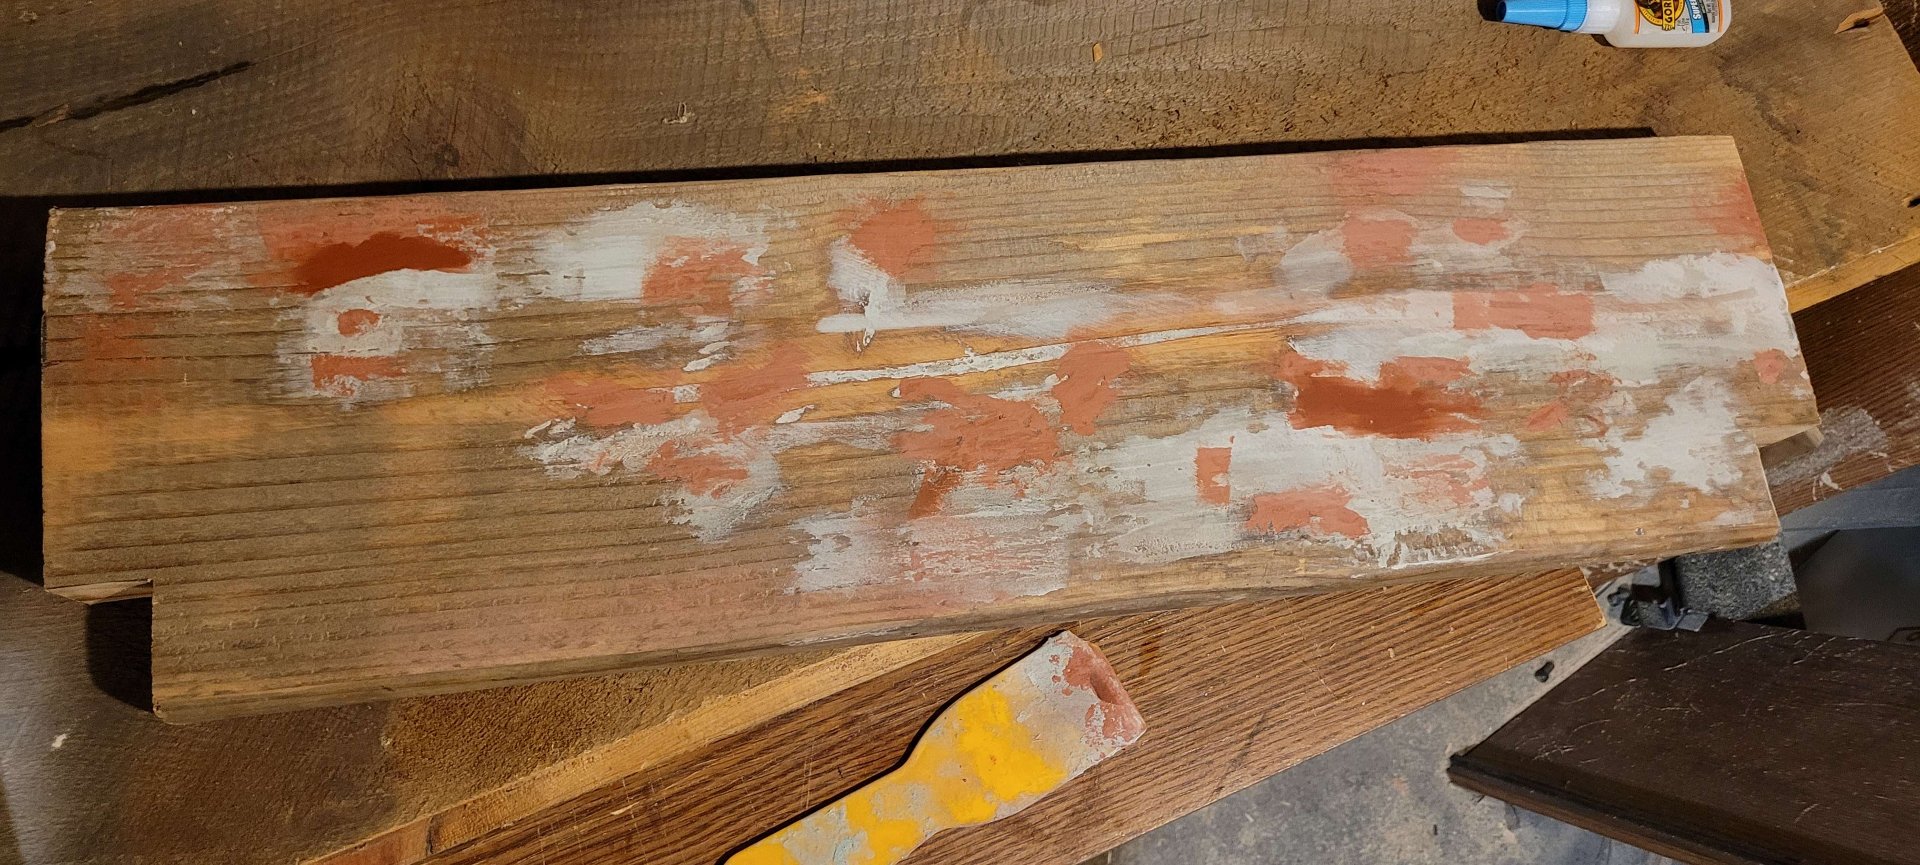
The pieces I'd used as a tabletop were just about perfect, a good height and depth, if you stood them on end. Unfortunately some fool had driven a bunch of screws into them, but that's what bondo is for.
Maybe it seems counterintuitive to start with materials rather than a design, but that's a big part of how I've always made things. I take an inventory of what I have, figure out how it can go together, figure out what kind of designs we can make with that, and work out a list of what else we'll need. I should note we also already had a TV - it belonged to my friend and it was important to them that we use it since it had no input lag (apparently the TV I got secondhand for the previous cabinet did, and that was a problem). So we knew the measurements there and it was compatible with what we had. Maybe it's just where I am, but I've found TVs of an appropriate size for an arcade cab screen to be absurdly easy to get, either from Buy Nothing or my local swap shop.
We now knew the upper limit on the height of the cabinet (as set by the cabinet/table pieces) and the width we'd probably use (based on the shelf pieces). Those were our constraints, so we started talking requirements. My friend is very tall, tall enough that on my more traditionally-shaped arcade cab, the marquee/roof blocks their view and they had to hunch forward to see the screen. The control panel was too low, making the posture problems worse. This would have to be taller in order for it to be comfortable. They wanted to be able to use it at parties, so the screen couldn't be recessed too far into the cabinet (either we'd have to cut the sides away like a traditional arcade cabinet (difficult to get that just right, likely we'd mess up the plastic cladding on the particleboard) or it'd have to be close to the front. They also wanted it to be sturdy. Really sturdy. I really enjoy overengineering things, so I was looking forward to that part.
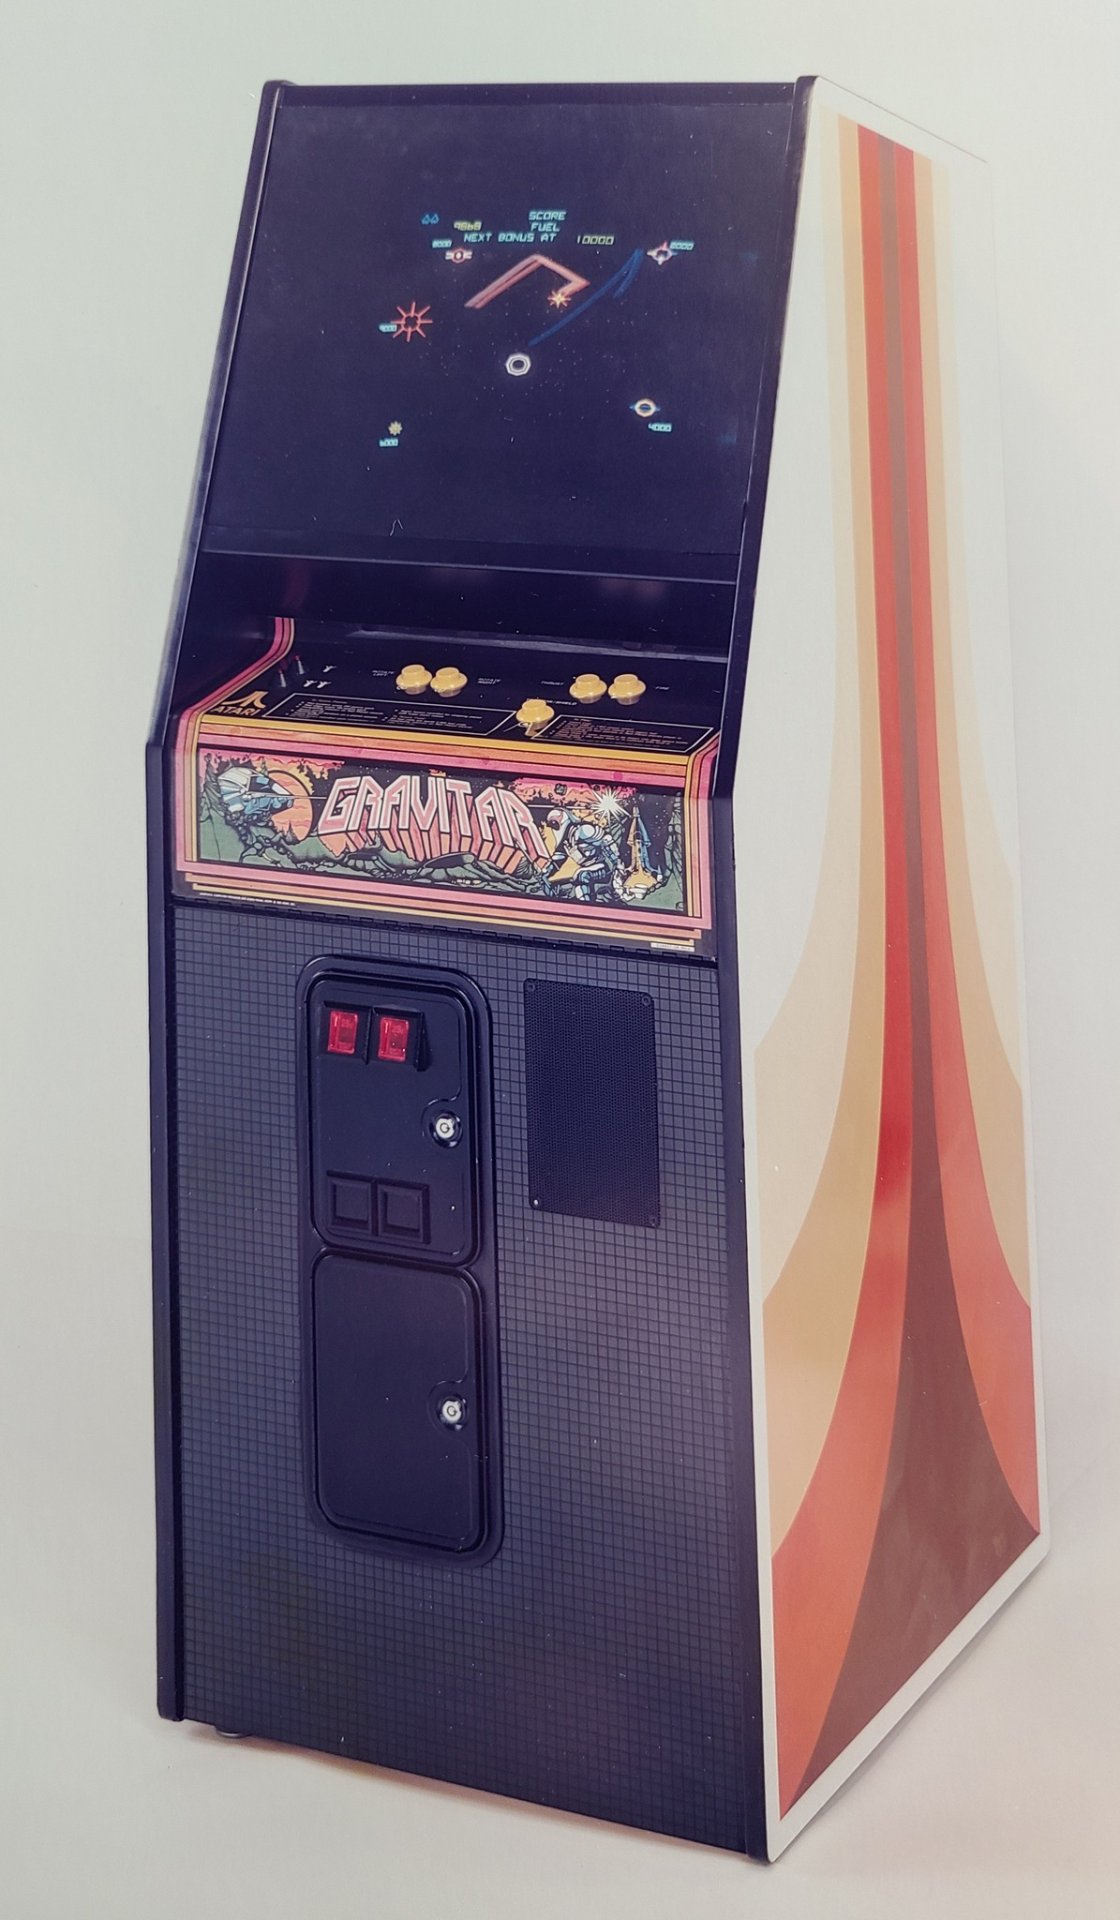
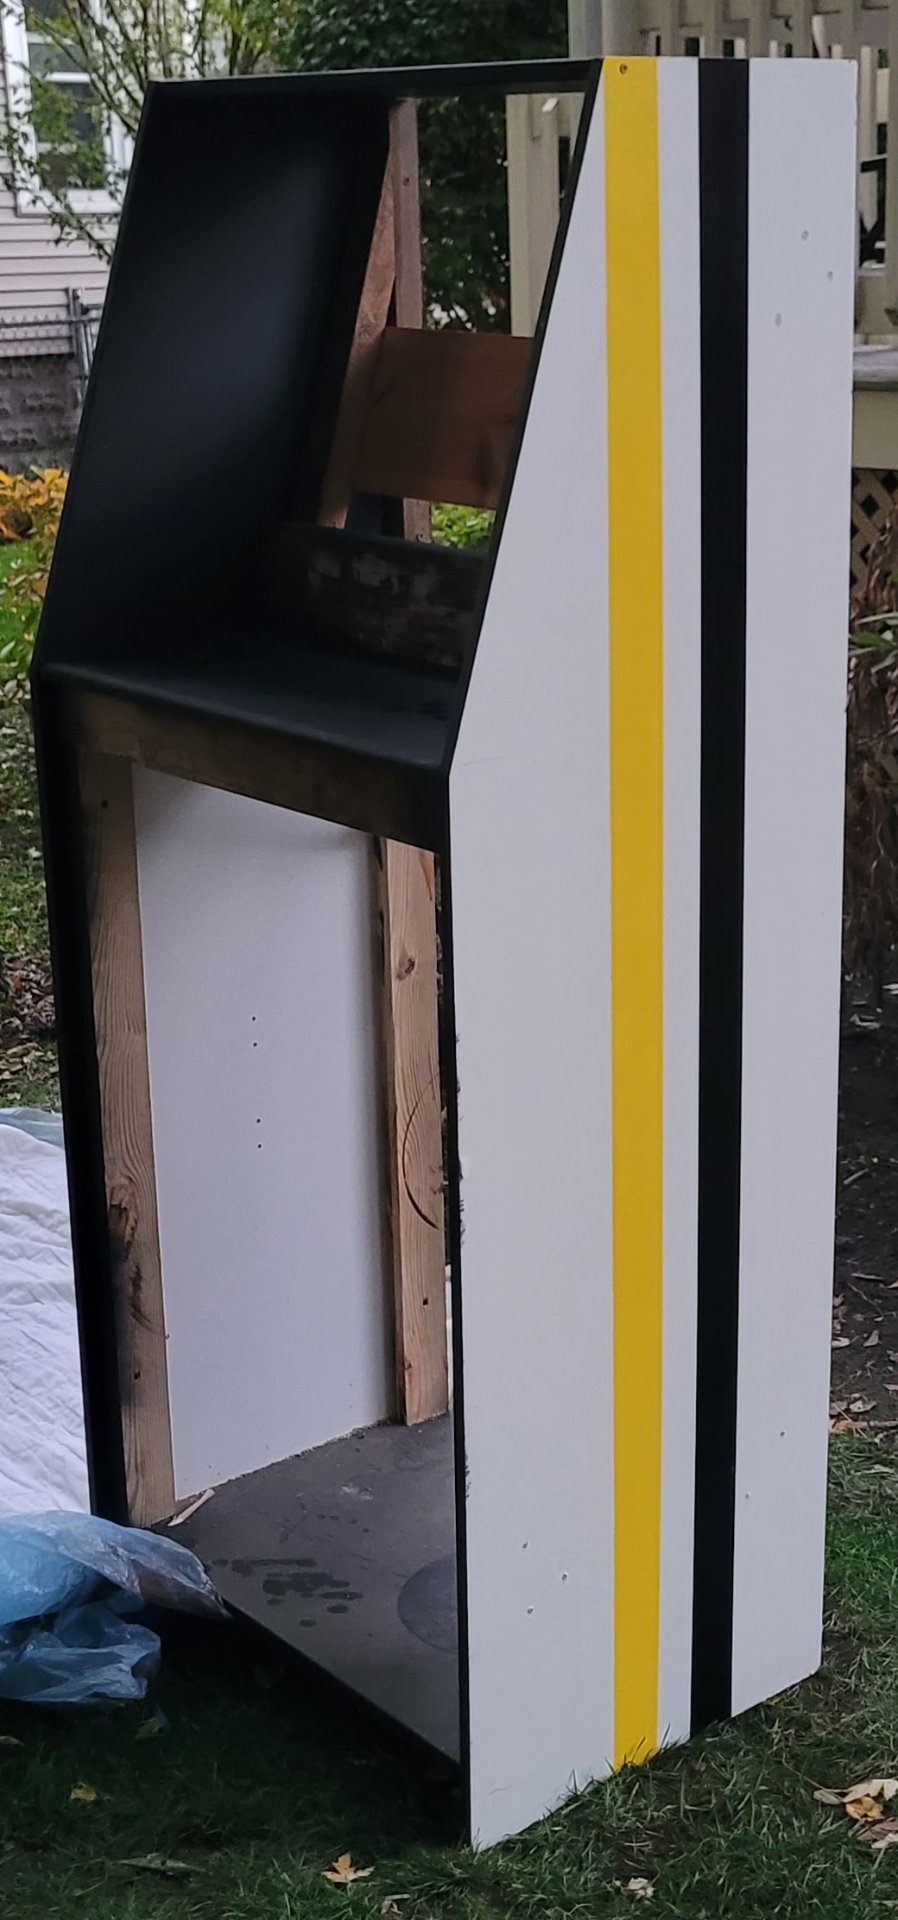
My first suggestion was that we do something based on this Gravitar 'cabaret' cabinet prototype.
I had a few reasons for this: the marquee was below the screen, so the screen and controls could be as high as possible. The screen was closer to the front, so it would be easy for spectators or groups of players to see it from an angle, and the overall adjustments to our side panels would be aggressively simple. Two straight line cuts at a matching angle, that I could do.
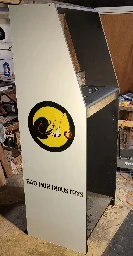
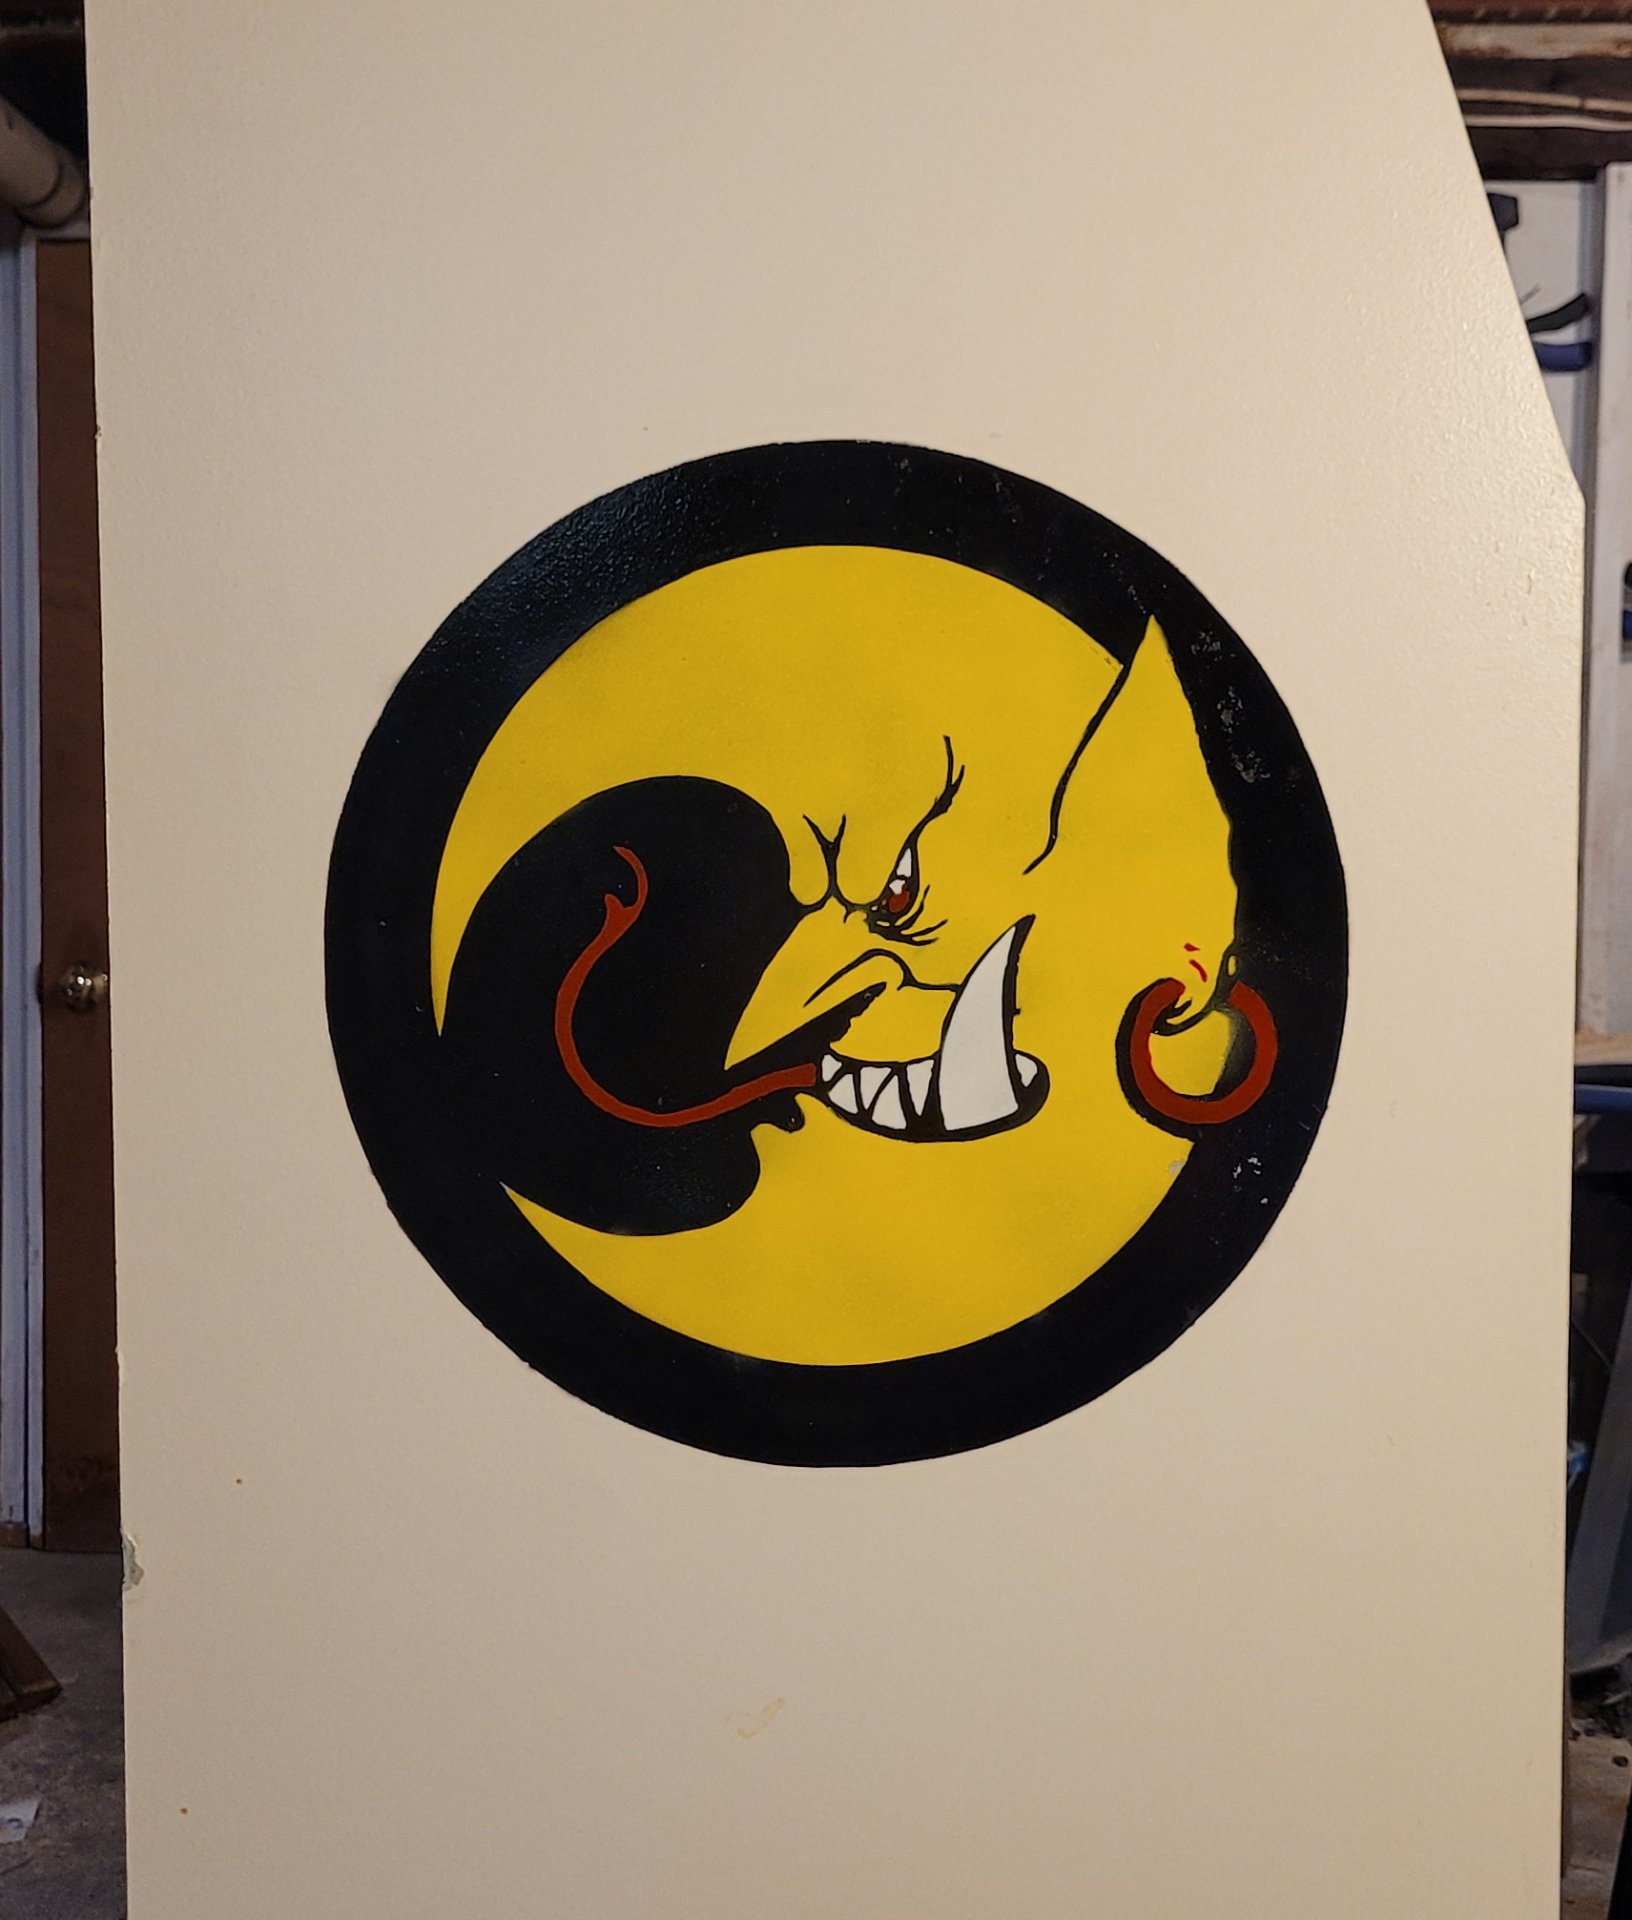
We talked design ideas a bit, as now was the time. We could do a specific game, or something generic (although I've always found the mame and other generic all-videogames themes to be really uninteresting, personally). Perhaps because we were basing our design on an abandoned prototype, they decided to aim for "like we found some weird pirate arcade machine out of time" and they picked the theme 'goblin dive bar' based on our shared love of warhammer.
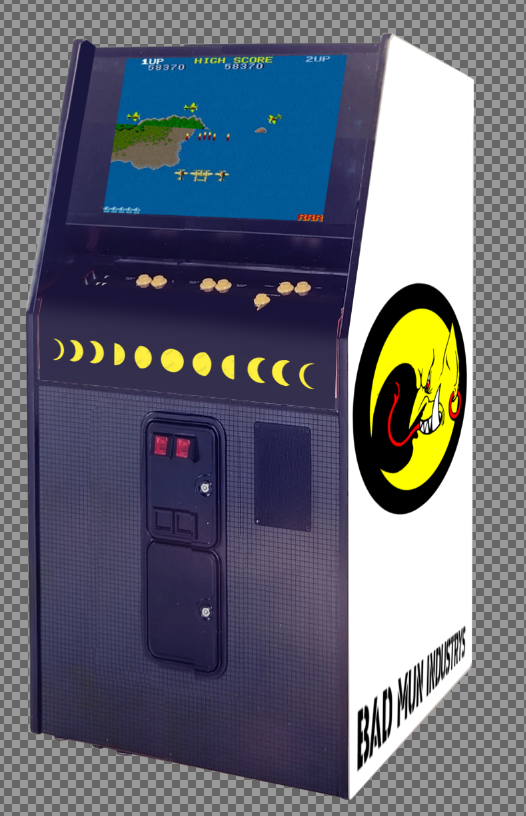
I started drawing up a cabinet design, we talked about a logo and I made this from an old warhammer orks and goblins design:
Many thanks to them for pushing me to make it simpler and simpler. I think that was a good call.
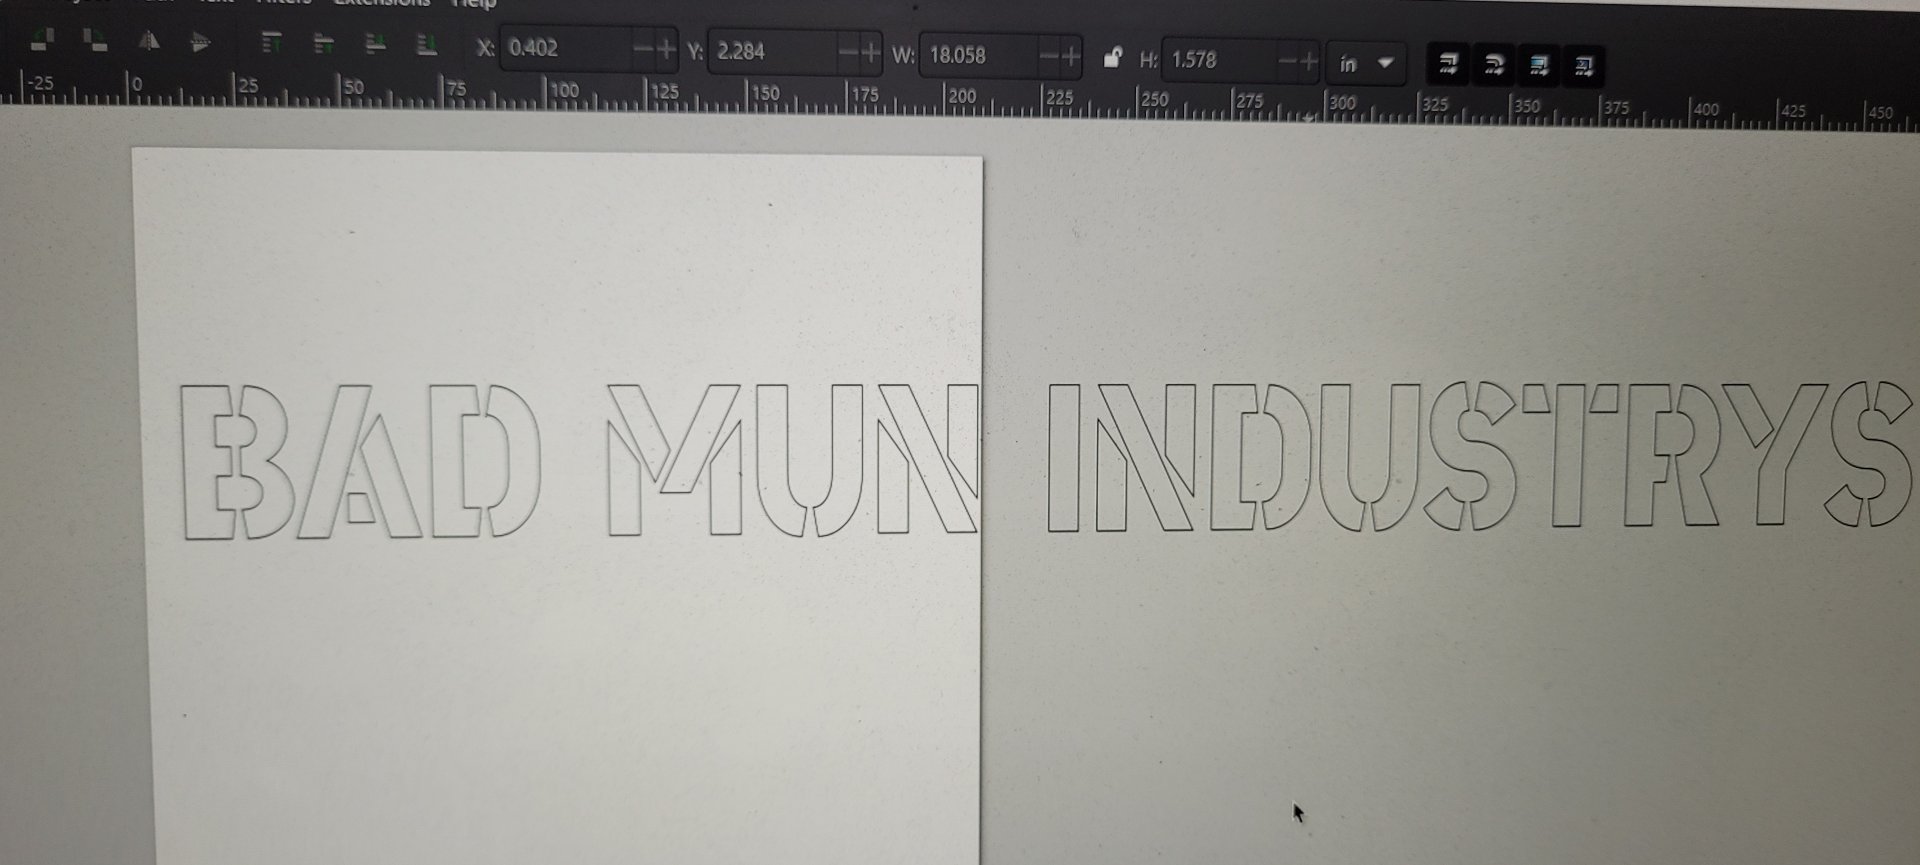
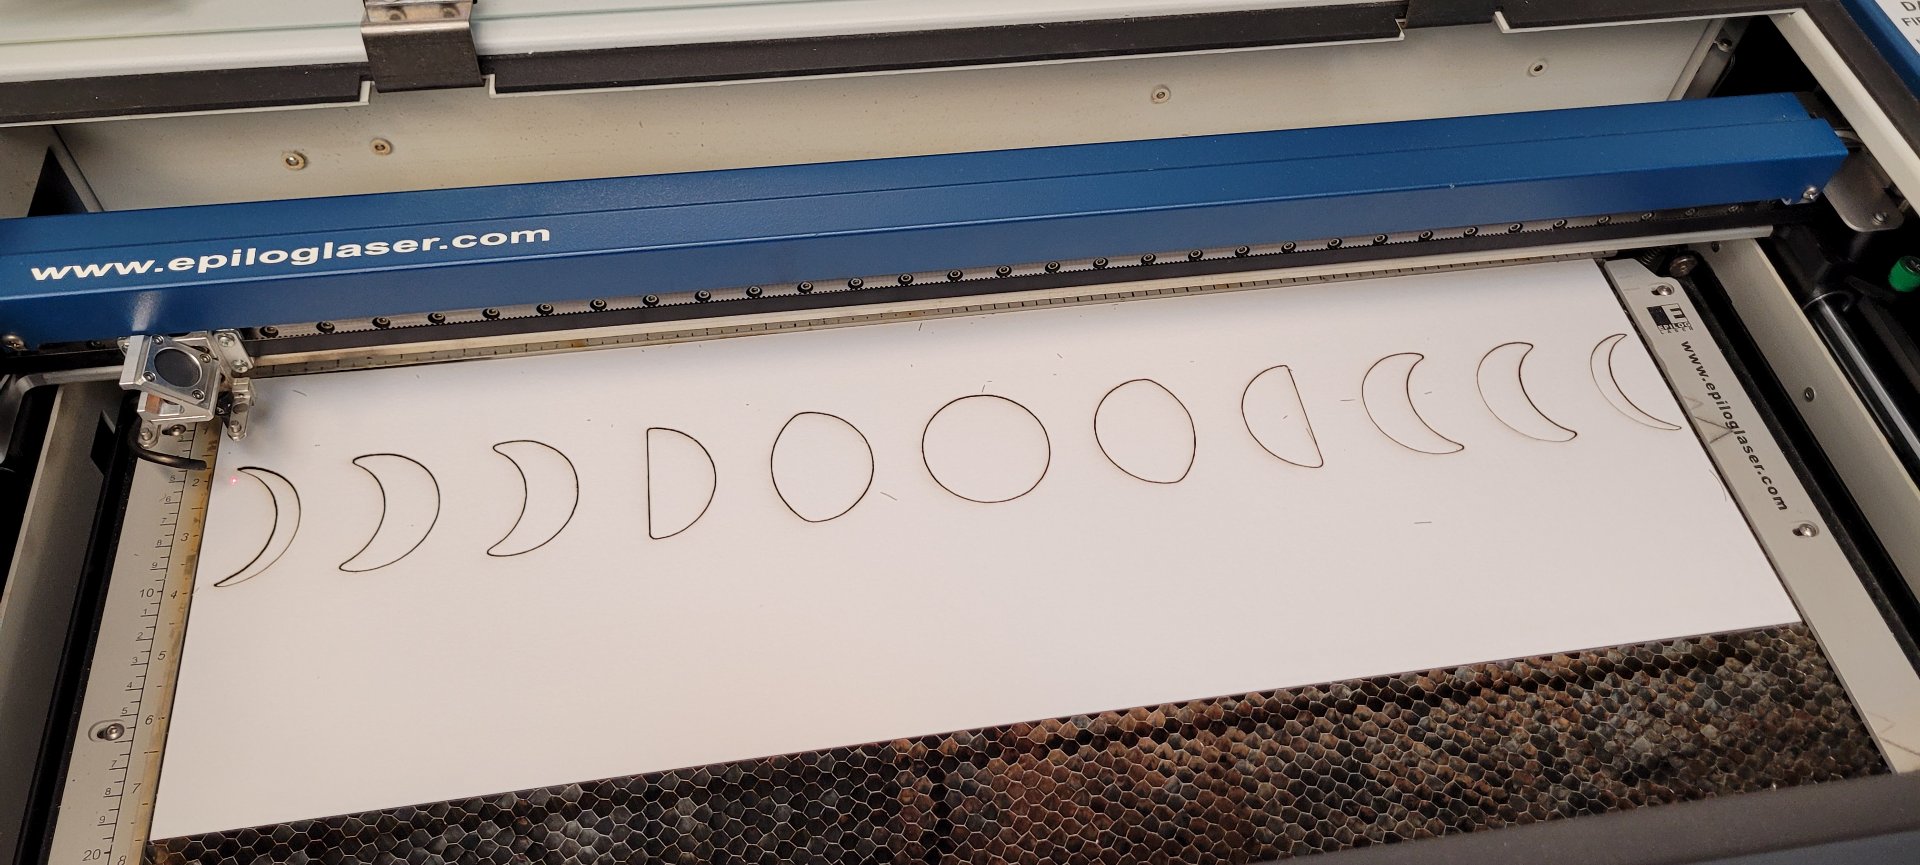
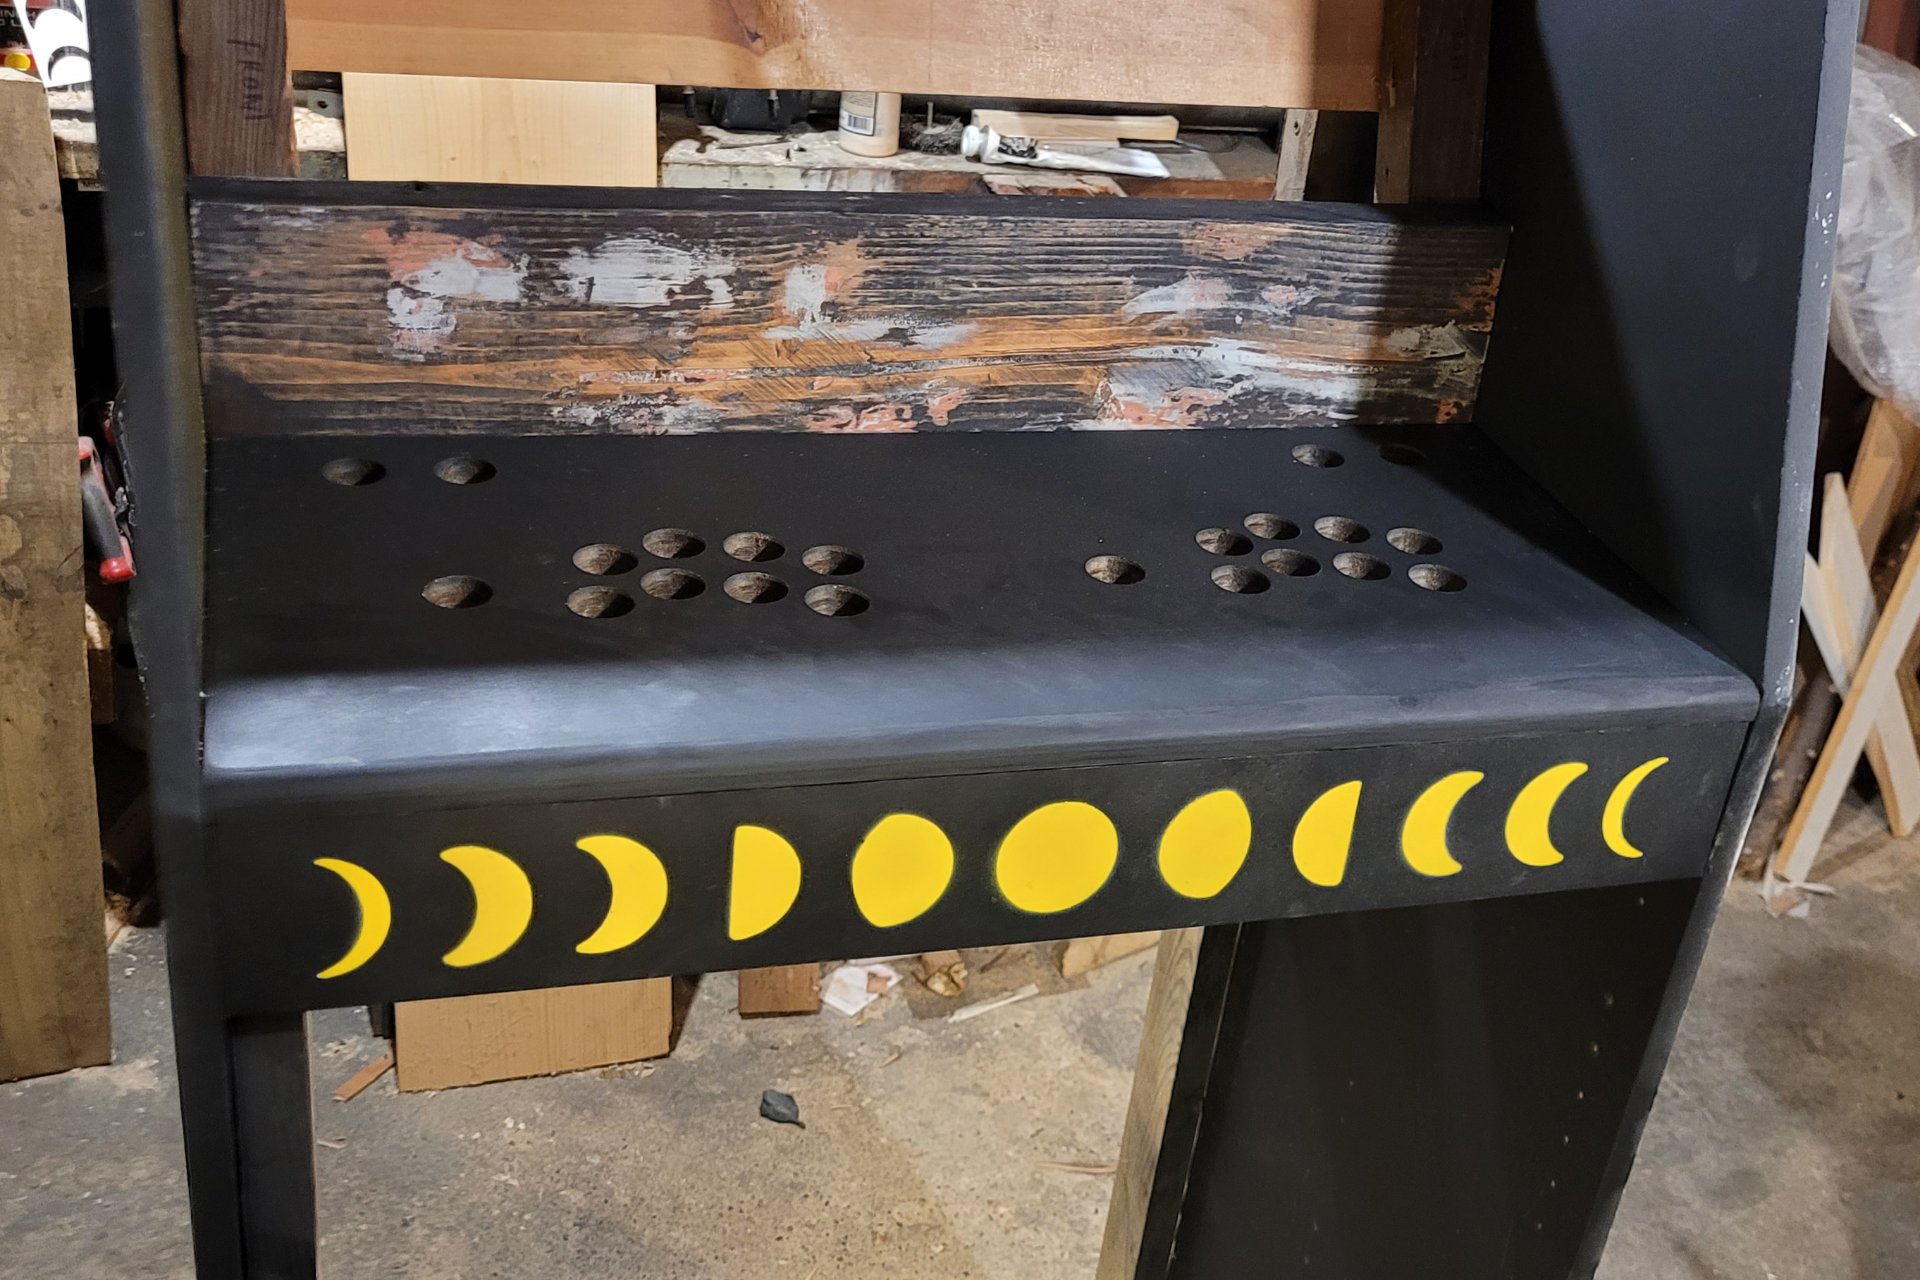
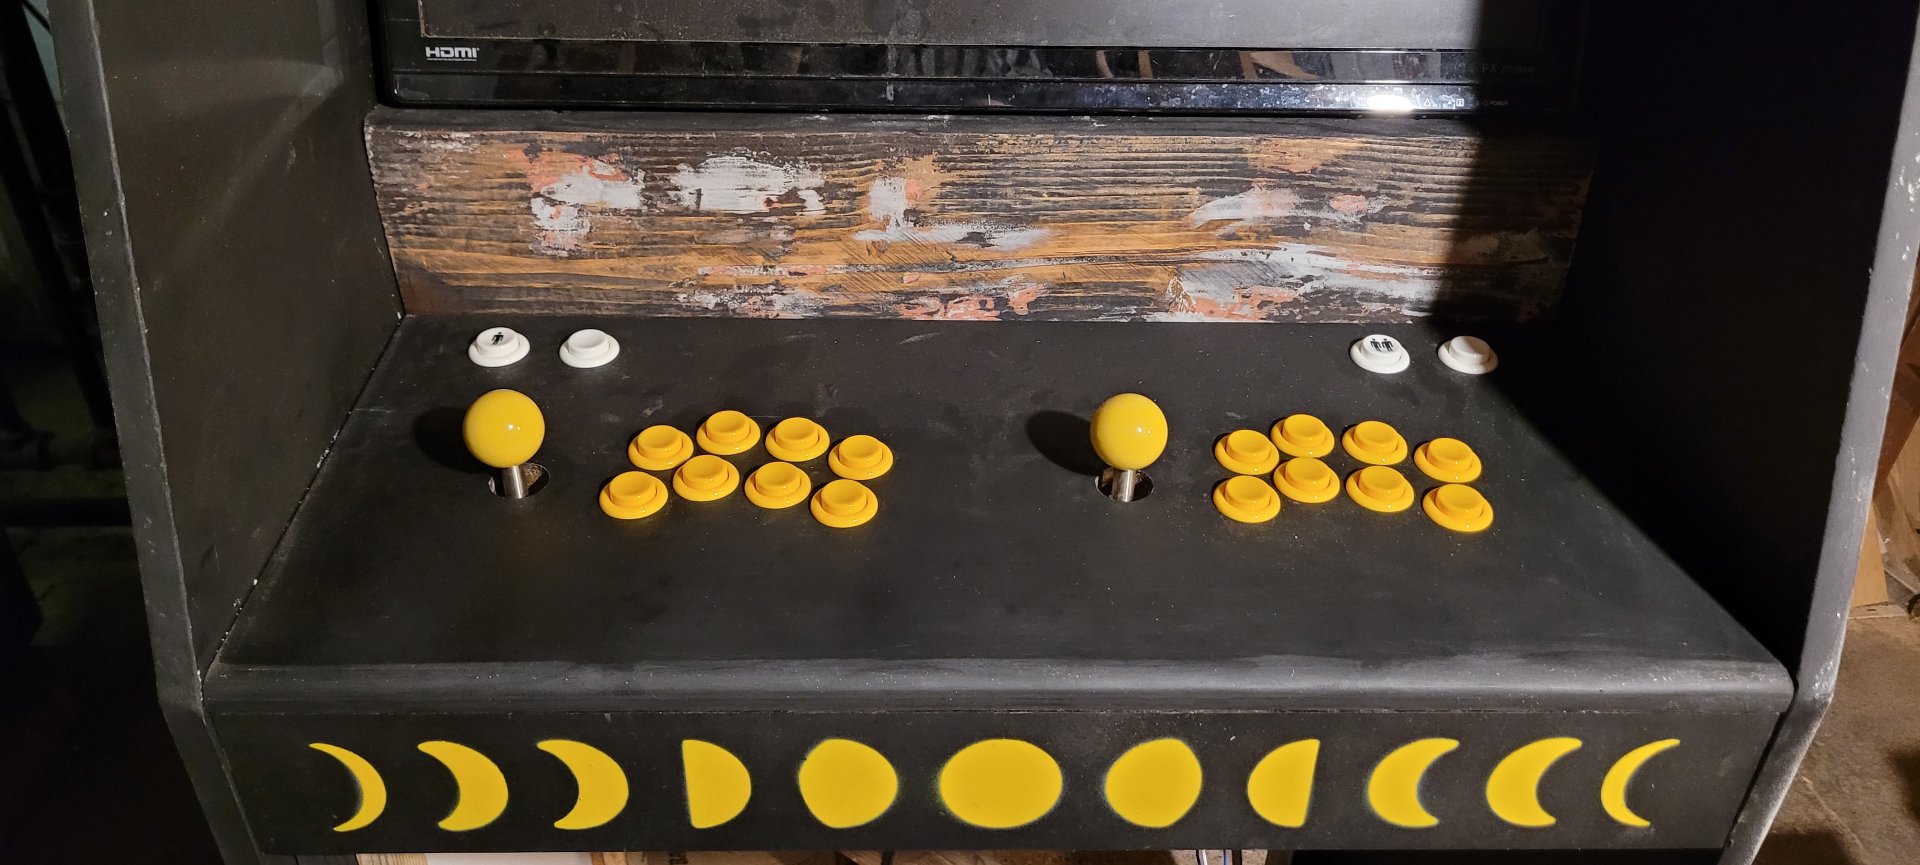
Arcade cabs are a great project because they take at least a little of everything - I really enjoyed the graphic design bit and went on to make stickers to cover it with later. With that figured out, I added a couple other flourishes, the moons on the marquee plate and the yellow buttons. My friend picked the name of the arcade company and we tried some stencil fonts and a layout for the side art.
This is the mockup I gave them. It's pretty hacked together but I wanted to make sure we were working from the same plan.
Once that was done, it was time to start building. My original plan called for a frame of 2x4s forming a cube inside the structure, with 45 braces at every corner, with the sides attached like cladding. In the end that was mostly what we did, but we used some smaller boards for the frame and relied on the sides a little more for the structure.
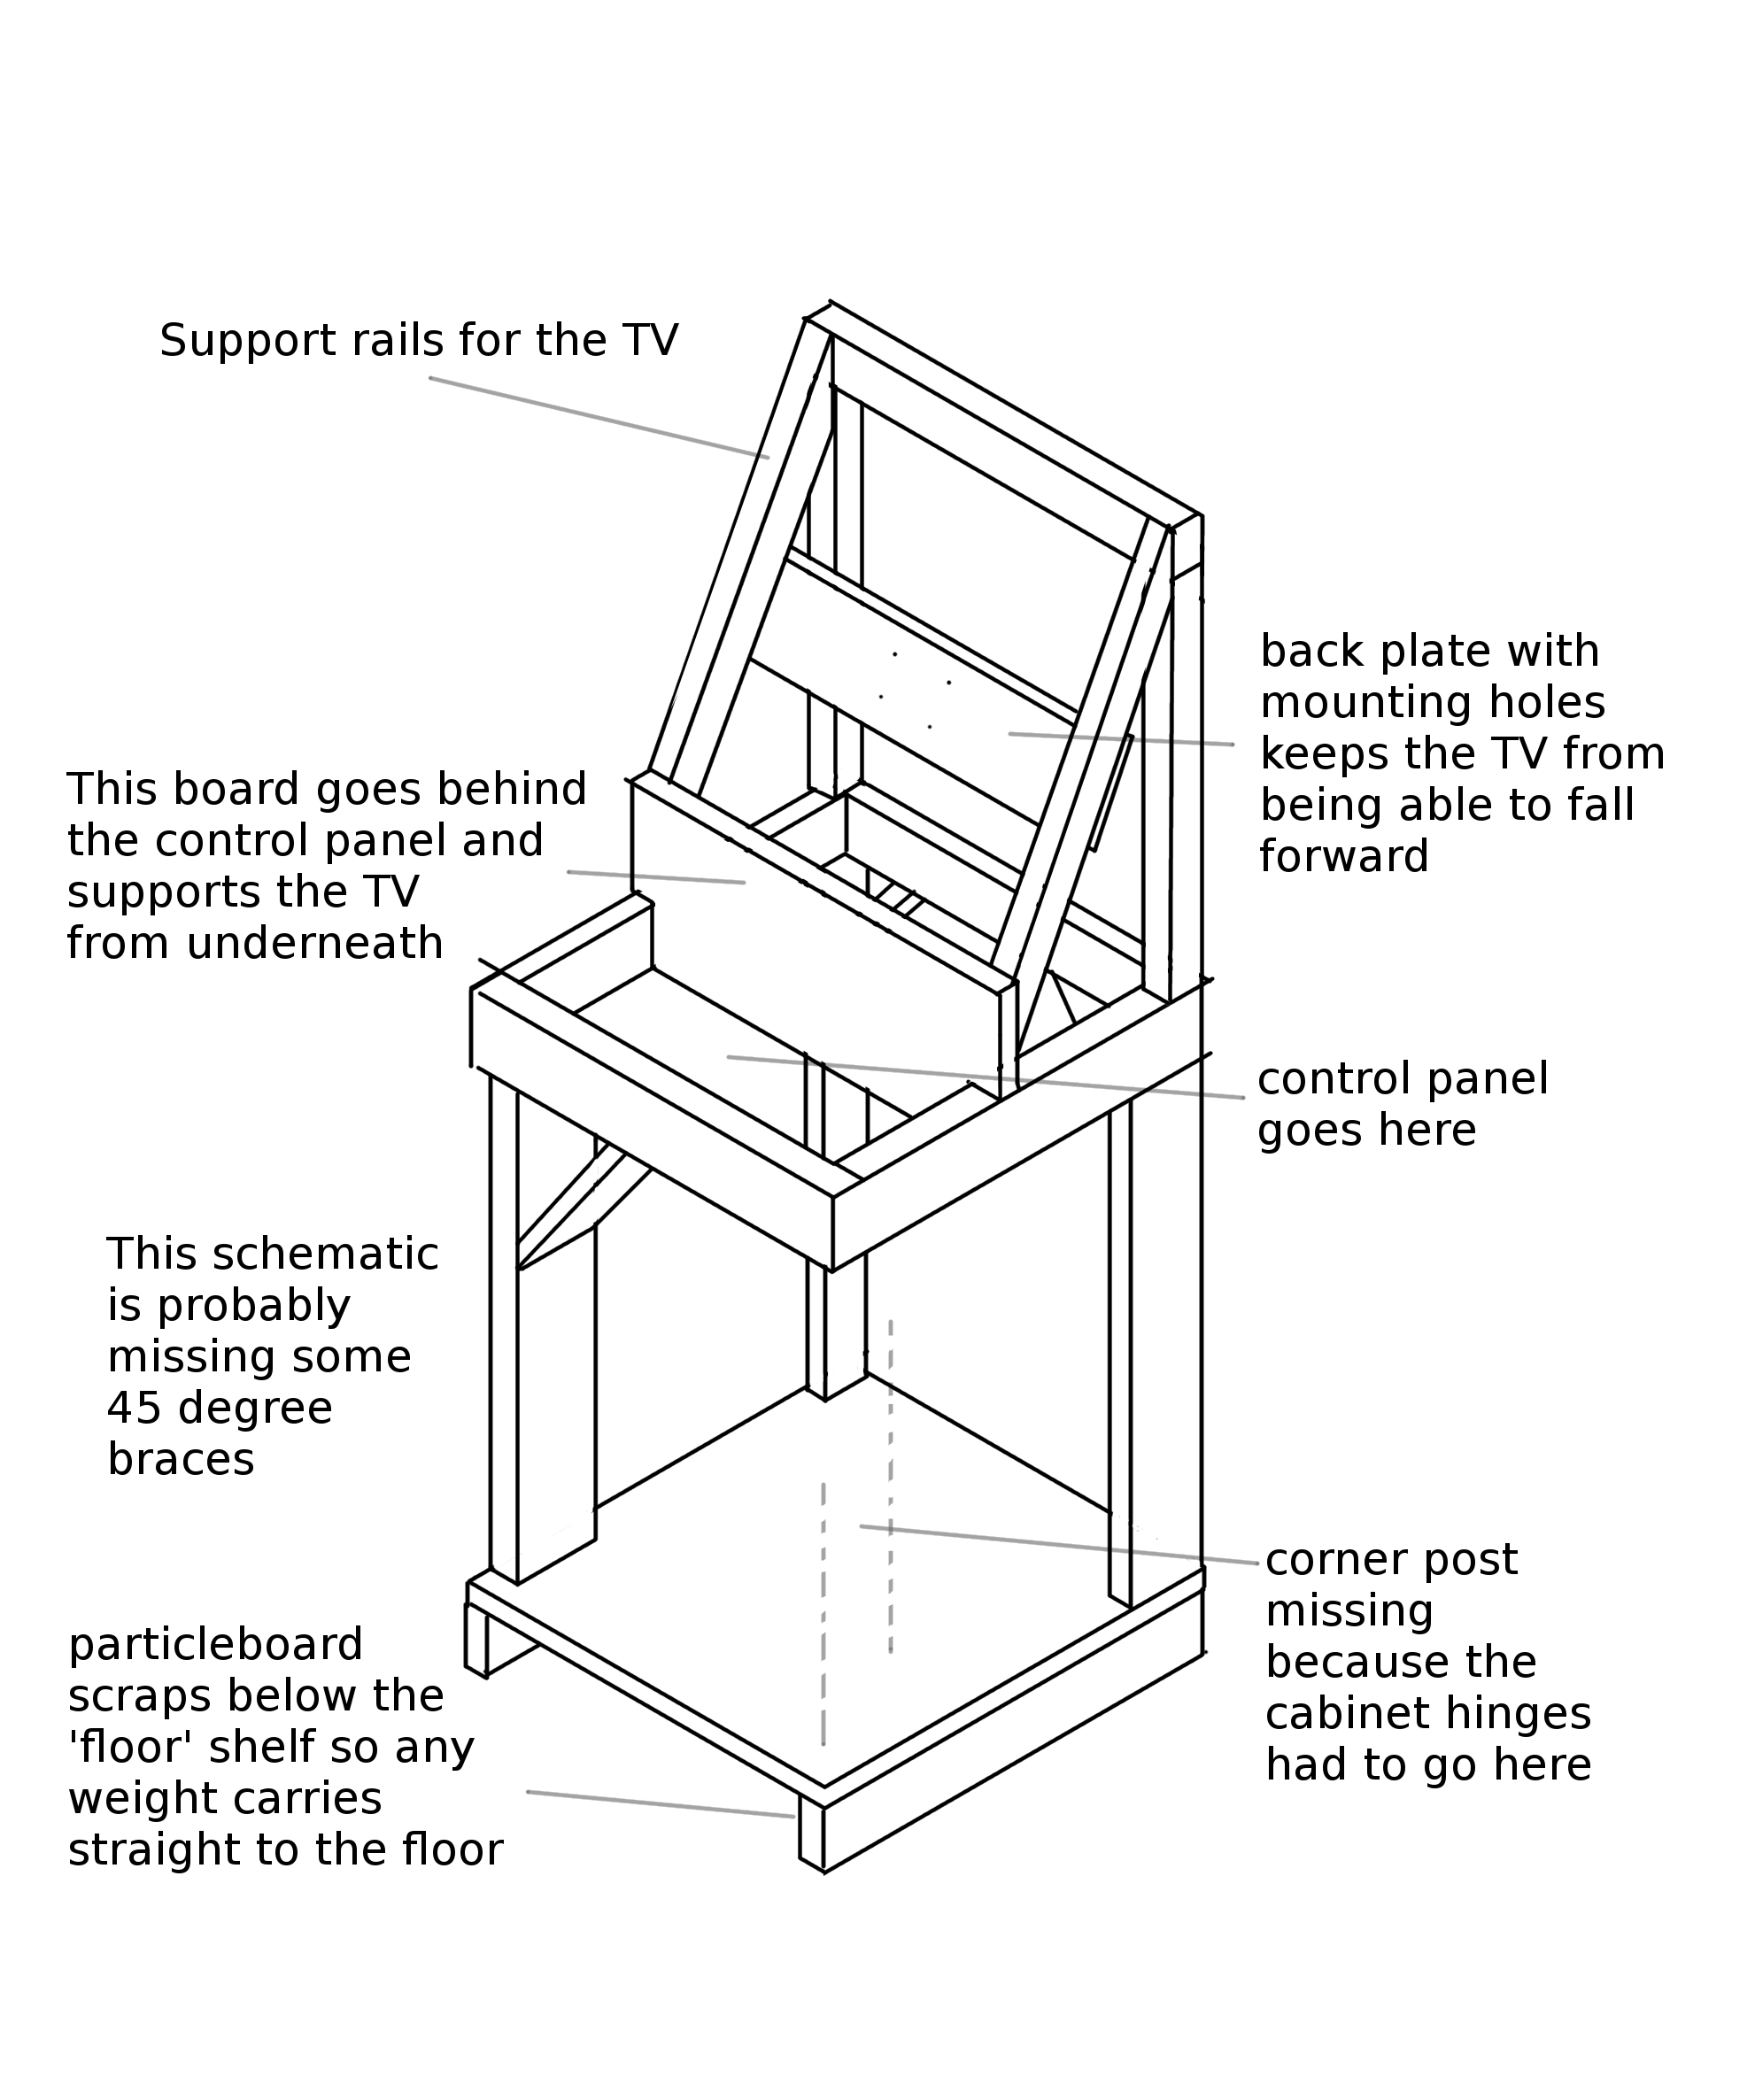
I tried to find my original sketches, but wasn't able to. Either they were on wood I've since used in another project, or they're on some envelope or receipt mixed in with the rest of my detritus. Instead I drew this up from memory and the pictures I have:
This sketch shows all the framing without the sides, front, or control panel. All of this was scrap lumber. The uprights were mostly a 6"x4" pressure treated post we ripped lengthwise on my neighbor's tablesaw (wear a dust mask if you're going to do that), the supports for the TV were scraps of house siding, and the big board supporting the TV was I think a scrap of 2"x12" which had been used as a concrete form and was pretty much garbage as far as materials go even after I scraped off most of the concrete.
We wanted it sturdy, so it had to have an internal frame so it wasn't relying on the particleboard sides for structure. I wanted the control panel in particular to bear its weight through the frame right to the floor. We also screwed everything to the inside of the sides of course, and that on its own was surprisingly sturdy. Lots of 45 degree braces helped to ensure it wouldn't sway or twist at all.
The TV frame was an improvement over my last design. On that one, the flatscreen sort of just rested in place on some rails. This time I wanted it to be fastened in place - after all, we were going to have to move this to my friend's place, and then they'd be moving it from apartment to apartment (and they since have, with no problems!).
I don't have a ton of pictures from early on (I never think to take any until it starts to look like something). Here's one from while we were trying to make that 2"x"12" look better with bondo. Even once it was sanded smooth it still looked bad enough painted that I eventually cut a piece of plywood as cladding to cover it.
!2x12
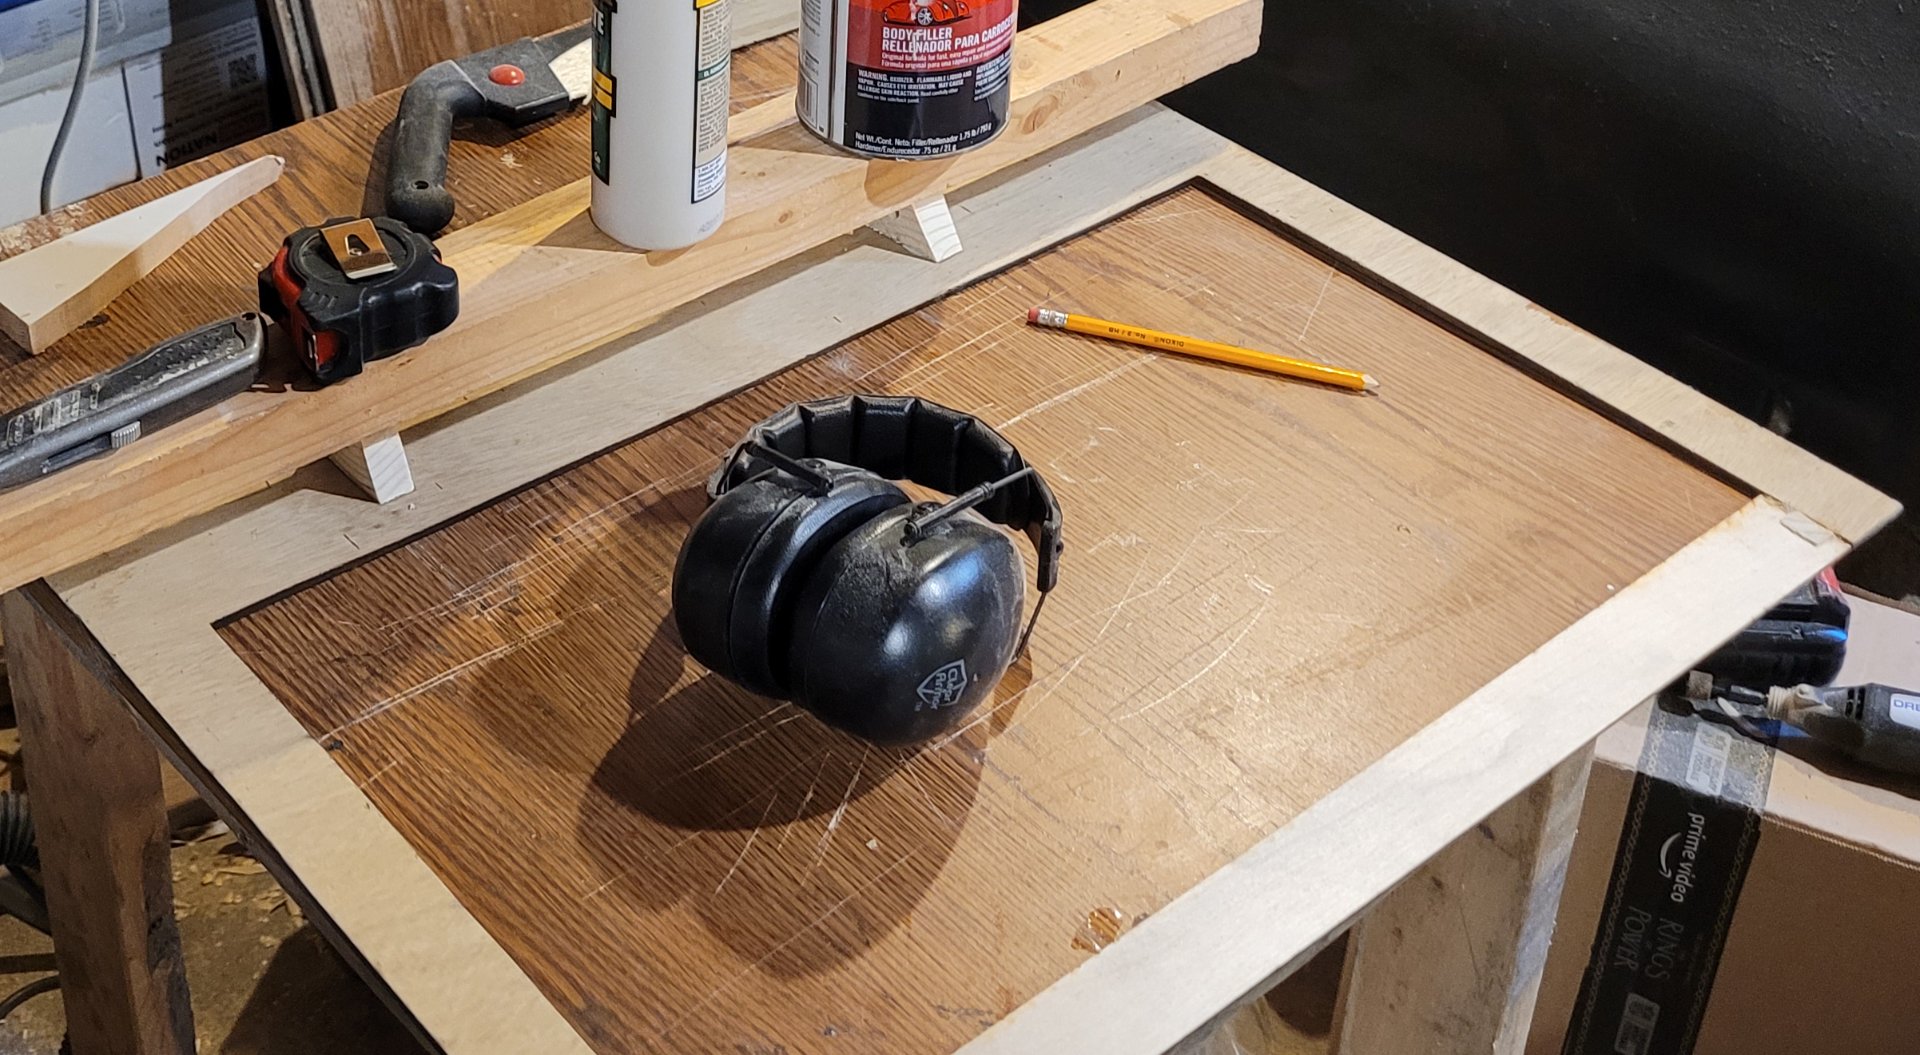
We made the control panel from a piece of 1"x14" composite pine I got from a disassembled ikea bookshelf I found on trash day. When I was working on the last arcade cab, I asked around on our Buy Nothing page and met a professional woodworker who had a large table router (this is before I got my little one). He helped me rout a round edge onto my control panel (plus a spare in case I messed up drilling the holes for the buttons) and to cut a slot I used for the marquee.
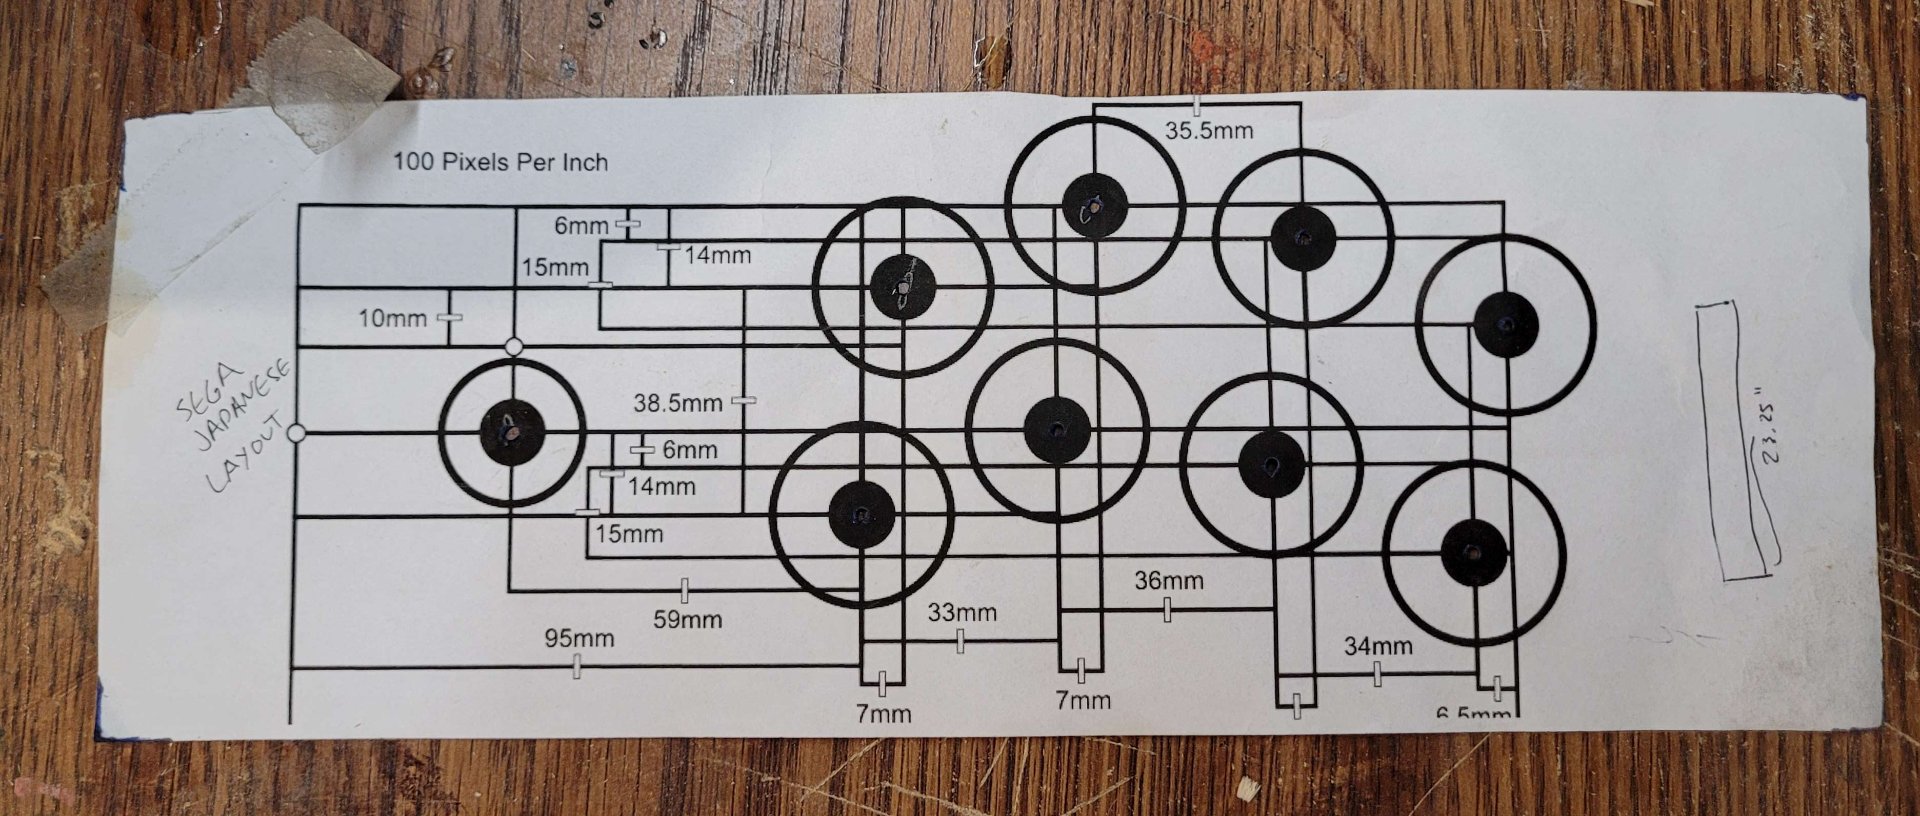
My friend and I used my spare to make their control panel. They picked the layout using some more lessons learned to improve on my first one, opted for the same sega layout I picked (found here) and we drilled the holes. They opted for a nicer set of authentic mechanical buttons and joysticks than the cheap kit I'd used the first time around, and I think that was a great call. Those buttons are also useful in other electronics projects.
We also filled in the front cut edge of the particleboard sides with bondo and sanded it smooth.
Once we had the basic structure and made sure the TV could fit, it was time to paint it (while the weather was good).
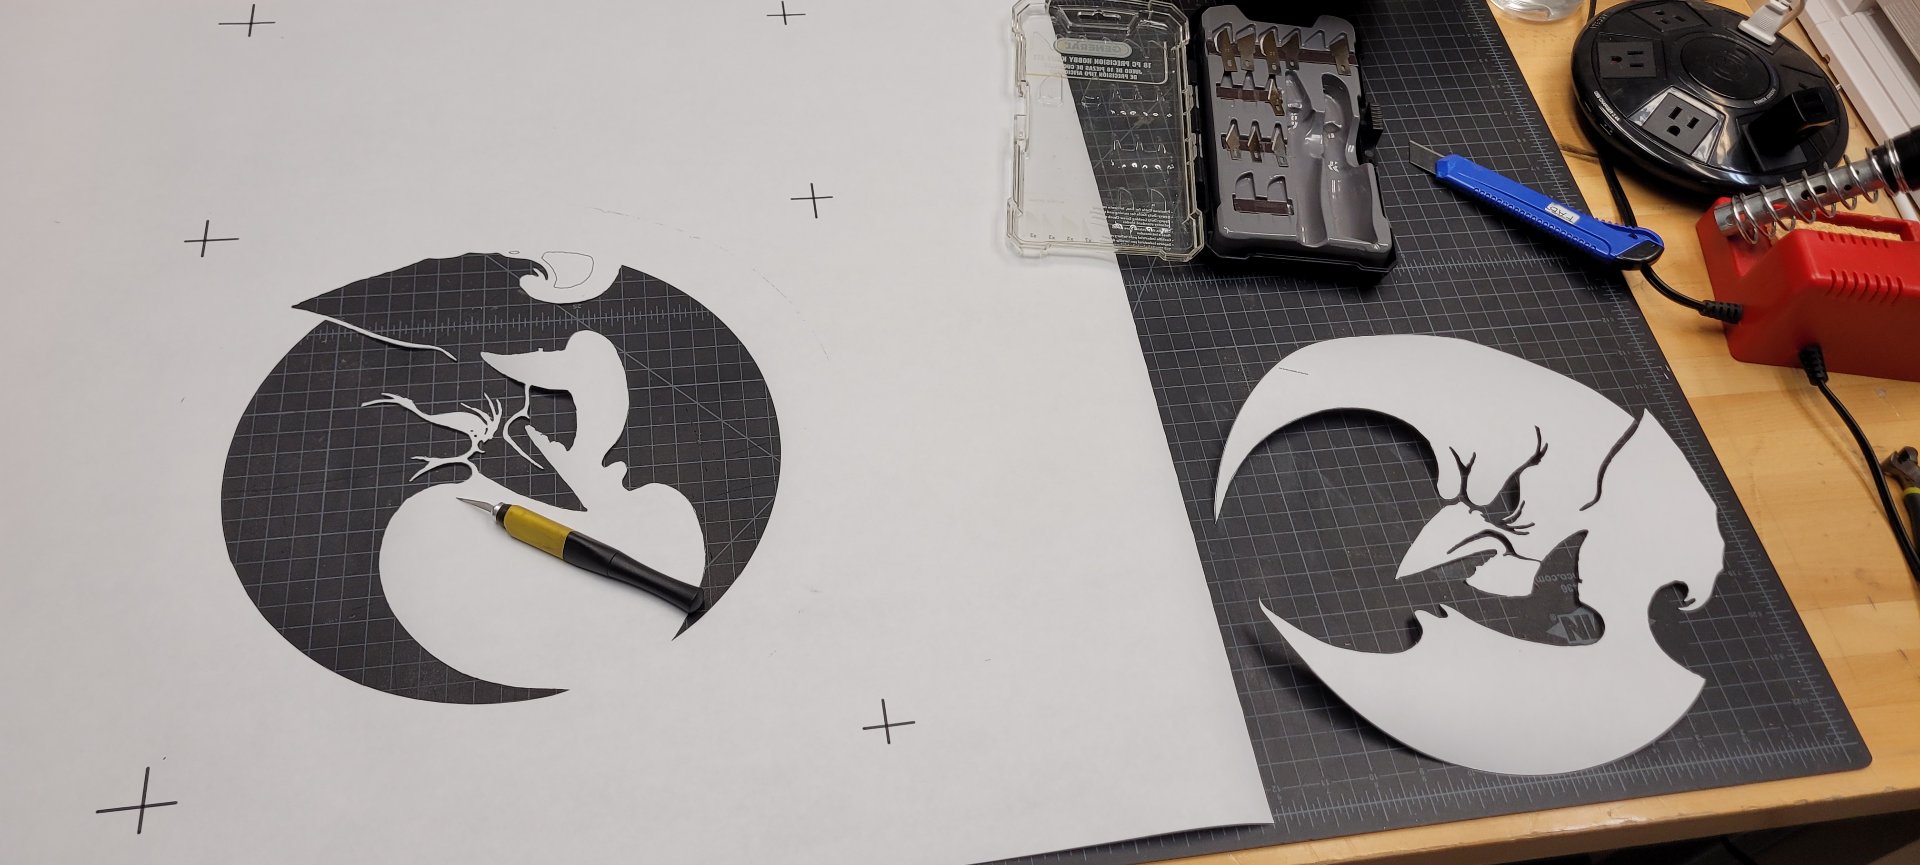
For this I printed out a large stencil at the local makerspace and cut it out by hand.
This was a large but simple four-layer stencil (black circle, yellow, red, white) so cutting it out took no time at all. Unfortunately, the only paper available for the plotter printer was super flimsy, and that would be a pain later on.
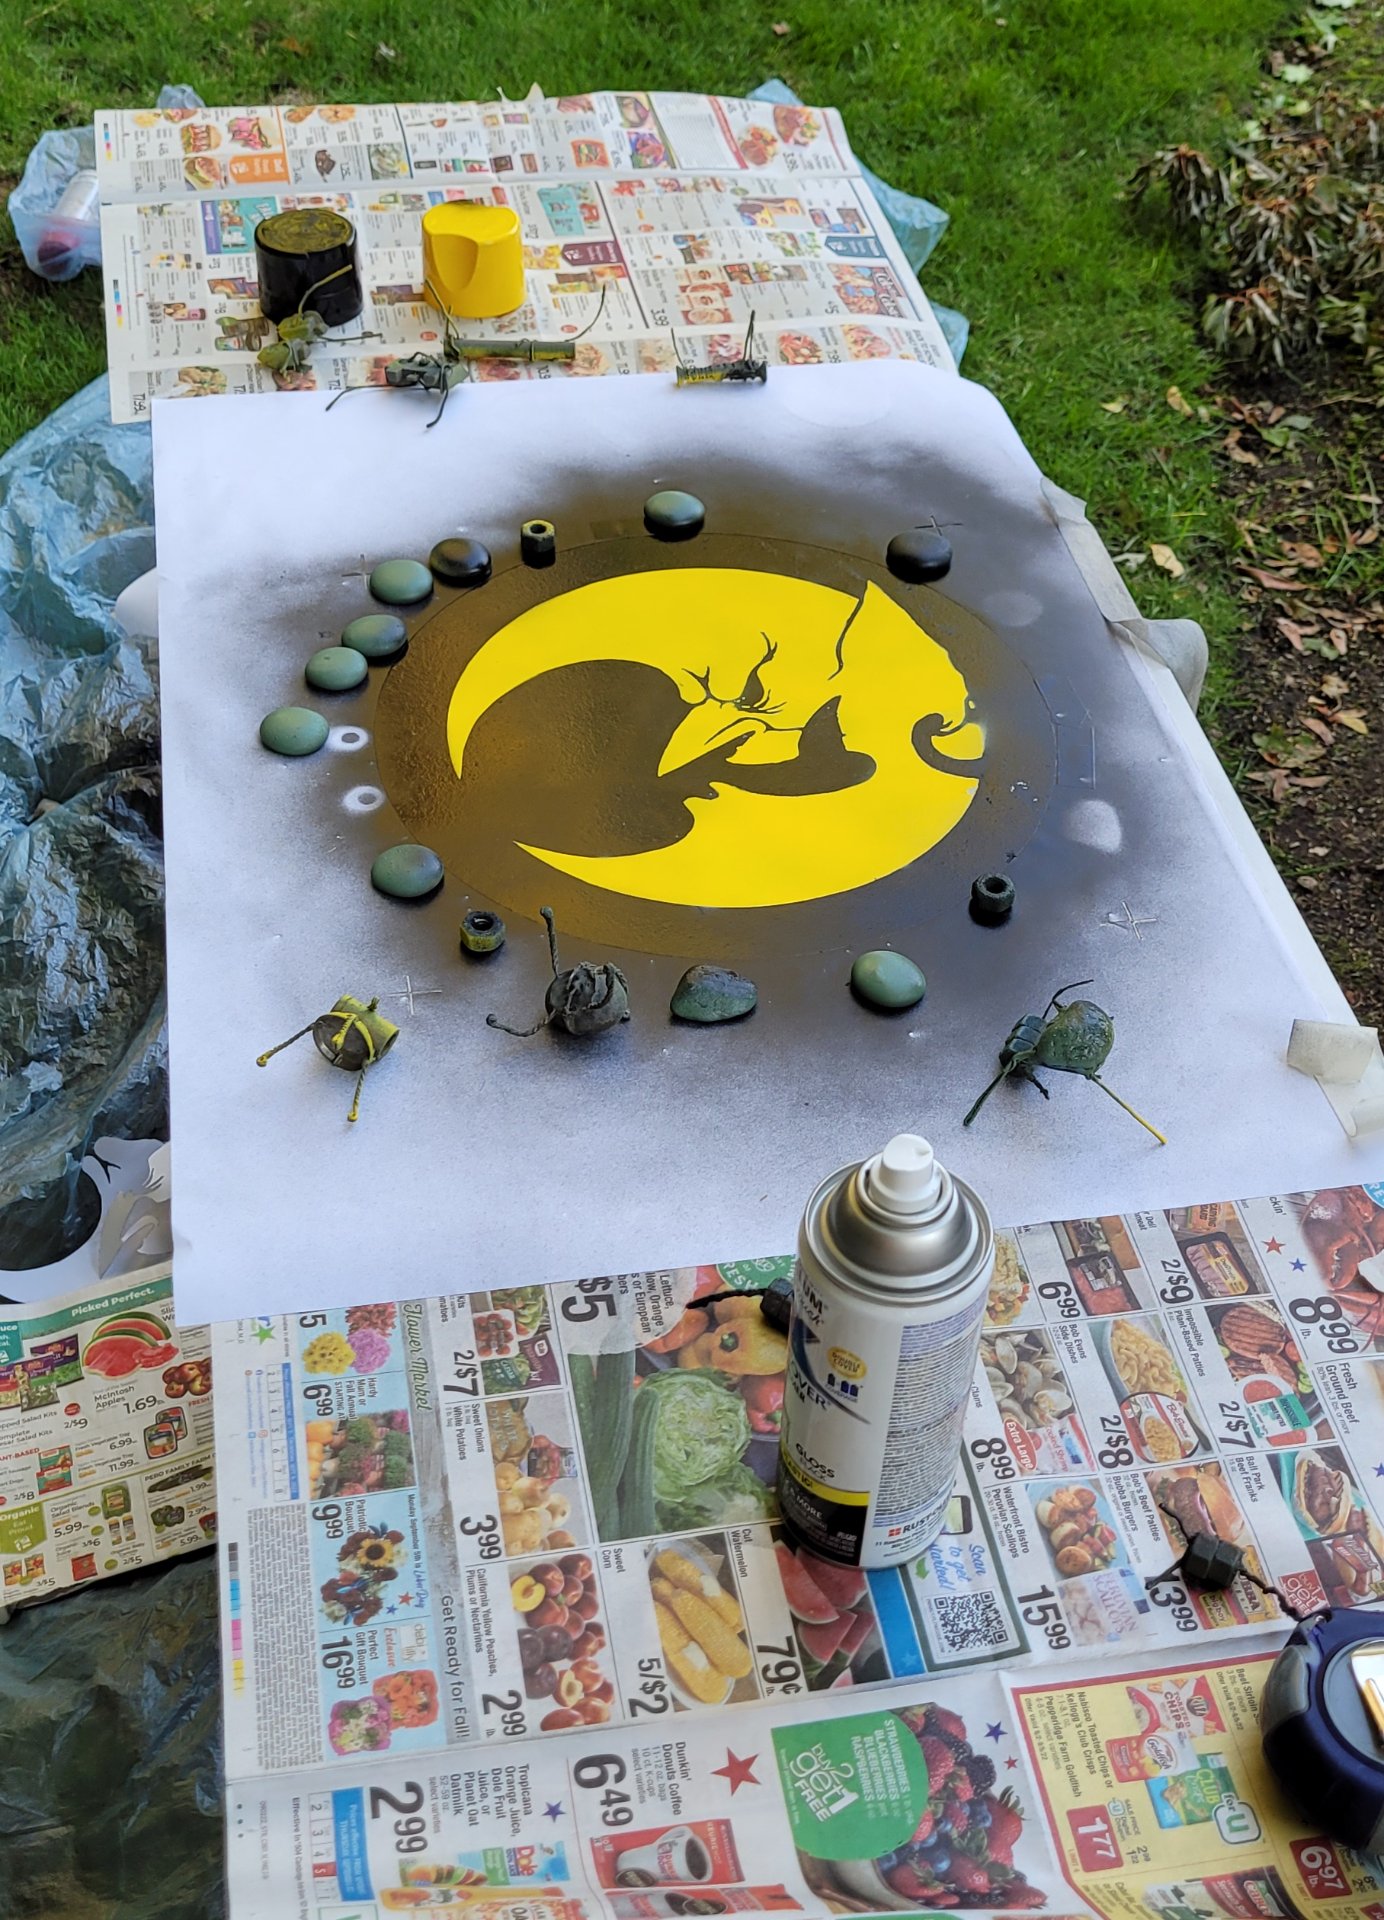
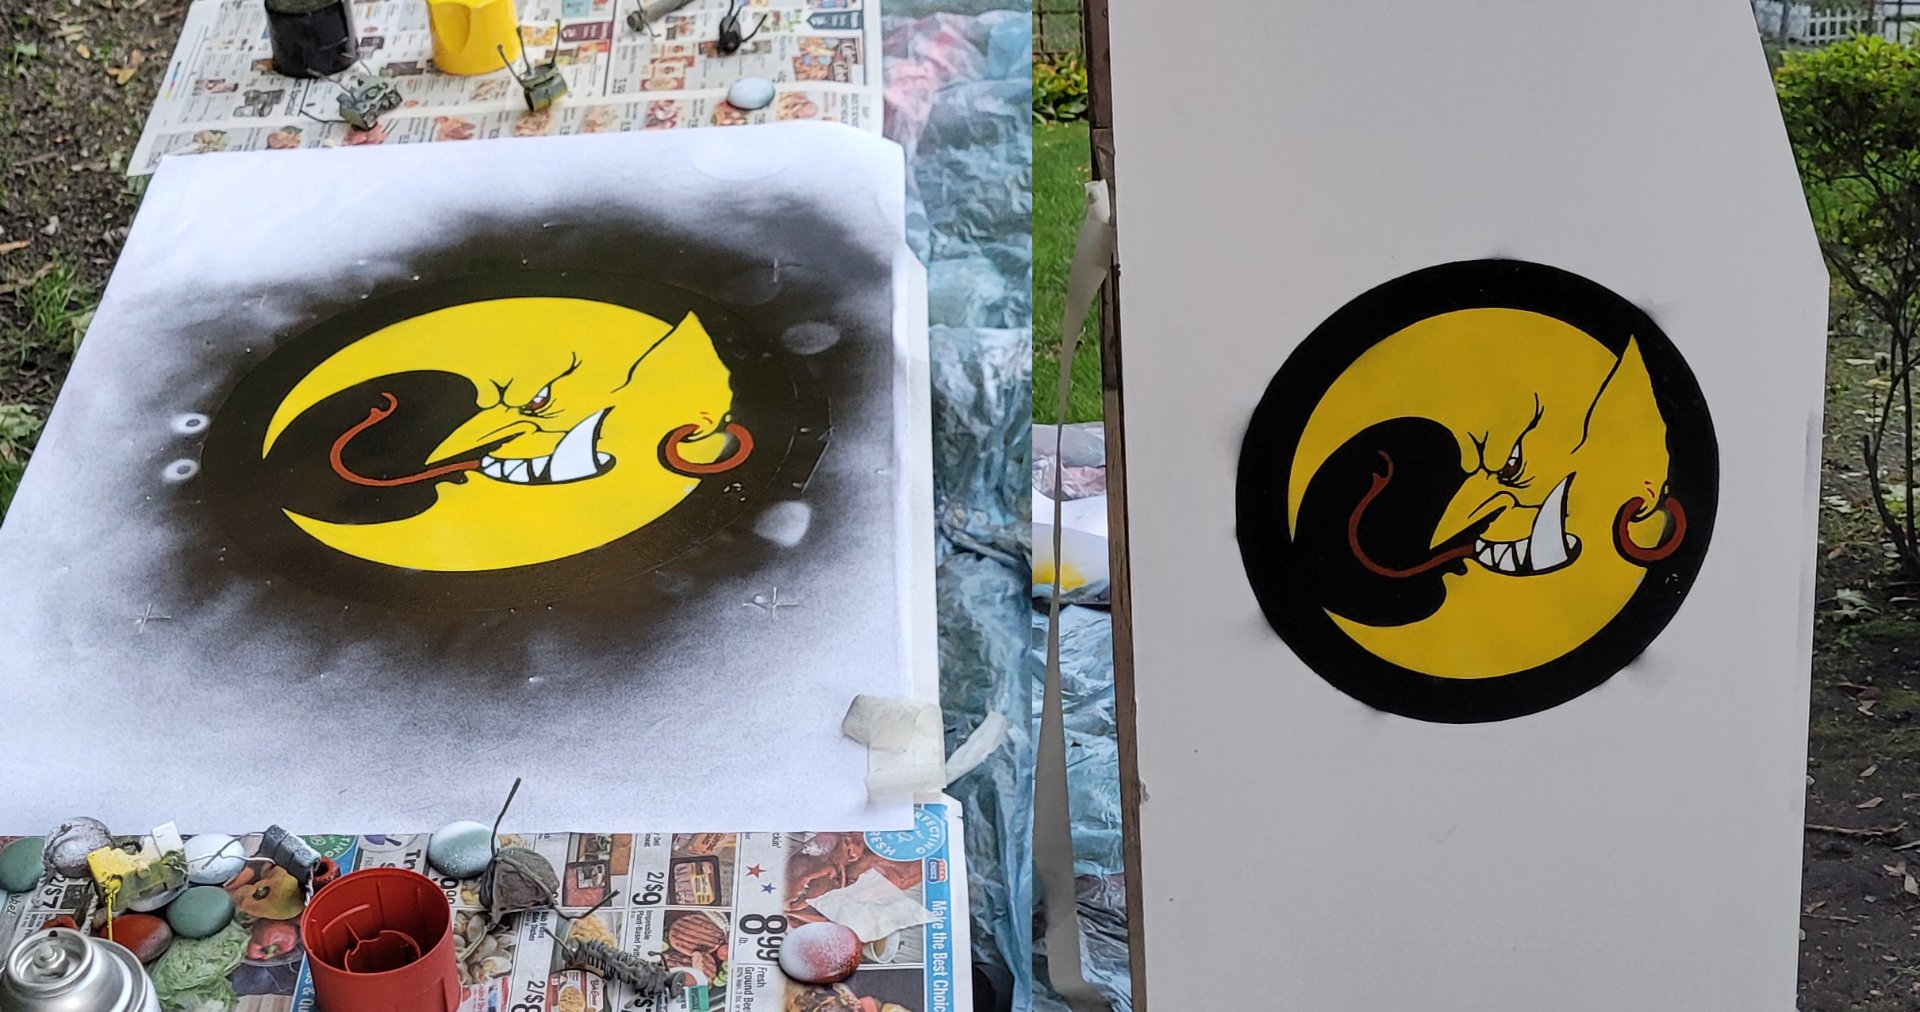
For the first paint session we only did the round logo. We weren't sure we'd be able to do both sides, so we started with the one which would face the room (this side also got the best particleboard). We had a bad combination of elements here - flimsy paper and because I couldn't find my good artist's yellow spray paint, we were stuck with some generic watery hardware-store-brand spray paint with the approximate thickness of kool-aid. We had to paint the black circle, paint the stencil of the moon with white, then use the yellow over that. By then the stencil had warped and in some places stuck, so the black layer was messed up with underspray and missing paint. Luckily we still had the 'negative' from the stencil, so I used that to protect the yellow while I fixed the black. Then we did the white and red.
All of that was a mess and I wouldn't recommend it as a strategy. It was one of the worst ways I've had a stencil project go, but the end result wasn't bad.
And in a second lucky break, because it was sprayed onto particleboard, it actually cleaned up pretty well with isopropyl alcohol.
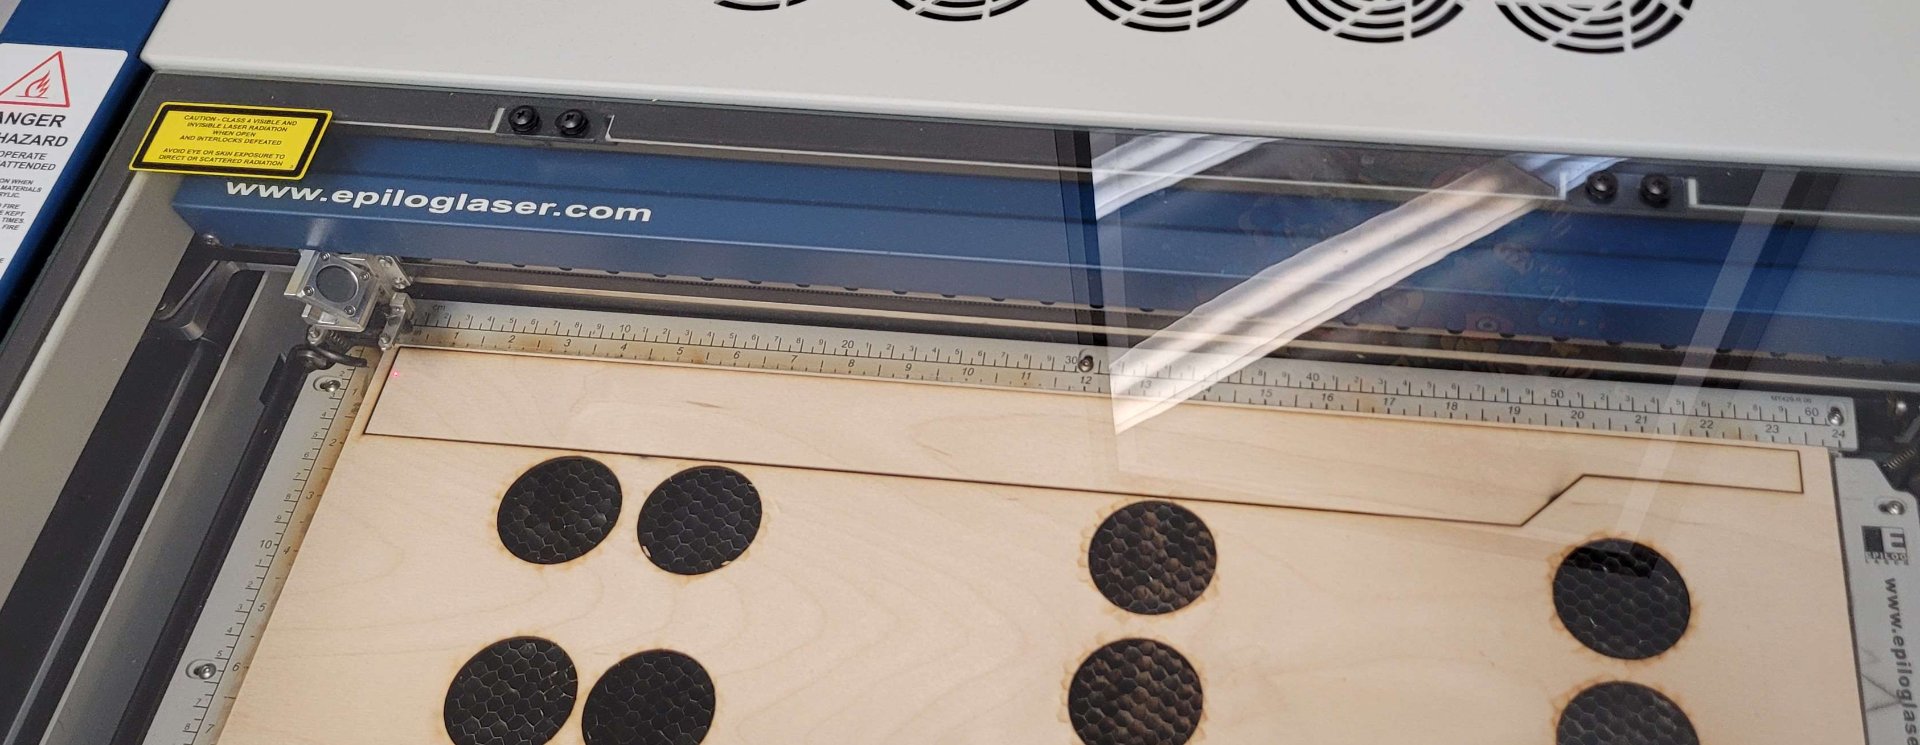
The finishing touch for that side, the company name, was comparatively easy. dimensionally it just fit inside the laser cutter, so we used that to cut it out of cardstock.
!the stencil design converted to vectors
I think we even painted this one on indoors (another bad idea but the cab was heavy).
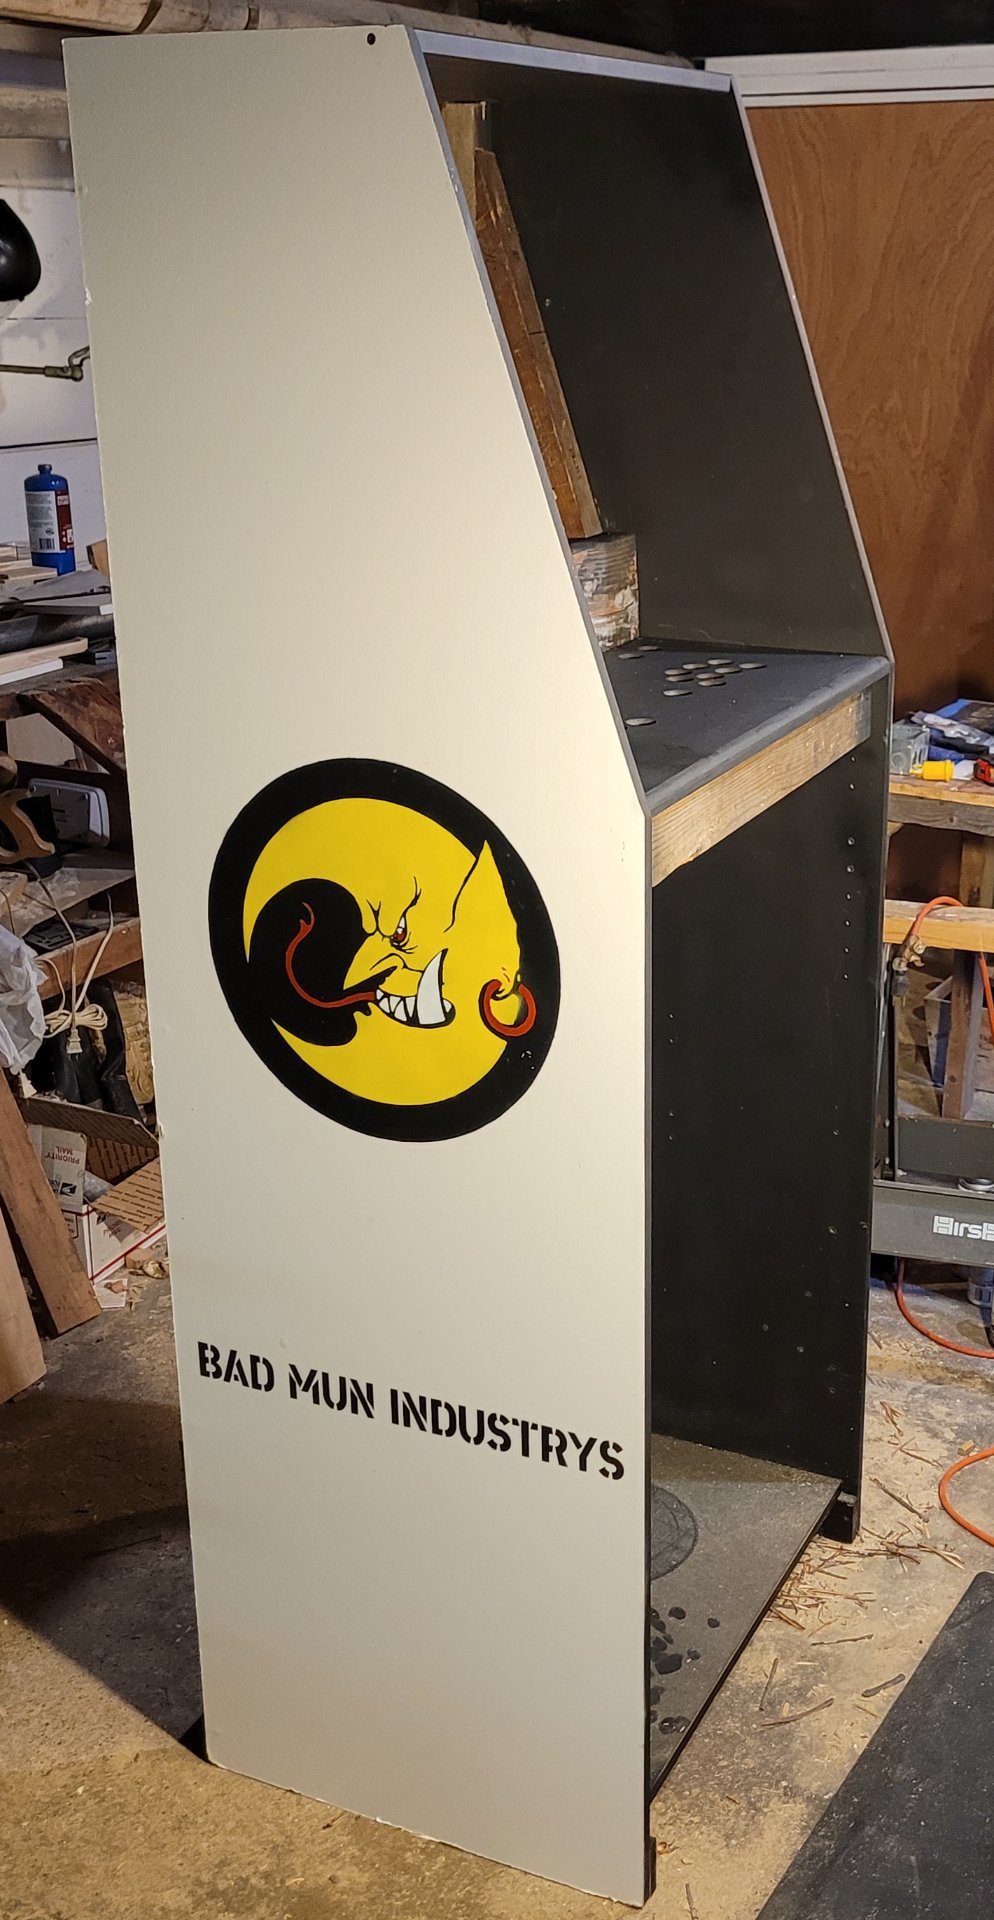
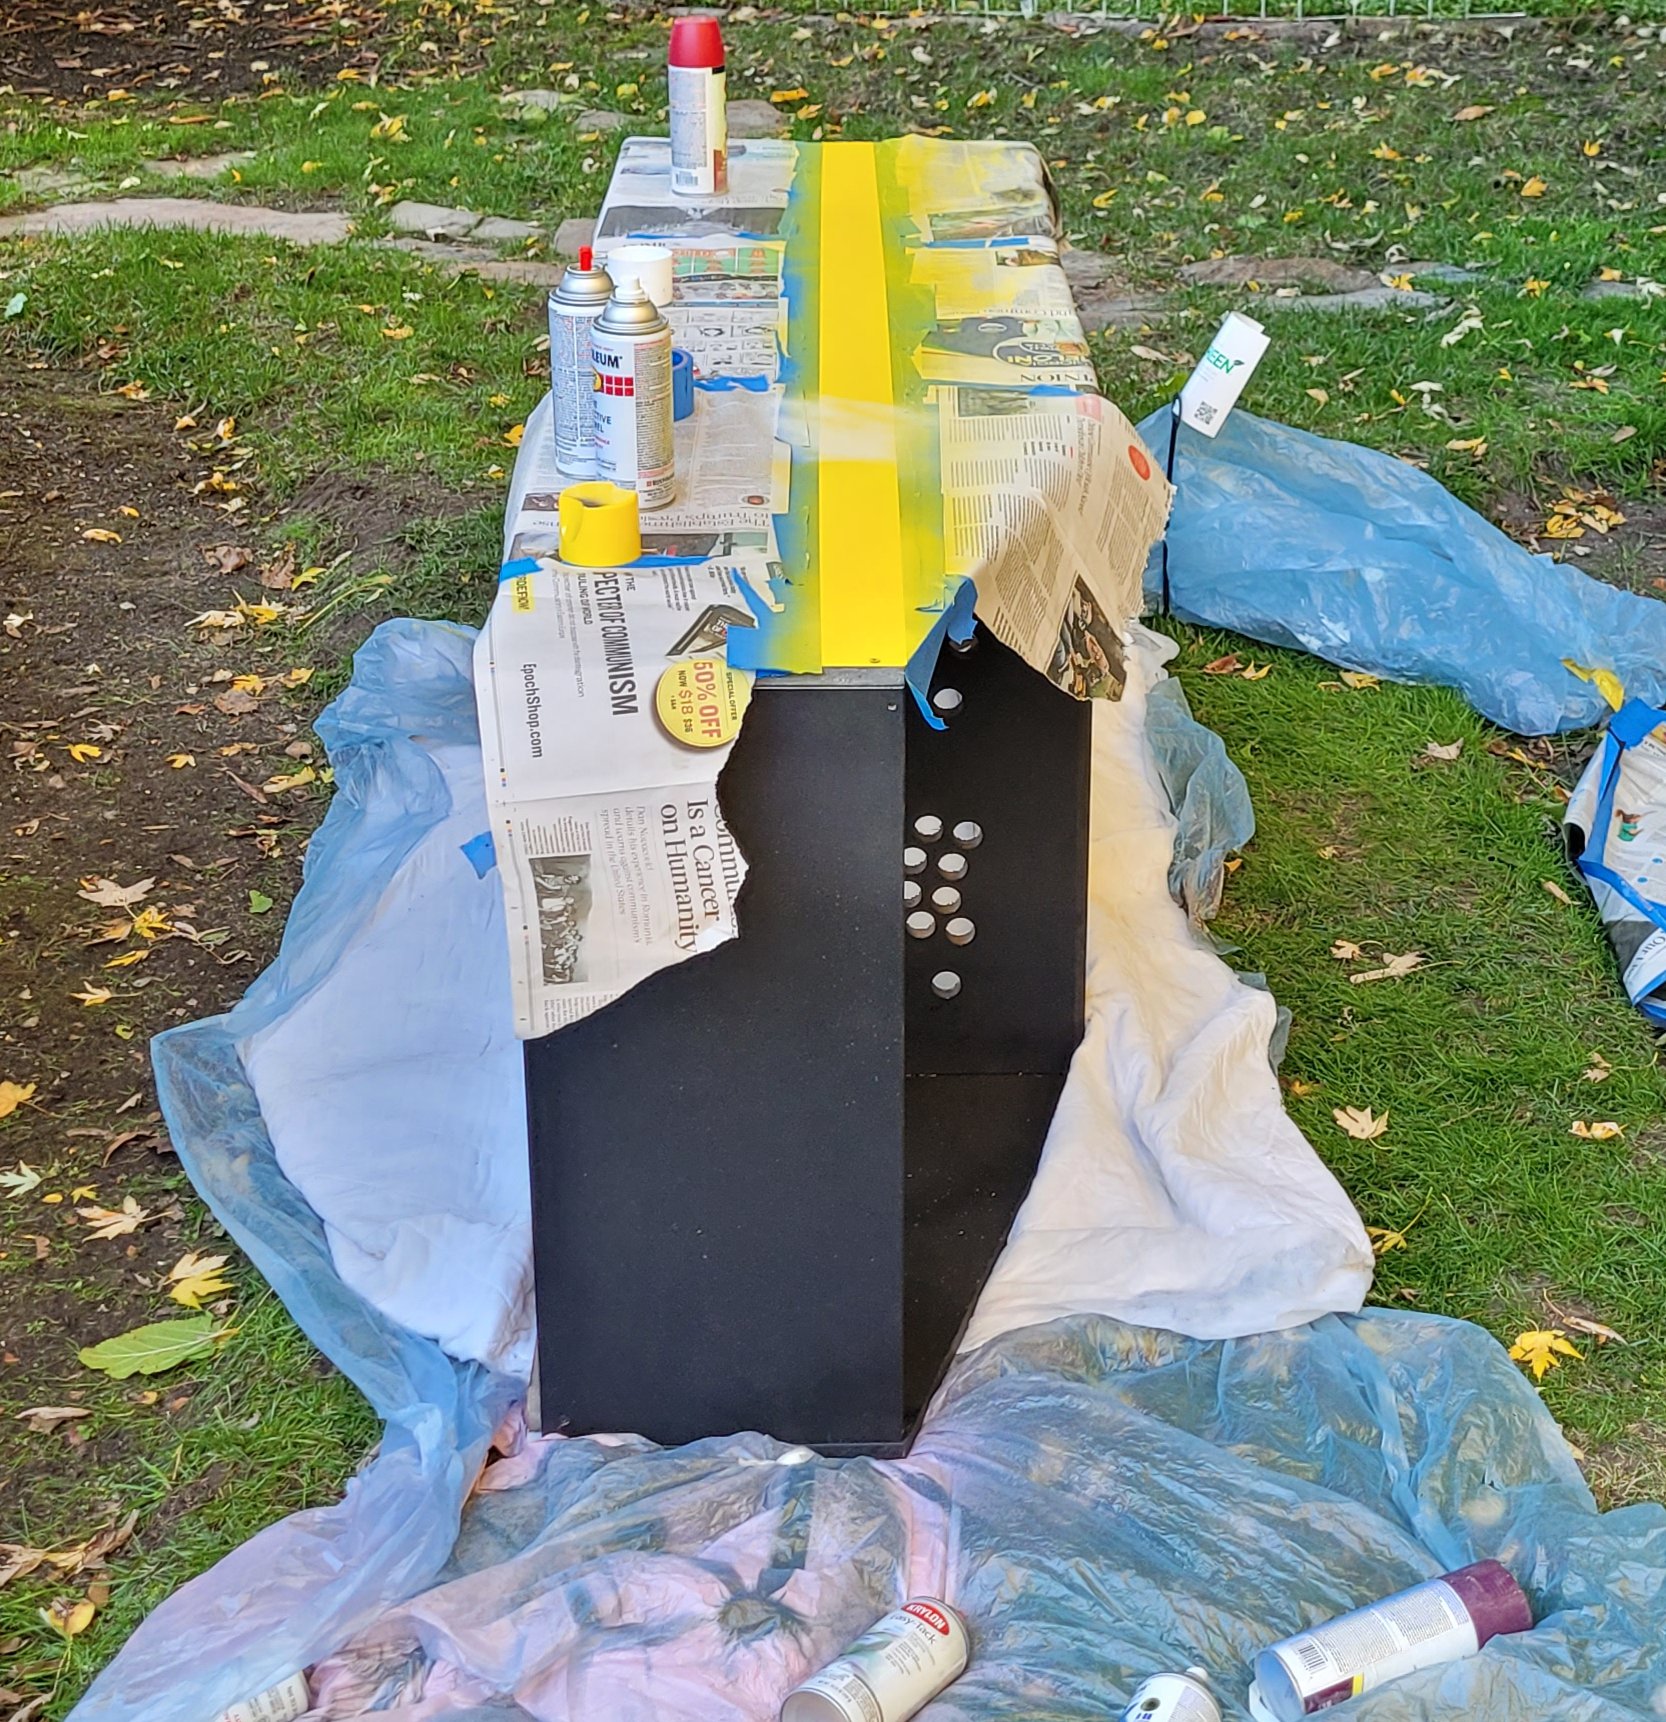
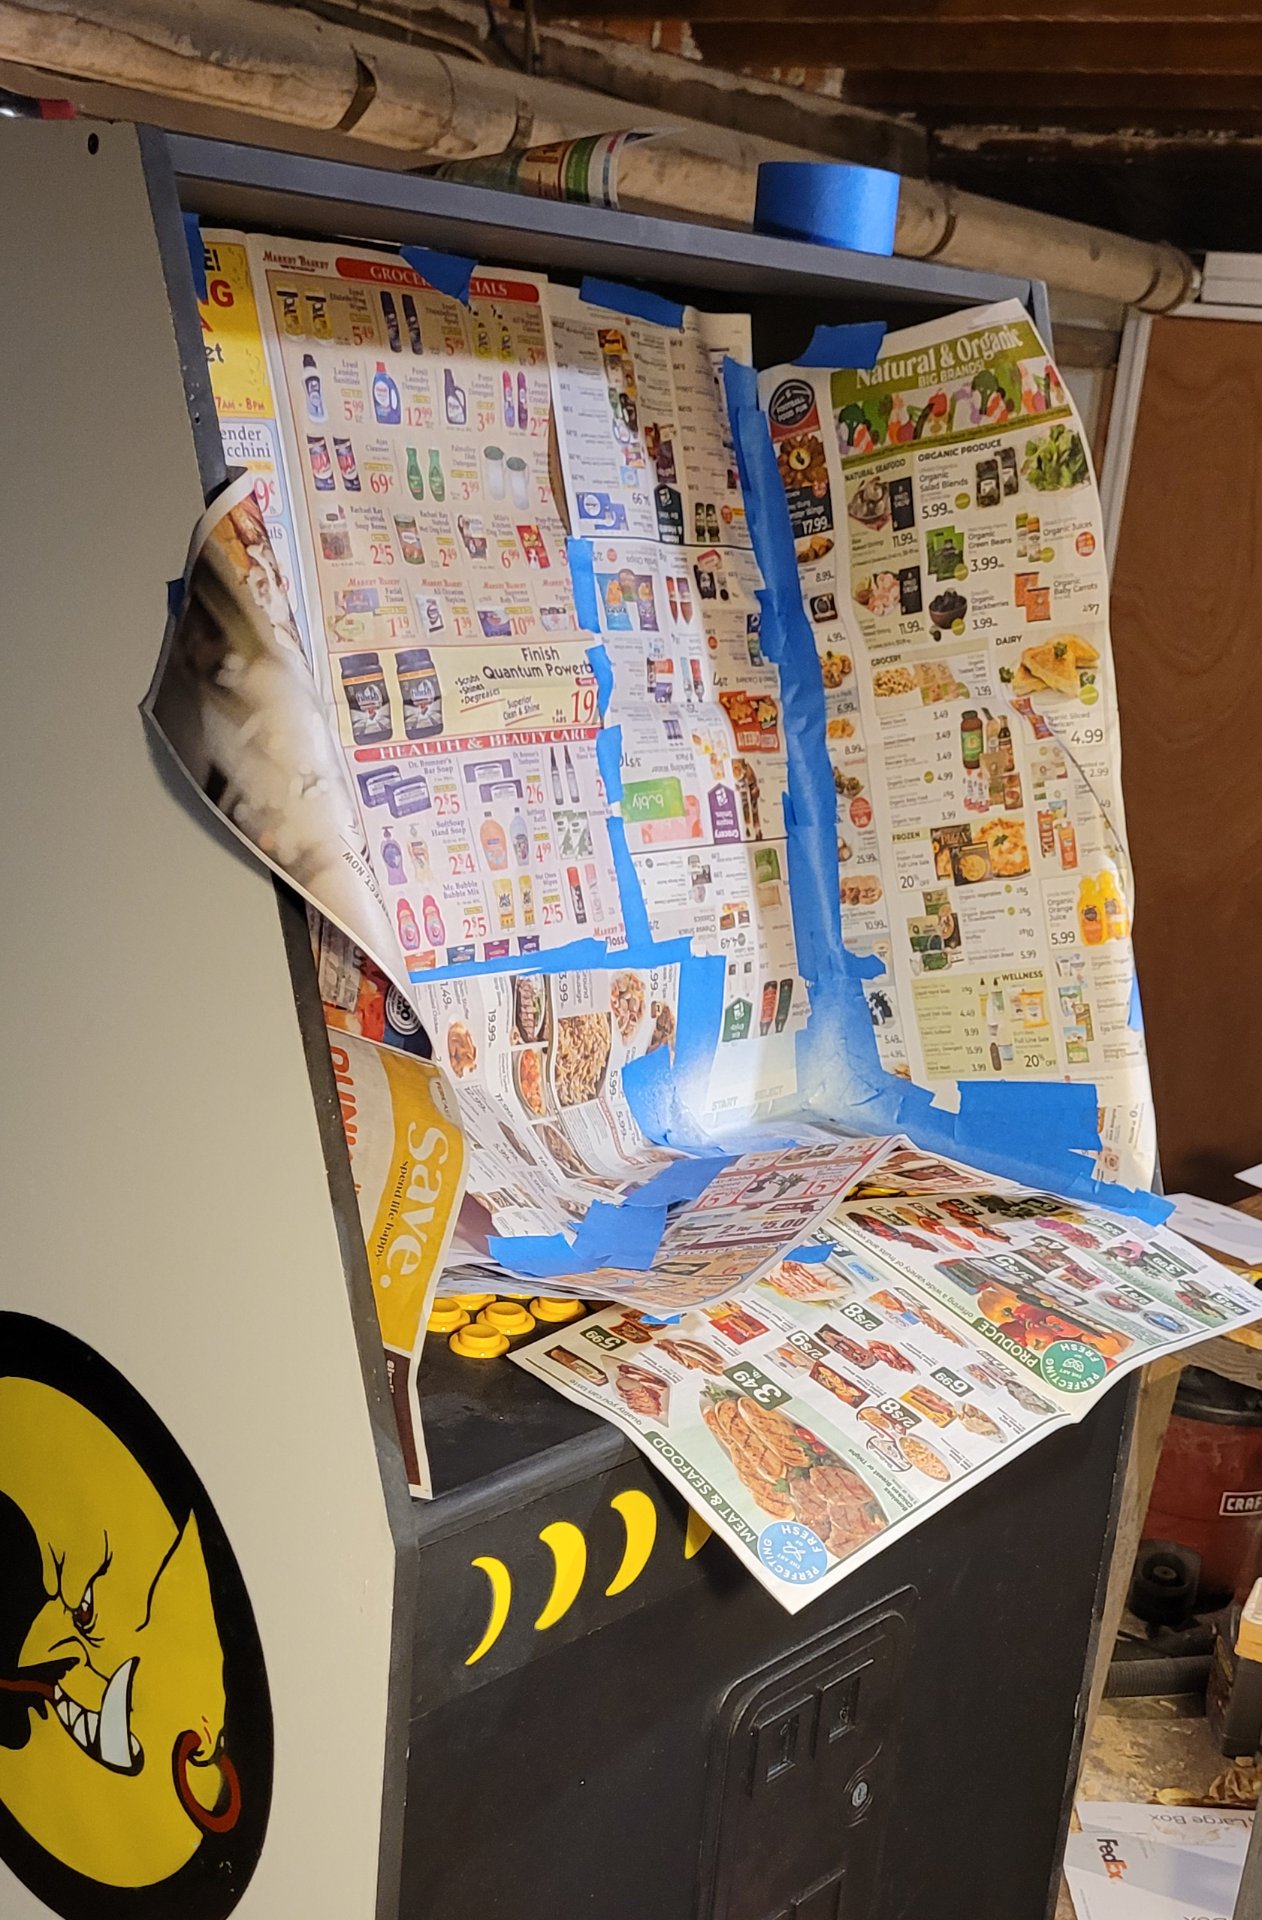
We definitely weren't going to repeat all that for the side facing a corner, so we did a simple two-color racing stripe instead.
It's always nice when your stencil is just a length of painter's tape and some newspaper. Even that garbage yellow paint couldn't go too badly this time around.
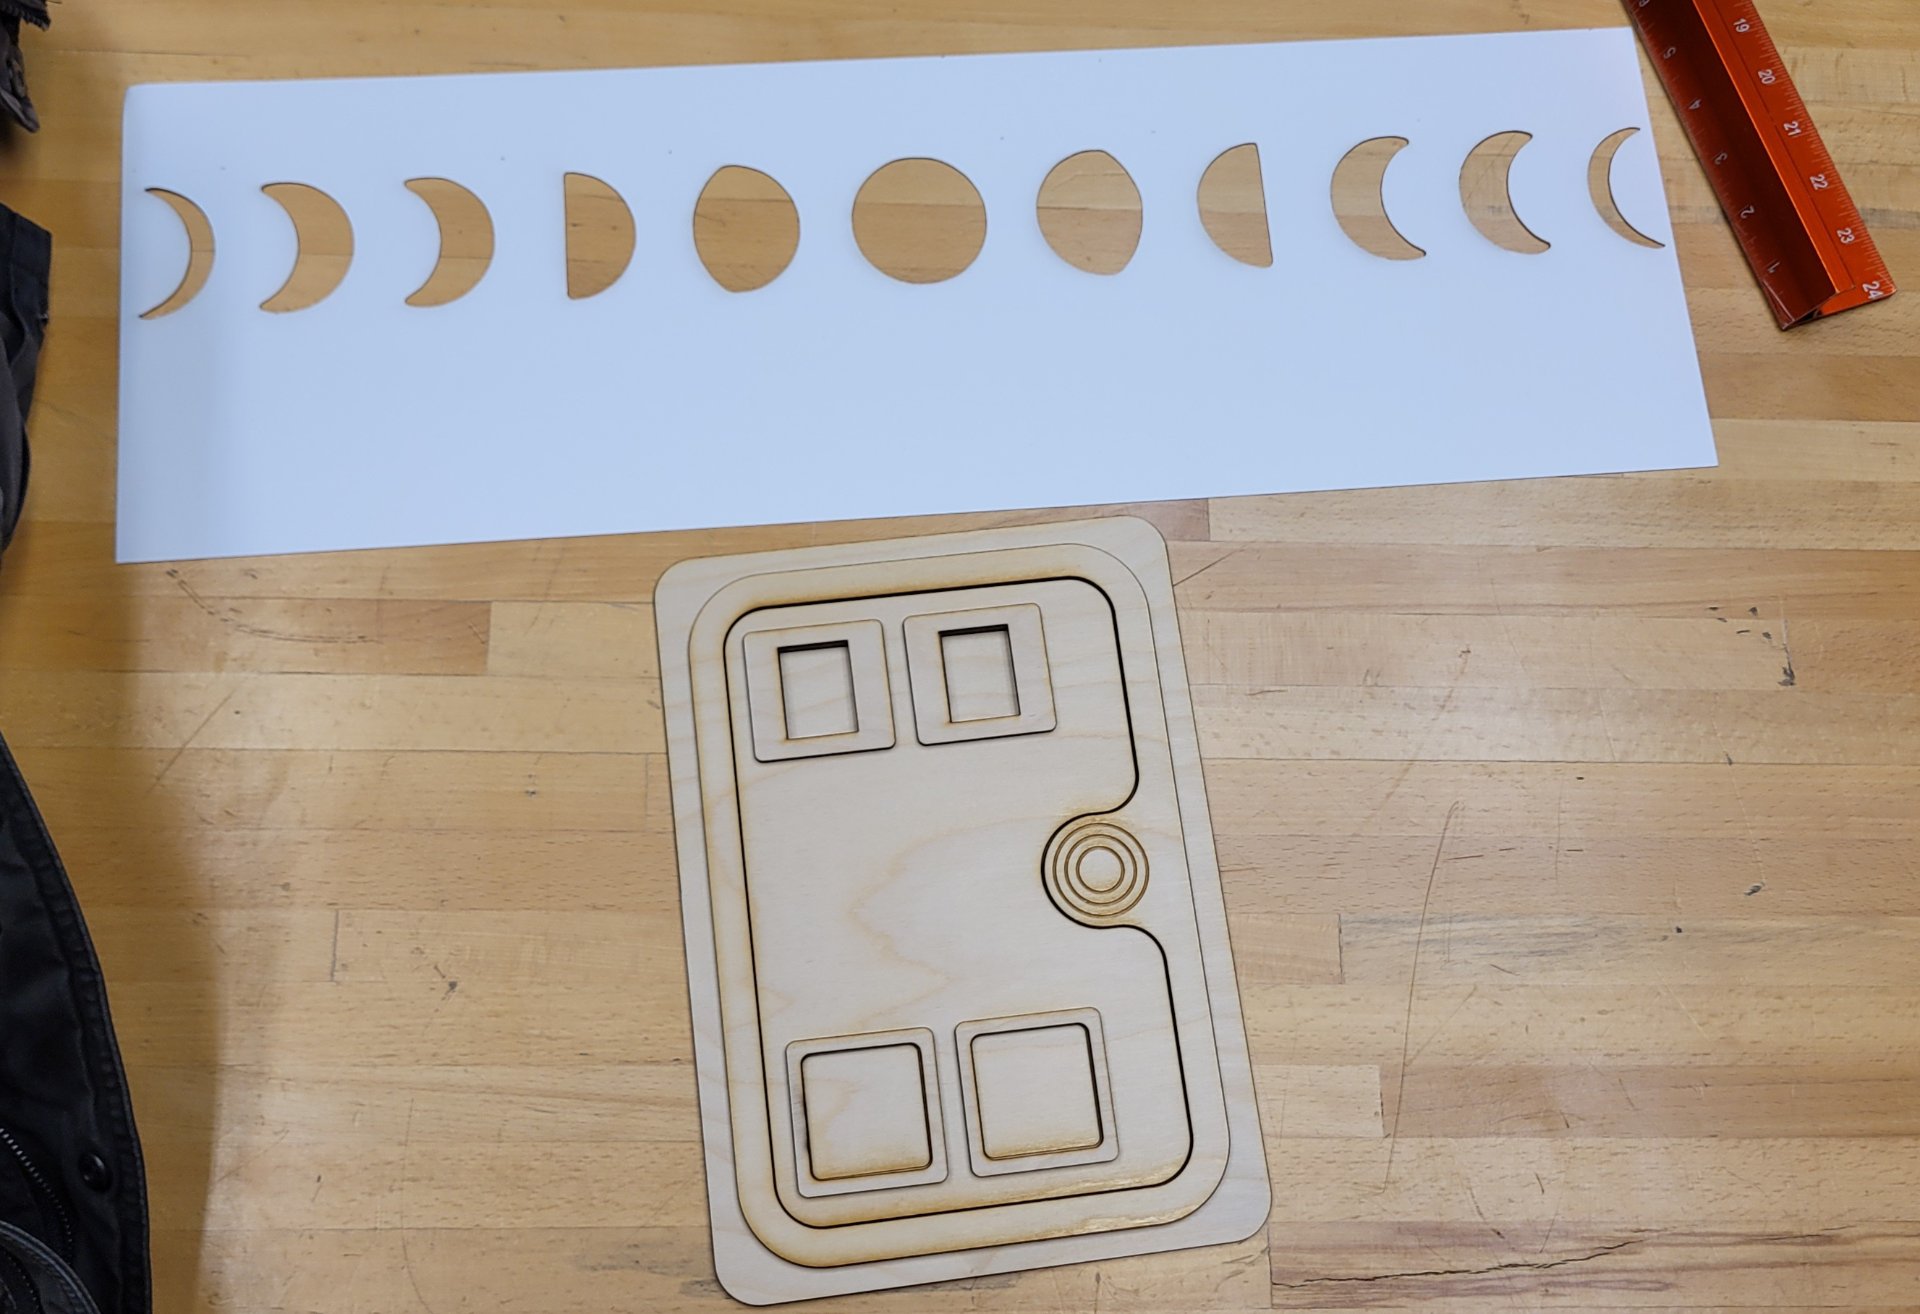
We made another trip to the makerspace and cut out a couple more things. The first was the very basic phases of the moon template I'd bashed together for the front marquee, the second was a fake coin door and buttons I found online.
We thought about doing something fancy like getting a real coin door, wiring up buttons so you had to push them for the 'coin' button in the emulator, but it seemed like a wiring hassle and our plan was for the lower part of the cabinet to be storage, so it'd be better if there wasn't wiring hanging around in there.
Painting the stencil on wasn't hard because we didn't have to haul the whole cabinet outside, we just painted a thin strip of particleboard with veneer black and stenciled it, then attached it to the front above where the door would go.
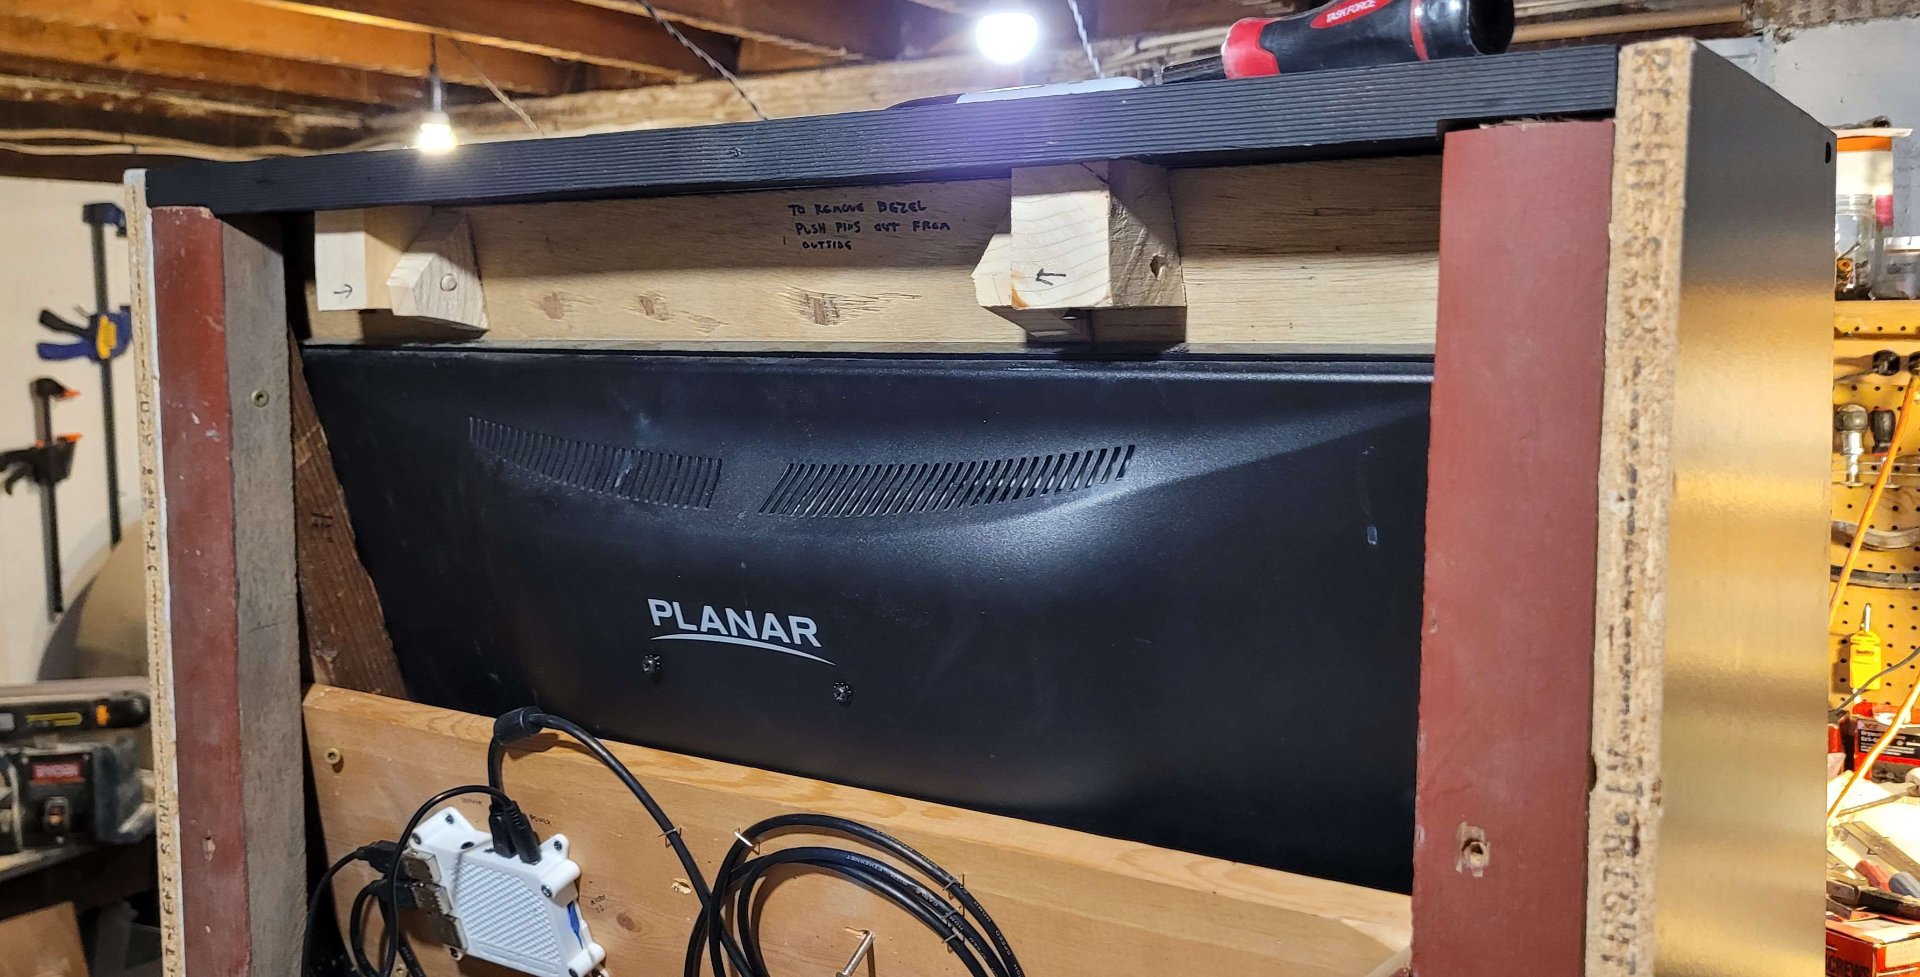
Now it was time for wiring. We got the TV in place and fabbed and test fit its bezel. (The bezel was too big for the laser cutter so we had to cut it by hand with a box cutter and a straight edge.)
I marked the mounting holes for the screws in the back of the TV by putting in some screws, daubing black paint on the heads, and settling the TV in place against the back board. That got close enough, though it was always a pain screwing the screws in through crooked holes in a pine board. I don't think we usually had all four attached, but it didn't seem to make much difference, the weight was on the board underneath, the screws were just to keep it from falling out when it was moved.
Then we added the buttons. Suddenly it was starting to look like something. I had to keep shooing my friend off the control panel (which wasn't currently doing anything) because they were so excited about trying out the joysticks and buttons. The verdict was good though, it was a comfortable height for them, even with shoes on. No carpel tunnel risk on this one.
Oh yeah, cable management is my passion. I think my friend eventually redid it so they looked nice.
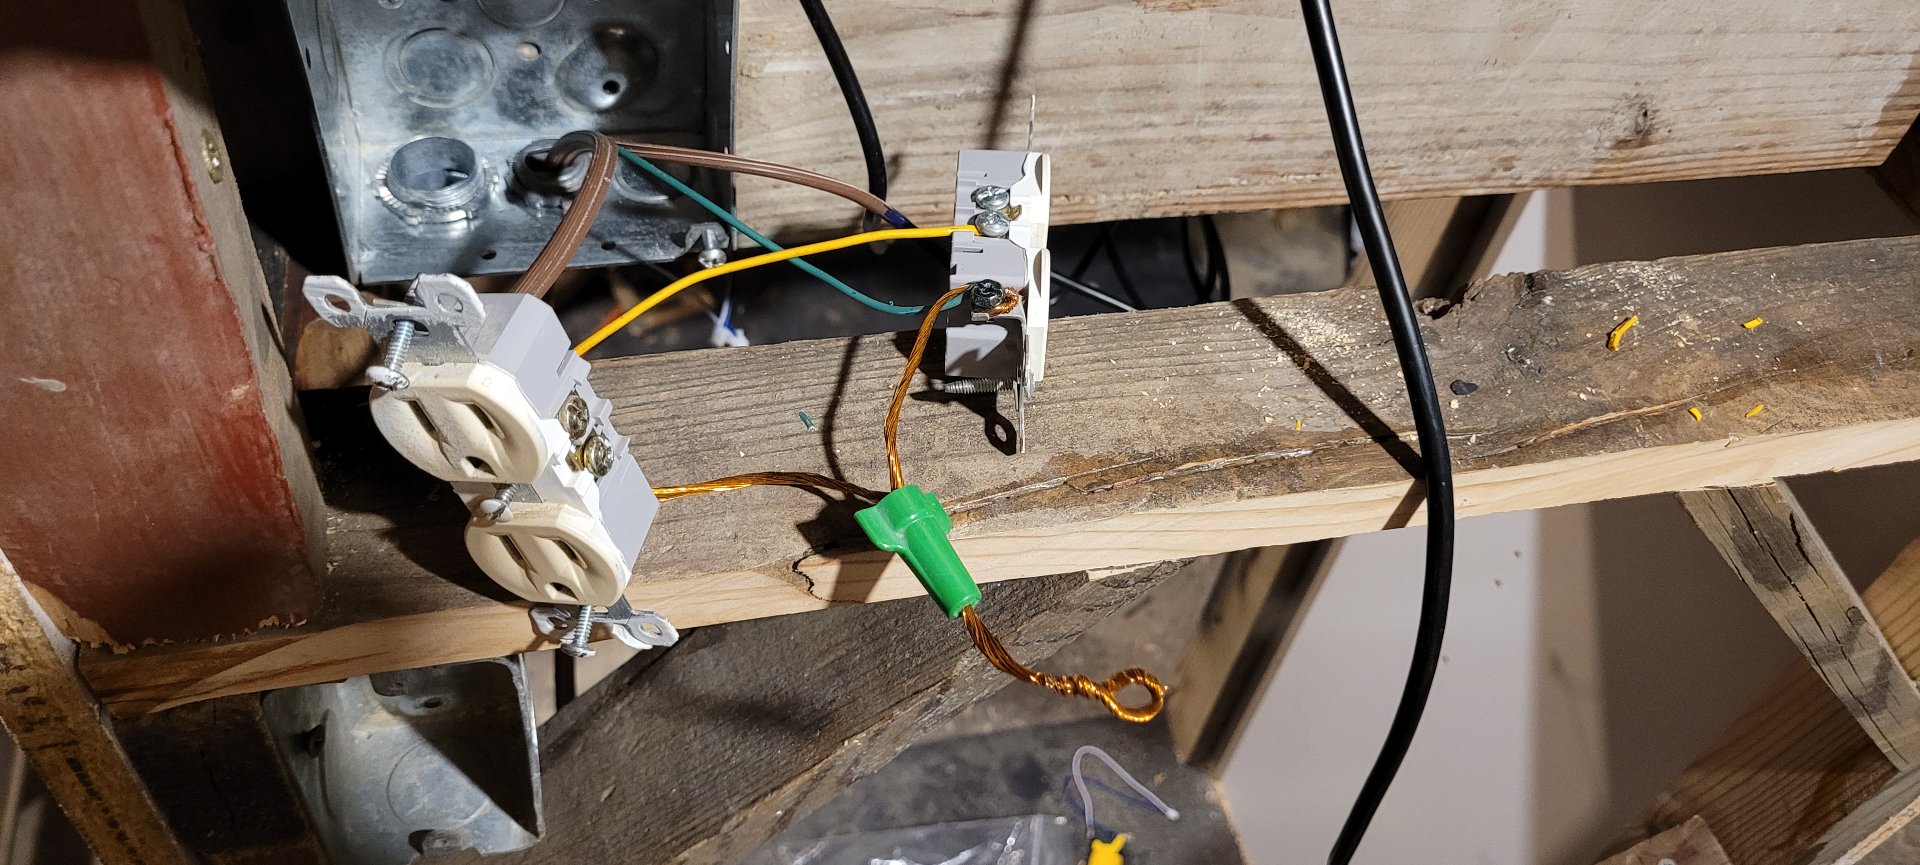
I wired the cab up for power using some outlets and a lightswitch I got from our Buy Nothing Group, some spare wire, and a power I cord I ripped off a refrigerator someone was throwing out. (Don't worry, they'd already taken the doors off and dumped it in a pile face down on the curb). Learning from last time, I set it up so two sockets were switched and two were on all the time (so the TV could be left on). It's a fairly simple circuit, but just in case I took a ton of pictures and ran it past an electrician I know, who said it looked fine, asked if it worked, asked if it caught fire, and gave me their blessing.
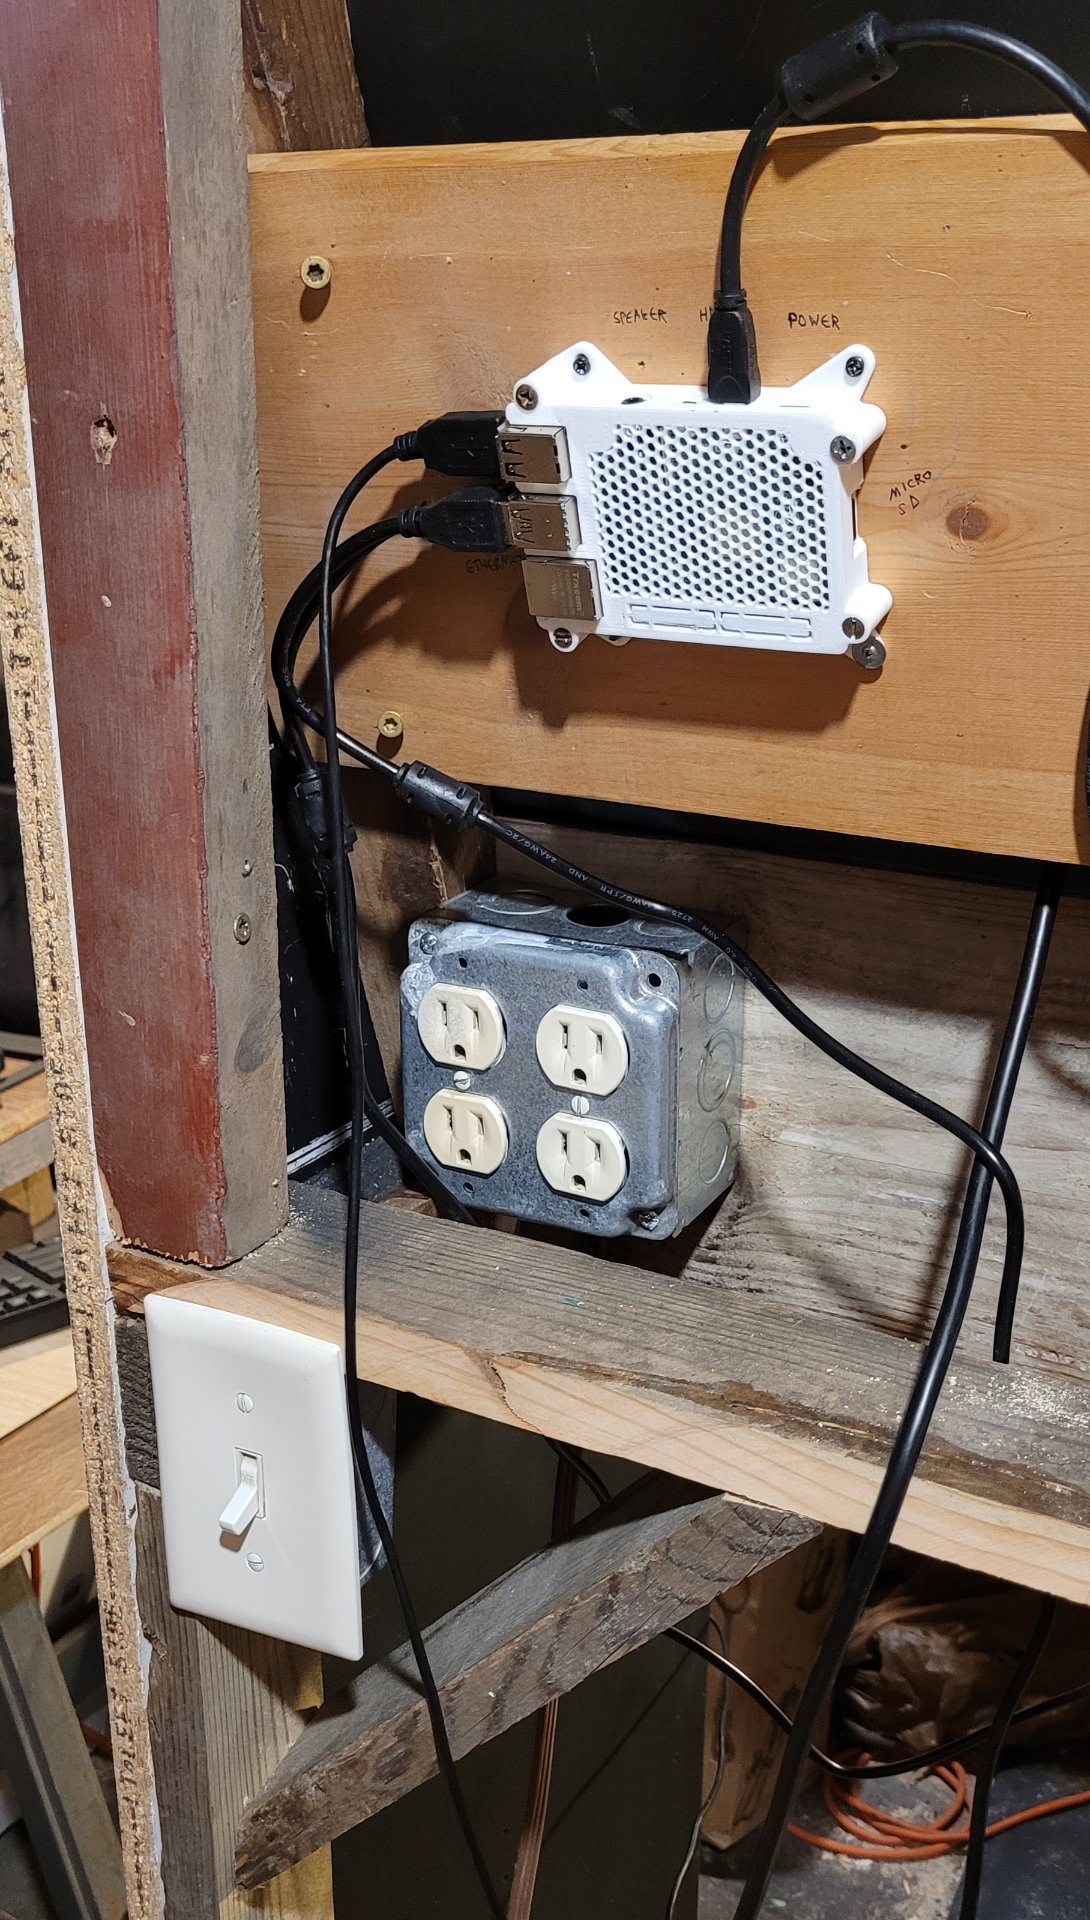
I printed the case for my friend's raspberry pi. I know we could have used a regular old junk PC and still even been able to run retropie if we wanted, but they were planning to leave it running most of the time, and the pi has comparatively low power requirements, so that seemed like a good long-term plan.
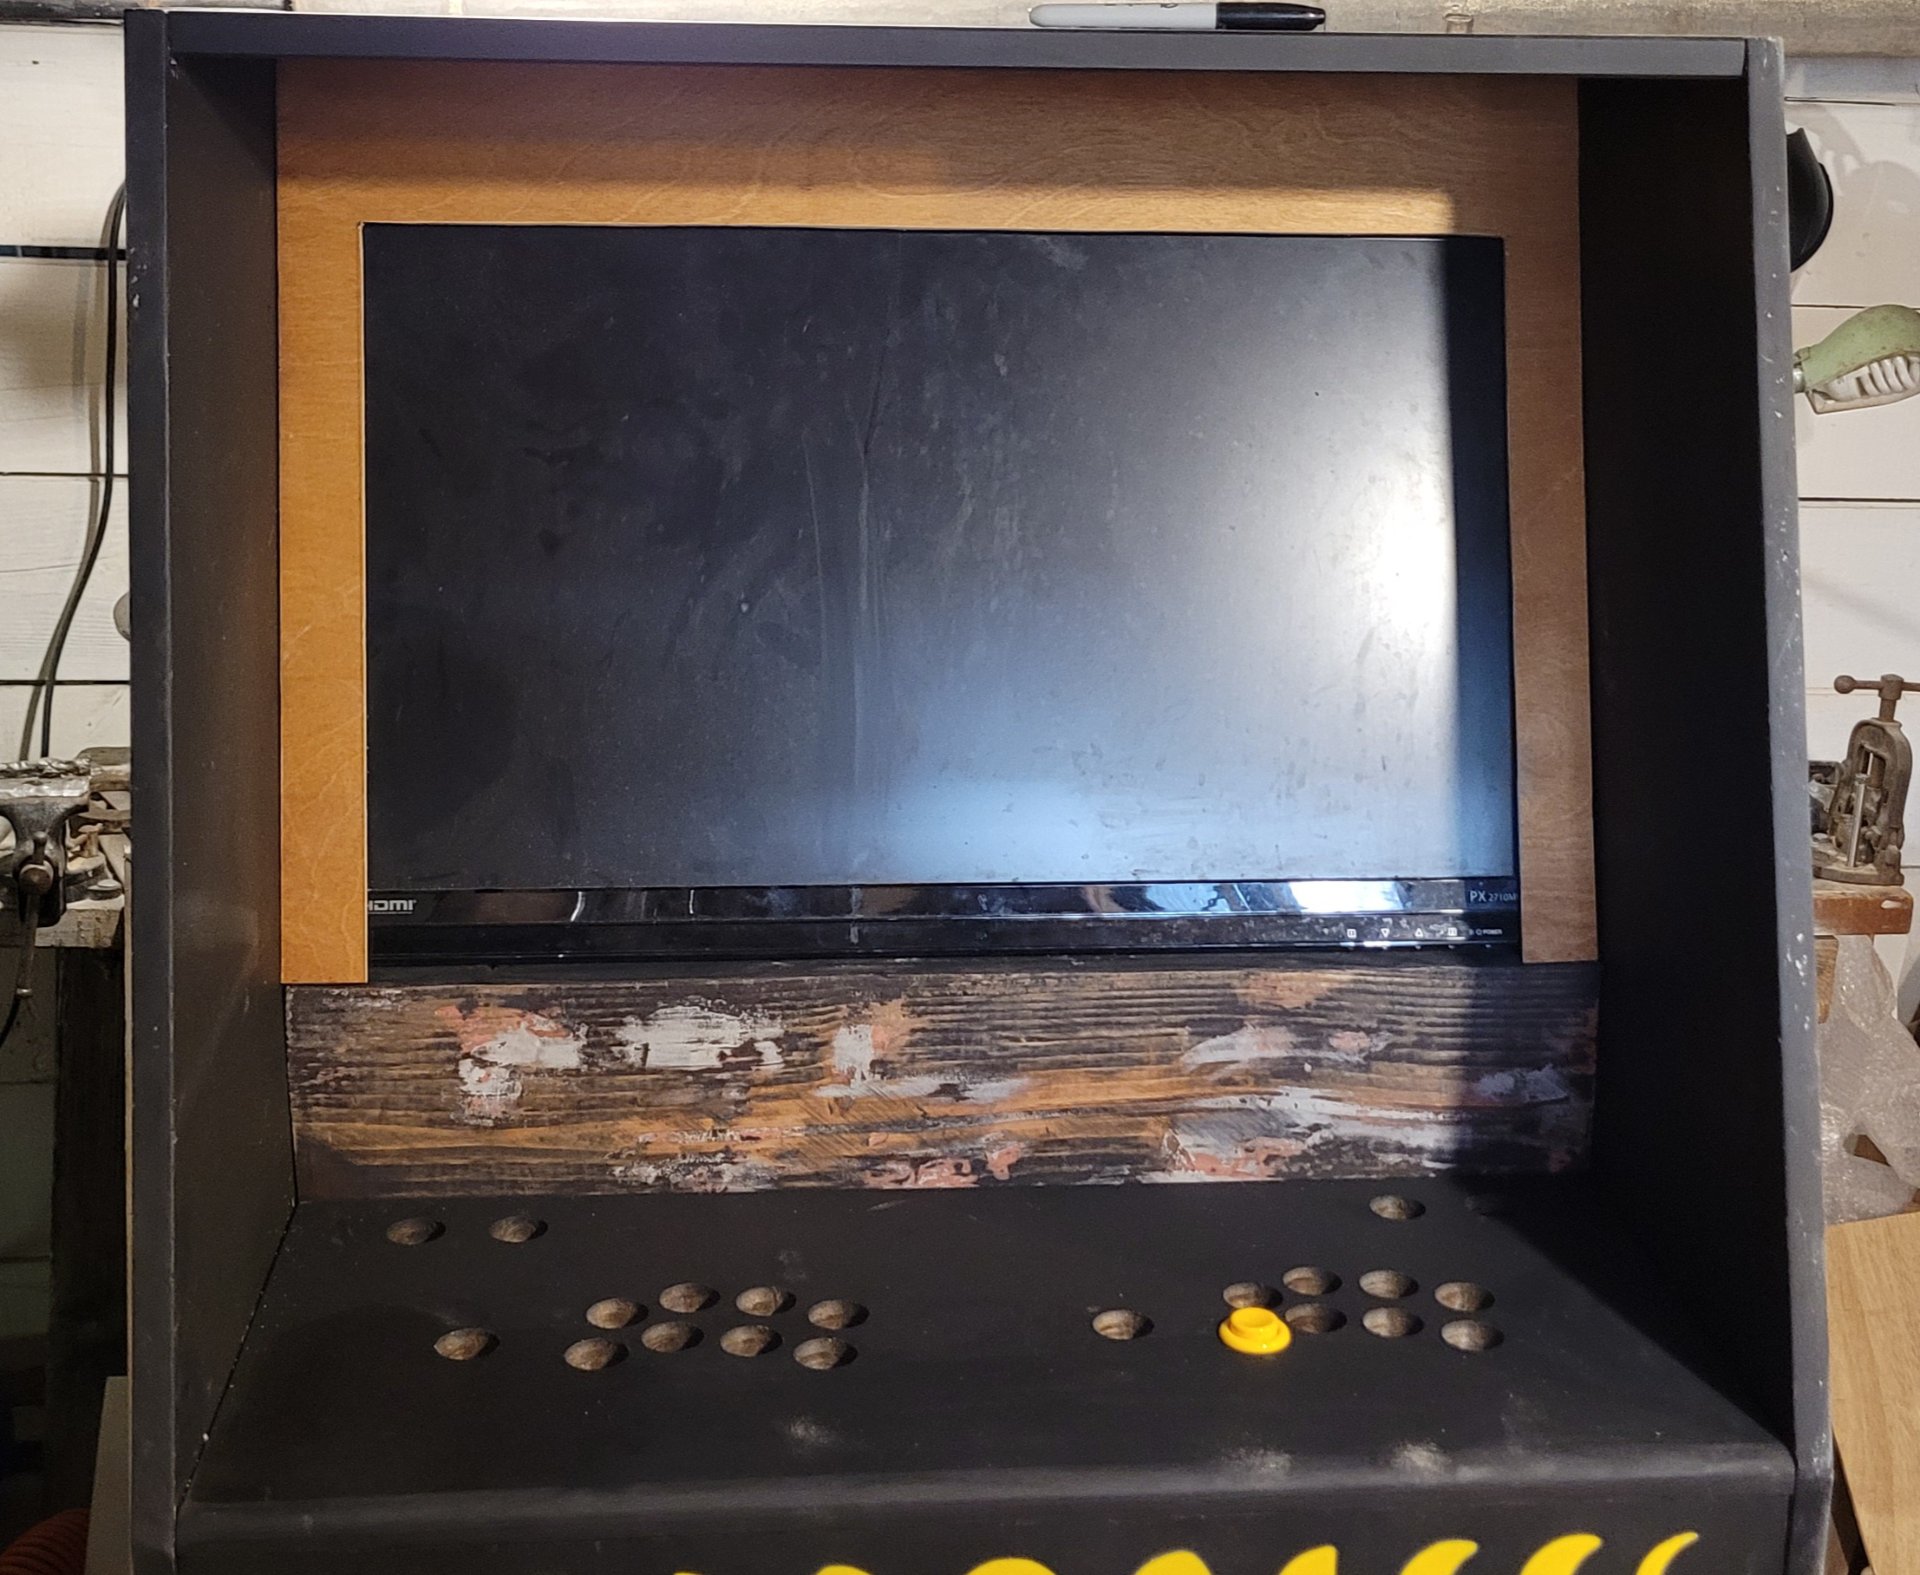
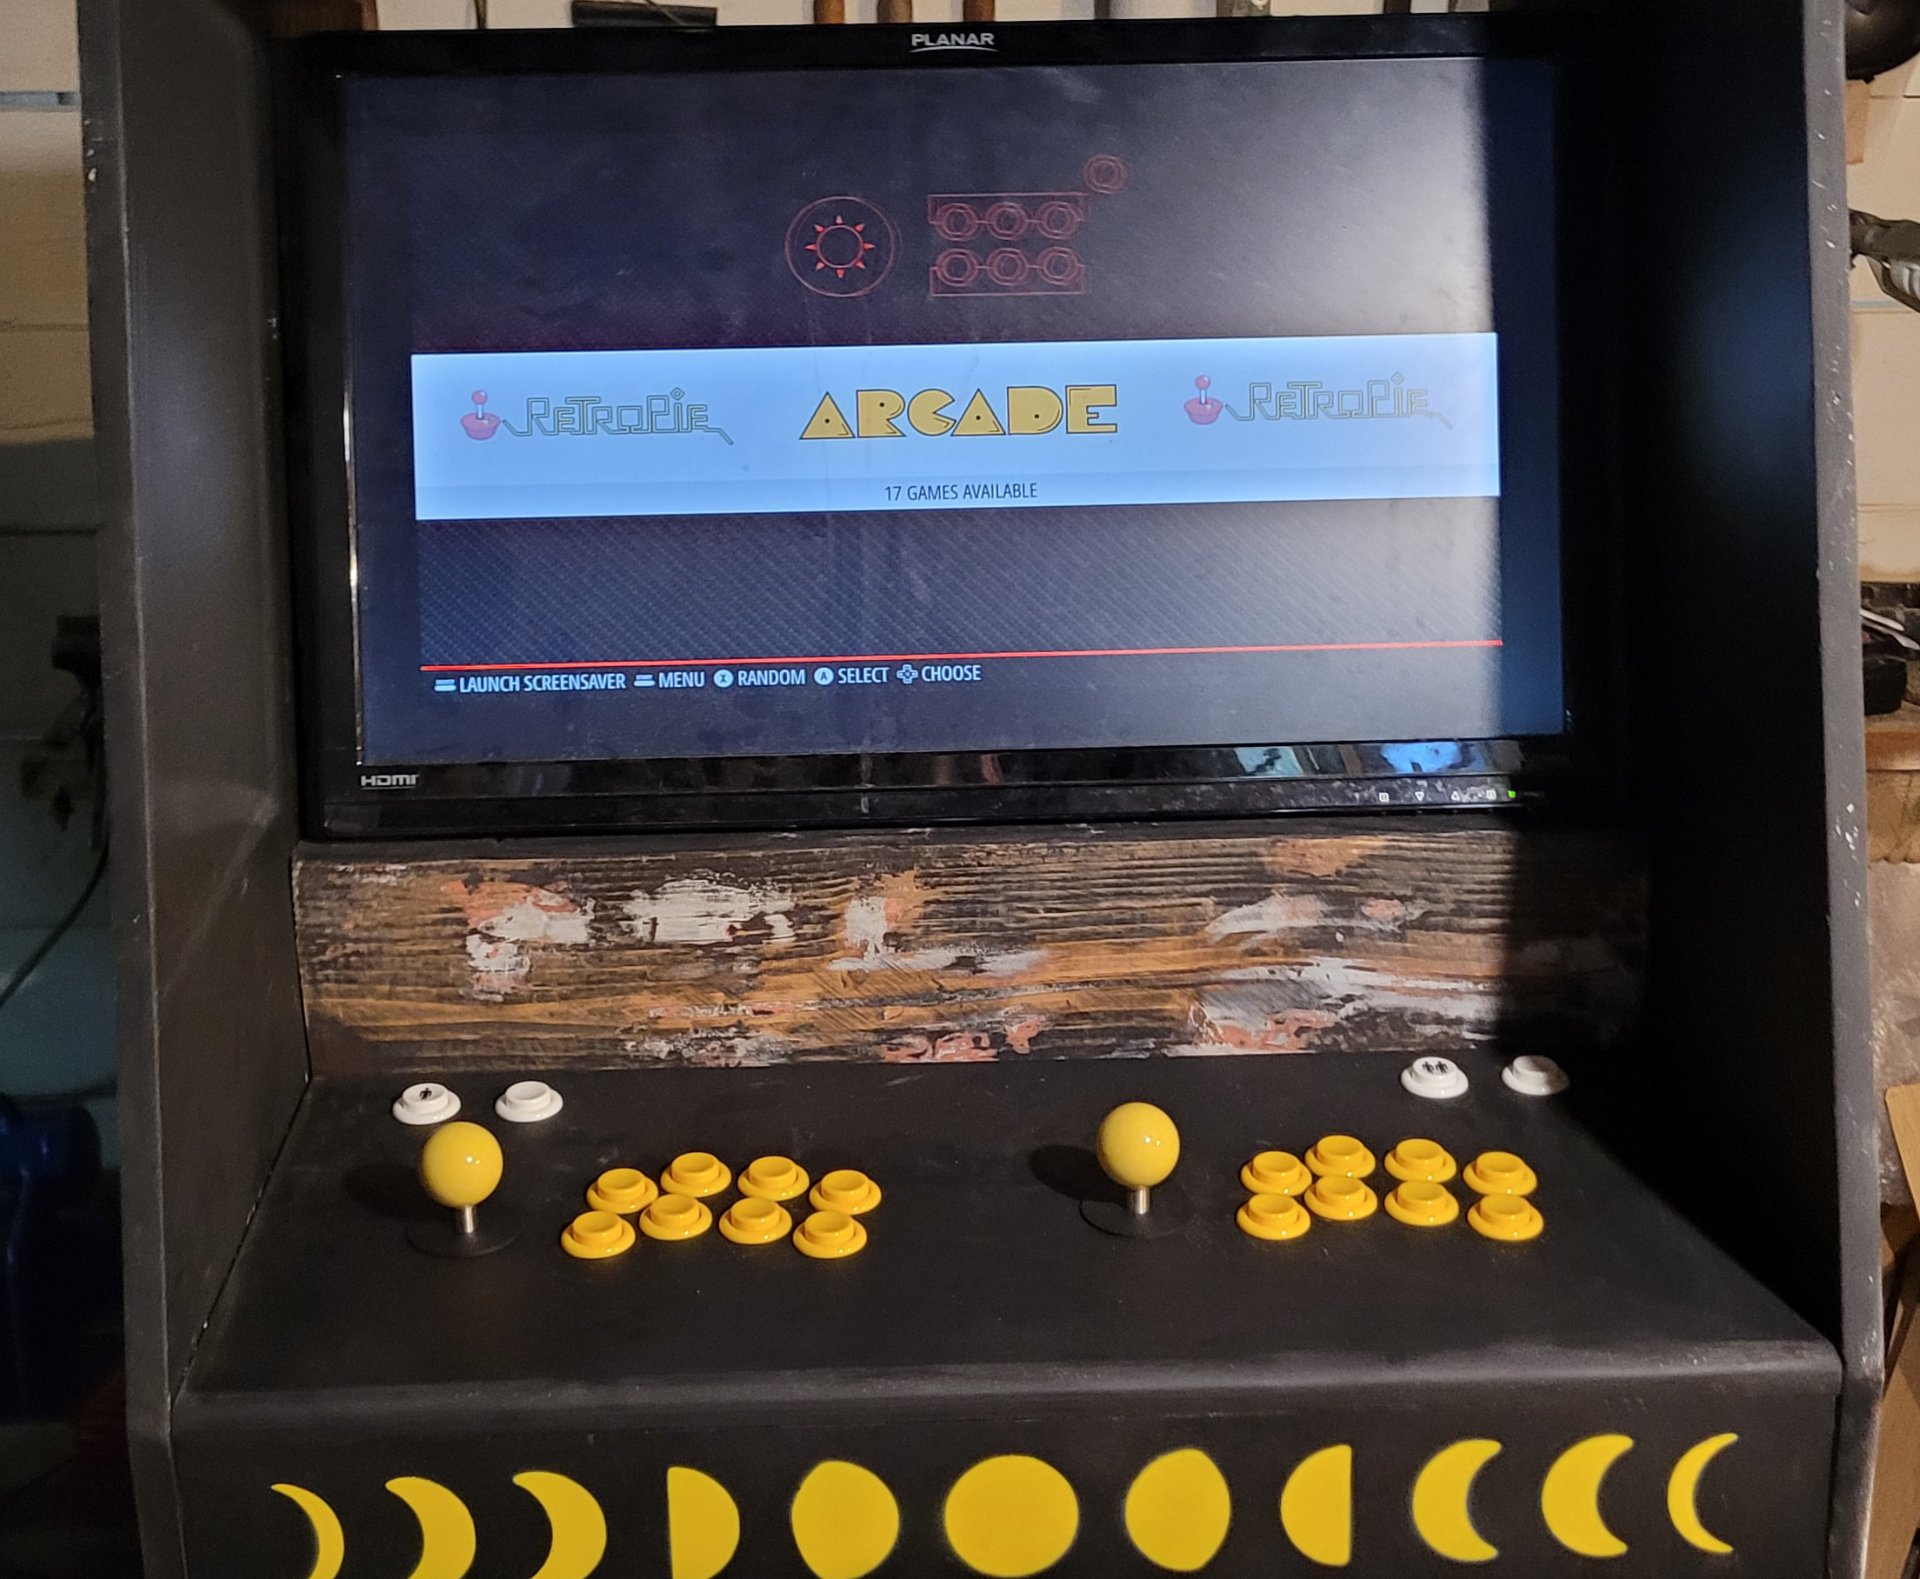
!the cab with the screen showing the retropie home page
It lives!
You might have noticed that somewhere in here the design had changed. My friend was worried the 'shelf' area for your hands on the original design would be too crowded, and the screen was a bit close. Considering that it was a widescreen TV which would only be showing a square game in the center, the cabinet sides didn't actually hide much. And standing the TV here simplified construction even further.
I cut a separate marquee piece for the bottom of the TV (I think because the design changed somewhere along the line?). It had a cutout at one end so the TV could see the IR light on the remote, and so the user could reach the buttons under the screen.
I glued the two pieces together, painted them, and worked out a way to attach it using hangers at the top. I remember it being difficult to attach it in a removable fashion, without anything showing on the front, and this is what I came up with.
The final design used wooden pegs to fasten it together for some reason, and I remember you could push them back out using a pencil which was handy during all the test fitting. There was probably a better way but this has held up fine.
The next step was finding enough flat, single panel material for the front panel/cabinet door. I watched our Buy Nothing and Everything is Free groups, and scouted around on trash days for months, looking for something big and flat enough (tabletops etc) and had no luck. A few house doors came up but they were like an inch too thick for how we wanted to do the hinges. Finally I gave up and bought a slab of particleboard. The home depot I got it from was able to use their fancy saw to cut straighter edges than I could have with my skillsaw, which was great. When he was done, the guy asked if I wanted the rest. I said they could keep it to resell, I was happy to pay for the whole thing to get the piece I needed, and he said they'd just throw it away. That's how I ended up with a (I think) four-foot by eight-foot piece of particleboard cut into two door panels and one long piece. The spare door eventually became the top of this table. The long piece hasn't found a use yet but it'll probably end up being a shelf. I haven't gone back to those stores since.
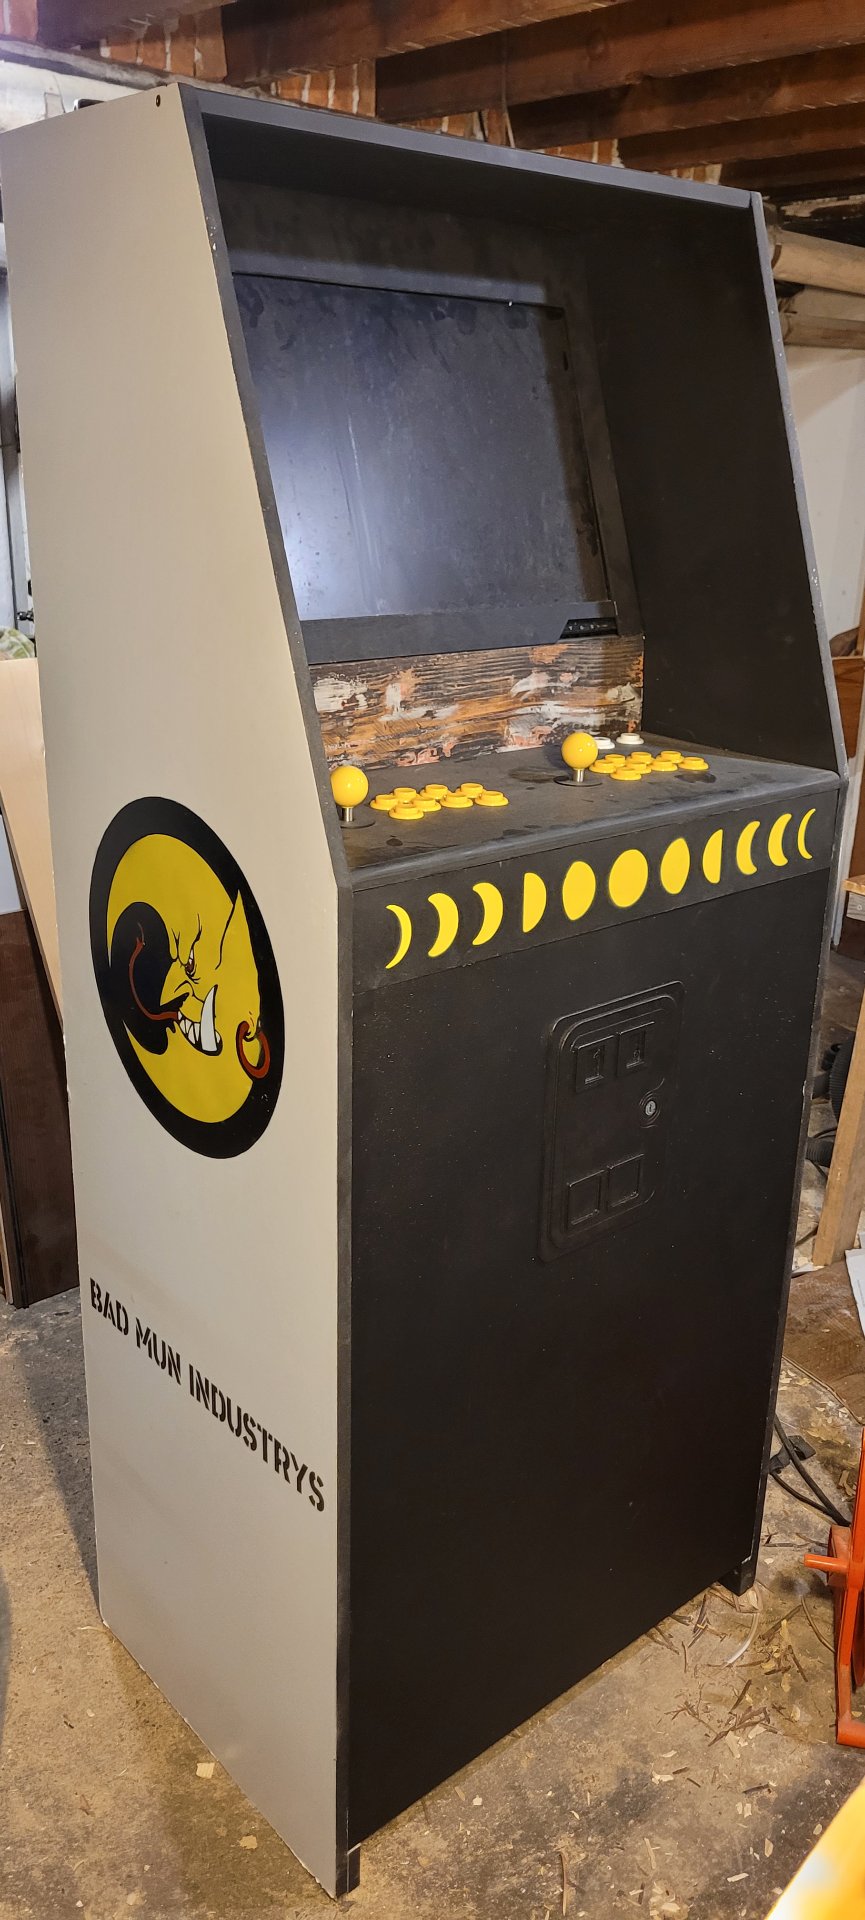
!the arcade cab with the door and bezel
The last piece was a bit of cladding glued/screwed to the board under the TV. I honestly cannot remember why I did it this way, but I painted it black, glued it in place, and we only decided after to add labels to the buttons on that piece.
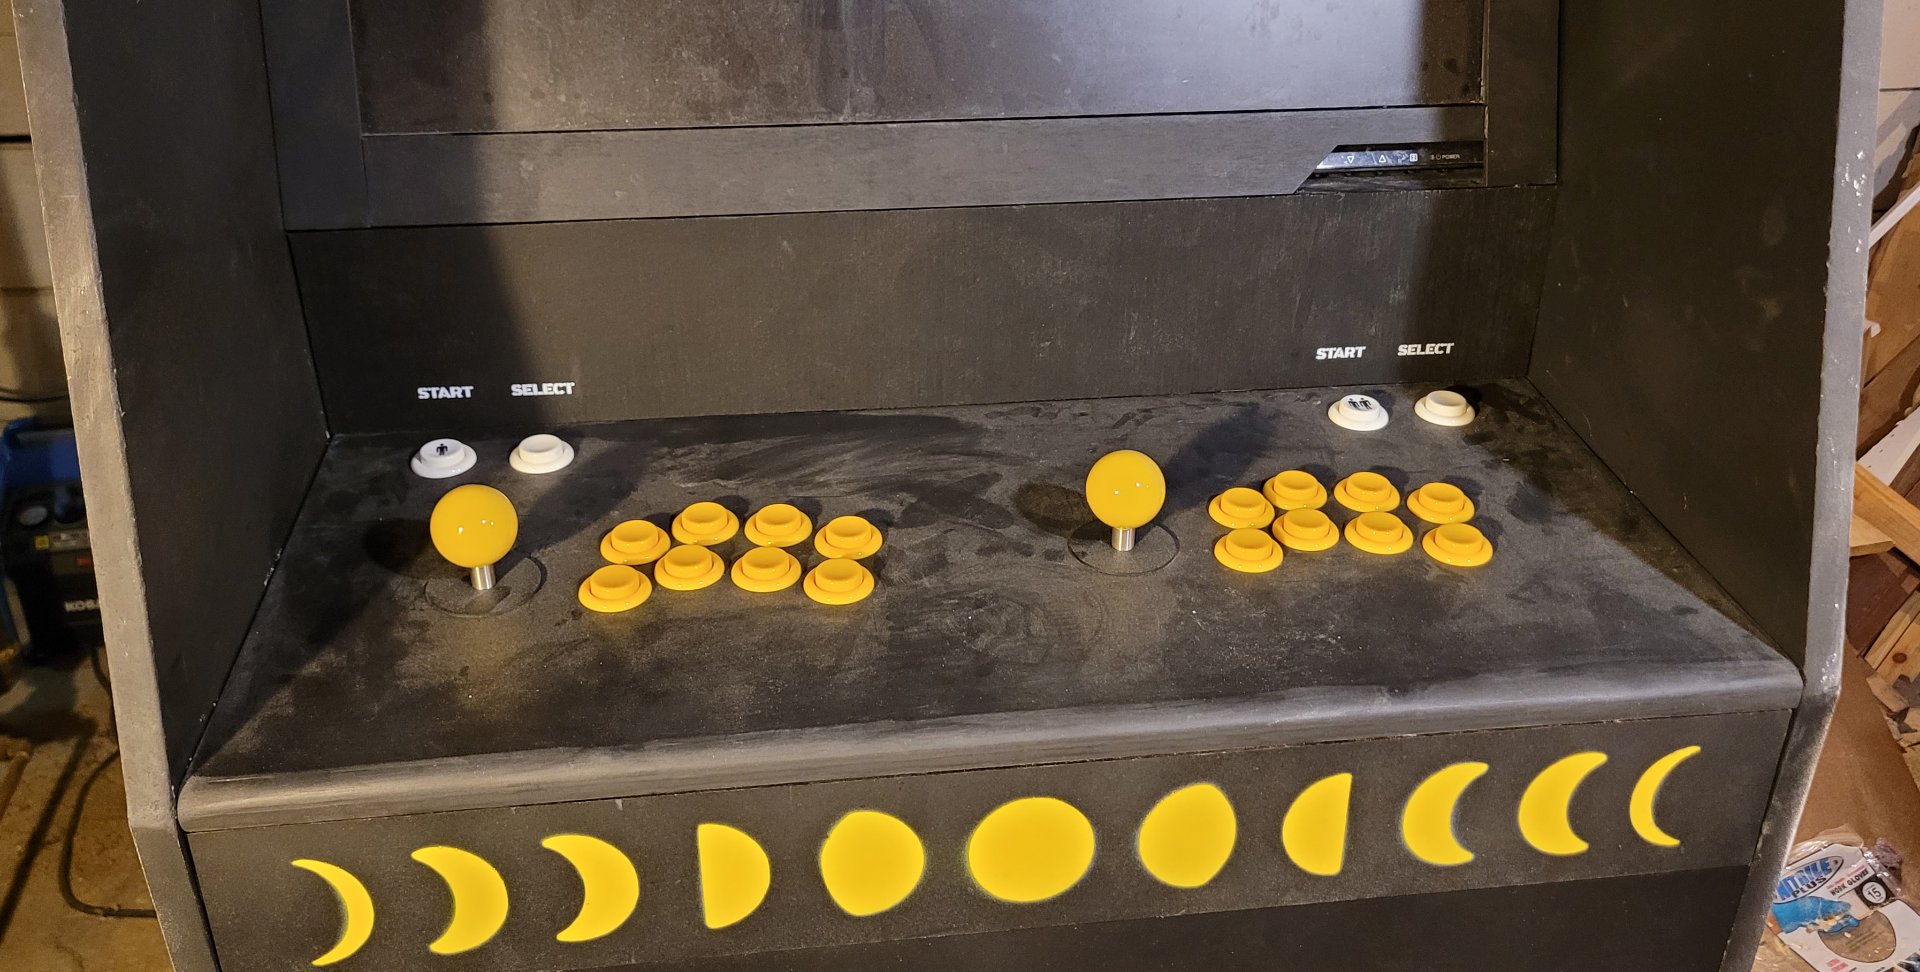
I took a bunch of measurements of the buttons, lasercut a couple very simple START SELECT stencils with various spacings, found one that fit well, stuck it in place (probably with easy-tac), masked the area with tape and newspaper, and gave it a couple quick hits with rusto white.
!stencils and finished control panel
Considering the circumstances, I'm pleased with how they came out.
The last big task was moving the thing. That was a challenge as making it sturdy made it pretty heavy, though not as heavy as the real thing with the big CRTs would have been. We rented a moving truck, and used ratchet straps to fasten it to the back inside wall, standing upright, wrapped in blankets. As a bonus, we also delivered some speakers my neighbor wanted to give away.
My friend was planning to replace an armchair in their apartment with this cab. Their plan was just to throw it away, but first thing when we got to their apartment, I posted the chair to our local Buy Nothing page with the promise we'd deliver it. Then we set about hauling the cabinet inside, rearranging furniture, getting everything hooked up, cleaning off months of sawdust, and finally testing it out.
Hanging out, finally playing games on the arcade cab, in the place where it was supposed to be, was awesome. It's since seen a lot of use at parties, and it gets a lot of attention from newcomers to their apartment. We still haven't gotten around to stickerbombing it yet.
By the time we were done and the celebratory snacks had been eaten, we had a taker on the chair. We drove it to their apartment and carried it upstairs on the way back to the rental place.
A few months ago I discovered the Shōwa era Gamera movies and I gotta say: I love this goofball.…
This is my second step-by-step post using our local movim microblog platform rather than imgur. I've also done an imgur post as a backup but I’m seriously impressed with movim, very glad to have a noncorporate place to centralize my projects. Let me know if there’s any issue with the link.
A few months ago I discovered the Shōwa era Gamera movies and I gotta say: I love this goofball. I love that he's a giant turtle who stomps around on two legs. I love that he eats fire and screams constantly, no matter what he's doing. I love that he dances when he defeats an enemy. I love that he is, canonically, a friend to all children. And I love that he flies through the sky by retracting his legs into his shell, shooting fire out the openings, and spinning through the air like a frisbee.
Every year I try to make a new Christmas ornament. We normally add a few as souvenirs from that year (keychain from a place that was significant that year etc), but I always like to add a little carving if there's time. This year's pick was Gamera (flying). Due to life stuff, it took longer than I'd expected, but here it is.
I started by looking for suitable models (in real life or printable) and quickly decided it'd be easier to just make it from scratch. I've made cravings of animals before so a turtle shell was doable, especially if I cheated and used power tools.
I sketched the shape using different movie stills and posters as references. His design, both in the art and even the costume, sometimes varies, so I picked whichever features I liked best or were easiest. Unfortunately, for as long as this ended up taking me, I took surprisingly few pictures along the way. So I guess I'll paraphrase my dad's favorite unhelpful carving advice: picture a turtle shell inside your block of wood, then remove everything that isn't part of the turtle shell.
I started by sketching the shape top-down onto a piece of scrap pine and cutting it out on the band saw. Then I used the belt sander to rough it down to a turtle shell-ish shape. It's important to oversize it, because if you're like me, you'll need room to correct mistakes. And you do that by removing everything else around the mistake until it's gone. Here's an early rough version of it
I kept sanding it down, consulting occasionally with images from the films to make sure the overall shape was correct (or at least not mutually exclusive with the material I had left).
Eventually I got it smoothed down and could start positioning legs, tail, and head holes in the shell. Unfortunately, this is apparently where I stopped taking pictures. I can tell you that I needed to make this much thinner, and took a lot of material away from his belly, and flattened the shape of the shell. I cut in a pattern of the underside armor, and then removed a bit between it and the upper shell to make it more distinct. I cut the holes into the sides, but left a sort of volcano shape inside for the four limbs, so it would look like the jets from one of the movie posters. I did a similar thing for his head and tail, but didn't add a hole in the middle for fire to come out of. I also carved his head kind of pointed, with the ridges which run from snout to eye (though the eyes are hidden) and removed some material around his tusks.
On his back, I drew a scale pattern, and the worked from the tail end to the head with a dremel, cutting away the 'top' end of each scale, just below the next one, so it would look like they're overlapping. On a big animal carving, I probably would have done this more carefully, but this is kinda just a silly ornament for the two of us, so I wasn't stressing getting the scales perfect.
Once that was all done, I drilled holes into the 'volcanoes' sticking up from the leg holes. I hadn't decided how I'd do the fire yet at this point, but I was thinking sprigs of painted wire.
The next step was painting. All the costumes and even in the art have Gamera looking pretty one-note, color-wise. Just sort of a blue-green-grey color. I started with flat black spray paint, getting it pretty thoroughly, but in many light coats (so as not to raise the grain from the wood), then hit it with with lighter coats of brite blue from an angle, to try to preserve some of the darker color in the nooks and crannies. Then I mixed some green and blue acrylic paint and did a sort of drybrush all over. I painted black into some of the nooks around the jets, and head and tail. I painted his tusks white.
Then I got some breadbag ties, the wire and paper kind. I was going to do a small bouquet of them sticking out of each jet, but the first test actually looked quite good on its own. I cut four of them (tapering it a little so it'd go into the hole better, and so it'd look more like flame on the other end) gave them each one twist, and painted them yellow-orange-red with a bit of flame pattern. They fit in tight without any glue.
Finally I drove a little eye-loop into the top of the shell and tied an old clothing tag string through it.

I'm not sure if this is a good fit for this community, but I've read enough to know there are some very knowledgeable folks here, so I thought I'd give it a shot. Feel free to remove if it's off topic/too specific.
This umbrella pine has been here for around 60 years, and recently started having some trouble. I know a certain amount of yellowing and seasonal needle drop is common, but it seems like this one's been hit especially hard, and there's a companion tree on the other side of the house, same age, which is still deep green. I'd really really love to keep it going, and I'm hoping it's not too late.
We had a bad summer, unusually wet, and I think it stressed this tree - the other one is on top of a hill so it must get better drainage. There was also some construction somewhat nearby, and uphill, which might be causing more water to enter the yard - the basement flooded for the first time in awhile. Also a road crew cut some trees that might have been shading it occasionally, I'm not sure. They might have been too far away to make any difference.
I'm planning to improve on a drainage ditch which runs along the driveway between this tree and the wettest areas, hopefully before snowmelt. I guess my questions are is there anything else I can/should do? Soil test in case it needs something? Can this tree be saved? It's yellowing but it still has some deep green in places (mostly on the shady side).
I have some closeups too if that would help.
Here’s another quick one. I don’t enjoy oil painting as much as I do photobashes and other…
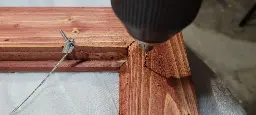
This is my first step-by-step post using our local movim microblog rather than imgur. I'll upload it to imgur later as a backup but I'm seriously impressed with movim, very glad to have a noncorporate place for my projects. Let me know if there's any issue with the link.
This is another quick one but at least I remembered to take pictures for most of it. I don’t enjoy oil painting as much as I do photobashes and other digital art, but it’s still a lot of fun in the right moment. I needed a picture frame for a recent one, to complete a gift to a relative. It was on a stretched canvas, rather than canvasboard, so the frame had to be deeper than normal. So decided to just make it from scrap lumber I had squirreled away.
I started with this stuff. These 1 ½” by 1 ¾” boards were part of a kind of disappointing haul I got from my local Everything is Free page. I don’t remember what it was I thought I’d find there, but by the time I got to it, all that was left was this tangle of busted-up boards from inside some kind of homemade builtin cabinet. They were cracked from their demolition, and full of wood screws, but I took them because there was still plenty of good material and I think I wanted to justify the trip.
I pulled all the screws and used them in another project, and when I went looking for material for the picture frame, they were pretty much perfect. Plenty of material, and I didn’t have to worry I’d use it for something better. The painting was of a rustic cabin, so the frame was going to be a bit rustic anyways, so a little battle damage was no big deal.
I measured and marked them based on a picture frame my grandfather had made (I would have used it instead but it wasn’t deep enough for the stretched canvas). I cut them to length, then down to 45 degrees on my miter saw (it makes squaring up lumber and doing corners absurdly easy, I used to do them all by hand and getting them to fit was much more art than science back then.)
Once I was looking at it, I realized the frame was a bit too thick, and decided to remove about half an inch in depth from the four pieces. This would be quick work on a table saw, but I don’t have one, so I marked a line and used the band saw. Then I sanded up all the sides on a belt sander until they looked good. There was a bit of stain left in deep spots from the original project, and I tried to keep some of it – I like a little character and history from the life of the piece. This wood was a part of someone’s home, they knocked it out with a sledge hammer, a weird goblin man came by on trash day and took it, now it’s a picture frame hanging on a wall.
Then I had to use the router to notch the back of all the pieces to hold the actual canvas. My router was a recent junk store find, it’s the old craftsman kind that’s a hand router bolted to the underside of a little fiberglass table. I screwed it to the workbench over the lathe, down on the far end, since its out of the way and that’s my heaviest workbench. I have plans to rewire the router, so you can turn it on and off with a proper tool switch, like I did for the drill press, but I haven’t done that yet, so turning it on meant reaching underneath, feeling for one of the handles, finding the trigger and the locking button, and setting them, at which point it begins to spin. It’s awkward and I wouldn’t want to have to do that in an emergency.
This was my first time really using a router on my own projects, so it wasn’t quite as pretty as I’d like, but overall it looks fine. I definitely want to replace the small, two-part fence with a taller one that runs end-to-end and gets closer to the blade. That would reduce the piece’s ability to wobble when its only braced against one of them.
Once the notch was cut I found the 45 clamp didn’t work that well so I stuck each joint together with a big dab of wood glue and a couple small dabs of super glue. The super glue gives you just enough time to get the pieces where you want them, and sort of acts as the clamping force for the wood glue, which takes much longer to dry.
Once it was dry, I stained the frame with Sedonia Red, it came out a sort of pink color but I think it’ll be a good fit for the white cabin with red trim in the painting, and the recipient can always hit it with a second coat of a darker stain if they choose.
The last step was to add a cable to the back. They make little metal picture frame hanger things, and I thought about just cutting and bending one from a soda can, but to be honest, I kinda hate those hangers. I don’t think they work well and they feel unreliable to me. Usually I just use a strand pulled from some damaged CAT 5 wire, but this time I happened to have this metal cable left over from… somewhere? I honestly can’t remember what it came from. But it’s the sort of thing I keep because it doesn’t take up much space and it’ll be useful eventually, and sure enough it was! The loops had already been cut, so I just drilled a hole through the little aluminum clamps at either end, used the vice to squeeze them down on the wire a little extra, and used them to attach the cable to the painting. I measured both holes from the top, and predrilled them with a thin bit to make driving in the nail easier (since I didn’t want to break the picture frame.
As a very last touch, I cut a tiny sliver of wood and glued it into a notch where the miter saw ripped out a bit of wood at the top left corner. A little stain blended that back in nicely.
Overall, not bad for my first picture frame. It’s a little rough, but it’s supposed to look that way.
 JacobCoffinWrites @slrpnk.net
 I write science fiction, draw, paint, photobash, do woodworking, and dabble in 2d videogames design. Big fan of reducing waste, and of building community
https://jacobcoffinwrites.wordpress.com
@jacobcoffin@writing.exchange