Having seen Reap & Sow tileset nuking builds slowly starting to gain exposure and traction over the past few months, when DE announced Sev Prime, a small part of me was genuinely like "oh dear"
If people think the current Wukong slam spam is bad, they won't enjoy this :^)
I consider Ivara the Swiss Army Knife Warframe. If there's some miscellaneous task to be doing (mining, fishing, Riven challenges), Ivara's the one I'll use. She's versatile and useful. Her headshot bonus from her stealth, and Navigator shenanigans, begin to shine if you're ever up against any tough single target enemies where it matters (Disruption/Cascade)
Considering Volt is genuinely meta for pretty much every activity in the game (Eidolons, Profit Taker, E/SO, general mission/relic speed runs, Aya bounty farms, level cap runs in Disruption and Cascade, etc), I'm surprised he didn't get S tier
Yes it does! So for the event it's worthwhile to "farm"
I was also super disrespectful on my first attempt hahahahaha, I went in with a Certified Health Tank Oberon so when I saw the laser coming I was like "let's see how much damage this does", fucked around and found out
Other than that, I've been loving that Oberon gets to shine as a solid support in this fight with his death prevention, radiation damage buff, and status cleanse. Feels so good bringing my favourite out for something!
A fancy unique Sumdali for your landing craft, plus seems to be a guaranteed Arcane drop (other than some of the weird loot bugs occurring atm - loot often teleports above where the boss died so players have to make sure to check above and jump up to get it)
It's less of something to be farmed considering the difficulty and time it takes to do, and more something to do for fun and earn your trophy
The "secret" 60 Eyes boss is spawned on the new Assassination node on Deimos - Effervo. The mission only requires you to gather 30 Eyes, however if you continue collecting up to 60 Eyes, you will spawn the super boss rather than its regular variant. It's very tanky with pretty devastating special attacks that keep you on your toes as it is imperative that you avoid them - they cannot be face-tanked.
I find this an immensely fun boss fight, to the degree that I don't want to give too much unsolicited advice because I think it's great if people experience it and figure it out for themselves. However if anyone would like some general pointers to help them prepare before tackling it, I have some below:
The first most threatening part of the fight is catching Magnetic procs - This mostly occurs when the boss performs a frontal melee slam with a wide area of effect, but the snake Murmur ads are a frequent source as well. If you go into the fight assuming that you will not dodge perfectly and it is inevitable that some these attacks will catch you, you can prepare and build around preventing/recovering from it - Arcane Nullifier will prevent Magnetic procs and preserve your energy, and Rolling Guard is a quick status cleanse plus 3 seconds of invulnerability to reposition and recover. The Wyrm companion also has its Negate precept to prevent status effects
The second most threatening part of the fight is having your abilities dispelled and being unable to cast for a few seconds - This occurs when the boss's spinning laser attack hits you. Typically the first laser will hit you with the nullifier effect, then the second will swing around and one-shot your vulnerable health while you are unable to cast. Rolling Guard is a very effective panic/invulnerability button to protect yourself and recover from a laser hit. If you assume that getting hit at some point is inevitable, then you can prepare for frequent and inevitable re-casts of your defensive and offensive abilities and allow for a good energy economy
The first phase of the fight has very few ads - just a random Eximus every now and then - This means the first phase is where you are most likely to run out of energy and/or ammo. Incarnon weapons with their free ammo from their Incarnon forms, or battery weapons that cannot run out of ammo, can prevent this being a problem. Energy can be managed by not catching constant Magnetic procs and not building deeply into negative efficiency
The second phase of the fight has far more ads - This is good, because if you have effective area clearing you are provided with far more energy orbs, ammo, and Arcane/Galvanized stacks. However, this is also bad, because it can make the fight very chaotic and distract you from watching the boss and dodging its special attacks
There are no self revives, like in Archon hunts - Prioritise reviving your teammates. If you go down yourself, you can go into Last Gasp to prolong your bleedout timer even if you don't think you have a chance at pulling off a self-revive, but make sure to put a waypoint on your downed Warframe to help your teammates find it in the clusterfuck chaos
Stay mobile and stay focused - Once you have a feel for the fight and the boss's attacks, the biggest deciding factor is your own consistency in not getting caught out and not going down. Move lots, dodge everything you can, and try not to tunnel vision on ads and take your eyes off the boss for too long. Remember that the boss is always the main focus and the ads are just a distraction
Hounds have always had some useful abilities, like Repo Audit, Synergized Prospectus, and even Null Audit, while being able to equip the robotic mod Guardian, and they're now buffed by the new Bond mods like Manifold letting them use the abilities more frequently. Without perma-death it's great being able to take them into higher level stuff and benefit from their CC and utility - they do very nice aoe status priming for any situations where that's a benefit
I've found Sentinels most useful in terms of companion up-time, as they have the shortest base recovery of 25 secs with Primed Regen equipped, before the assistance of Bond mods, with a guaranteed 10 seconds of invulnerability when they recover. Plus since they naturally follow you around over your shoulder, any efforts you take to avoid enemies and damage naturally applies to them and benefits them too (simple parkour to reduce enemy accuracy, using cover from gunfire, Vazarin dashing the frame also catches the Sentinel, Zephyr's Turbulence covers the Sentinel with enough range, etc). The other companions still get the benefit of manual revives, but the situations where you're too busy to manually revive still apply the same as before the update so it's not always a positive you can make use of
In very high level stuff all non-Sentinel companions still tend to spend more time on the floor recovering than up and active, so carefully choosing Bond mods that give you the most realistic and practical ways to quickly revive them becomes more important
I've been having a lot of fun with Dual Toxocyst Incarnon on Zephyr specifically. Her augment Airburst Rounds provides base damage, so it frees up the gun Arcane slot away from Merciless/Dexterity/Deadhead. So in the Arcane slot I put Cascadia Overcharge for extra crit chance while Overshields are active. Her 3 generally protects the Overshields and guarantees she can maintain them. She also gets another crit chance boost from her passive whenever her feet aren't on the ground, and being up in the air aim gliding above enemies gives easy access to headshots, plus the grouping from her 2 helps the Dual Toxo's richochet. Just feels all round great, very fun to play
IN ACTION: https://www.youtube.com/watch?v=a85BcHCOtiY
Smite Mag is like Energy Vampire Trinity with extra steps. The biggest upside is that Mag's kit brings more to the table with crowd control and armour strip. The biggest downside is that the Smite & Magnetize combo needs the player to be Host, as the jank is just too high when Client to the point of not working at all
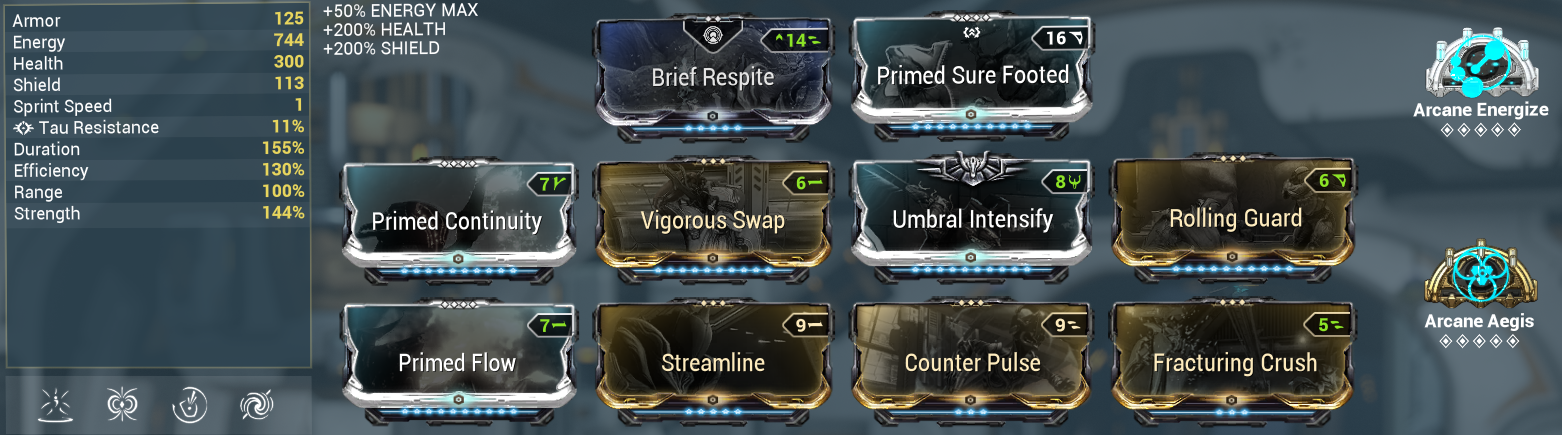
Counter Pulse and Arcane Aegis are flex slots
With a cast-heavy setup energy can quickly become an issue
The way it works is that Smite generates a bunch of orbs that do damage equal to 35% of the target's health. Magnetize traps those orbs, applies a damage multiplier, and forces them to all return and damage the isolated target as they can't escape the bubble. It needs armour strip as the orbs are not true damage. Viral will buff the orb damage
A level 9999 Thrax Centurion has approximately 9.5 million health, and approximately 15 million Overguard. Due to the damage buff of Viral not applying to Overguard, a certain amount of overkill is required to make sure the damage you're generating from the health will get through the Overguard - this is where the damage multiplier of Magnetize and Vigorous Swap helps. The jank always persists - sometimes Smite orbs will keep orbiting inside Magnetize and not return to the target, and in live gameplay you're always at risk of another unit being sucked into the bubble and taking some of the orbs. You want to know that each orb is doing as much damage as possible when it makes contact
Viral helps damage against the Thrax's health, but most importantly it helps against the Spectral form. You will see in the footage, that an orange crit headshot with Raplak, buffed by 10 Viral stacks, is enough to oneshot a level 9999 Spectral form while using Vazarin (the one focus school that has no way to buff its own damage). Level cap Spectral forms have approximately 3.5 million health
You can use a budget Smite combo with any frame with a Void bubble proc, but it doesn't work anywhere near as well
Mag's entire kit is extremely good for Cascade - using Smite is a fun interaction but it's not required. Pull is excellent for pulling enemies into Exolizer circles. Magnetize is CC and a damage buff - it will benefit any single target Thrax killing weapons as well as dealing with crowds of trash easily (Nullifiers aside). Polarize is a natural shield gating ability, made better by using the Counter Pulse augment to add some CC and breathing room. Crush pretty much always wants its augment, but is an excellent low strength armour strip, CC, and shield gating ability
LINK TO GUIDE (Google Doc): https://docs.google.com/document/d/1HiI9m0snsYnymzDFdwssv2Ov8wiT5MDyvkzuSP8d-as/edit?usp=sharing
The guide contains a lot of information, but it keeps wordcount to a minimum and I've done my best to present it in an easily digestible way.
The aim of the guide is to describe the strategies and tactics that work best, and why they work best, rather than just saying to equip X, Y, and Z mods. It's mostly aimed at inexperienced to intermediate players of the game mode, but there might be things in it that even experienced players weren't aware of. Likewise if you read this guide and think of something I've missed or something I've got wrong, please let me know. I aim to always keep it up to date.
Why play Void Cascade?
Have you reached a point where you're geared to the teeth, and you don't feel like enemies or missions provide much challenge? Are you yearning for some difficulty? End game?
Void Cascade is one of the fastest scaling missions in the game, so you can test yourself against very high level enemies without having to spend half the day sitting at your computer/console. An organised team can reach level 1000 in ~30 mins, and level 9999 in ~1hr. A solo player can reach level 1000 in ~1hr, and level 9999 in ~1hr 30 mins.
The mission is very fast paced. It's not just about killing enemies - objective management is extremely important, which means moving around and never camping in a corner.
It demands a lot of the player - fully geared weapons, Warframe, and Operator/Drifter. You get to stress test a full loadout.
Thrax drop Zariman Arcanes, which are a staple in many modern builds and help to broaden options beyond expensive Eidolon Arcanes. Steel Path doubles the drop chance, and a Mod Drop Chance Booster will double it again.
It's one of the few missions in the game that directly benefits from organised teamwork - it's a great mission to play with friends, and to form new friendships in.
You do not have to play until level cap - enemy levels hit 1000 at 65 Exolizers, which is where you enter the territory of health/armour and damage reduction builds hitting the mathematical wall of impossibility (even 1% of the damage enemies deal is enough to kill you). For maximum loadout variety, there's nothing wrong with aiming for 64 Exolizers (four C rotations) and extracting to reset.
Differences between Void Cascade and Disruption
Void Cascade and Disruption are similar in that you have mission objective points on the map (Exolizers/Conduits), and tough boss units to kill (Thrax/Demolishers). Otherwise the missions can be very different.
The easiest way to explain it is that Disruption is a mission that you make happen - you choose when to put in Conduit keys, and you control the pace. Void Cascade is a mission that happens to you, and it's up to you to react to the situation and manage the objective. A minimum level of speed is expected from the player in Cascade.
Both missions benefit from players splitting up to progress the mission objective more quickly and effectively. Void Cascade on average scales twice as fast as Disruption (~1hr vs ~2hrs to level cap in a team, ~1.5hrs vs ~3hrs solo)
Disruption gear-checks you in your ability to kill Demolishers. They can be Crowd Controlled with Cold procs, Magus Lockdown, and Warframe abilities between nullifier pulses. They have innate damage reduction. Some are immune to Viral and some aren't. You can use Faction mods for the Demolishers' factions.
Void Cascade also gear-checks you in your ability to kill Thrax - not only their Physical form but also their Spectral form. Their physical form has Overguard, so they cannot be Crowd Controlled until it's broken, and your damage will not benefit from Viral until it's broken. There are currently no Faction mods for them. Only Operator/Drifter Amp damage will kill their Spectral form.
Disruption teaches you methods of killing single target boss units effectively, and the majority of Demolisher-killing builds will transfer to Thrax with varied success. However, the bread and butter staples of Disruption - Epitaph and Vazarin - are detrimental to your ability to kill Thrax in Void Cascade. The playstyles of the two game modes are transferable in some ways, and not in others.
Overall, Void Cascade is a less forgiving mission that asks more of the player in order to succeed - hence the guide. In my subjective opinion, it's also way more fun.
I still see lots of general misinformation around the speed of scaling in various missions, so this is purely for info/reference.
---
SP Void Cascade
When: 107 Exolizers
How long?
Approximately 1 hour in a team
Approximately 1.5 hours solo
The level scaling is determined by the number of Exolizers completed, not time spent in the mission, which means player performance affects the speed. Competent attacking to purge each Exolizer as it spawns, paired with competent defending to make sure no purged Exolizers are re-possessed, means a faster scaling mission.
Why: Thrax spawn more frequently beyond 16 Exolizers, which encourages longer runs for Arcane farming. Also for build stress tests, and fun.
---
SP Circuit
When: Round 18
How long?
Approximately 1.5 hours in a team - depends on player's loadouts
Approximately 2 hours solo - depends a lot on loadout
The level scaling is determined by the rounds completed, which means the quicker players get through the rounds, the quicker it scales. Clearing Void Flood, Exterminate, and Defense quickly, and successfully defending Excavators, makes a faster run.
Why: There are bonus points awarded at Round 4, and at Round 5 and beyond the points per round increase. This encourages longer runs. With more decrees collected making players much stronger there's also the chance that rounds go by much more quickly once you're further in. Also, for fun.
---
SP Disruption
When: Round 45
How long?
Approximately 2 hours in a team
Approximately 3 hours solo
The level scaling is determined by the rounds completed, which means player performance affects the speed. The faster players kill enemies, acquire conduit keys, put in said keys, and find and kill the Demolishers, the quicker the rounds go and the quicker it scales.
Why: Disruption can appear as a fissure, with scaling buffs to resources per relic opened (such as Steel Essence and tileset materials). This encourages longer runs. Also for build stress tests, and fun.
---
SP Survival
When: Approximately 8 hours
Survival, unlike the others listed above, does rely on time spent in the mission, as every 5 minutes counts as a "round" and this cannot be sped up.
Why: Like Disruption, Survival can appear as a fissure, with scaling buffs to resources per relic opened, which encourages longer runs. Also for build stress tests, and fun.
---
Level cap = level 9999 enemies
As a general rule, health/armour and damage reduction tanking falls off at around level 1000 enemies, as they start dealing too much damage for you to reliably tank through. You can generally expect to encounter level 1000 in half the time/rounds it takes to reach level cap in your chosen mission. There are some specialised damage reduction builds that can go further, and may hit different walls at 3000, 6000, or 9000.
---
How frequently are people reaching level cap?
You are generally unlikely to find players willing to commit the 8 hours it takes to reach level cap in a Survival. However, there will be many players willing to commit the 1-2 hours it takes to reach level cap in Void Cascade, Circuit, and Disruption.