Yes sunsets are definitely my favorites as far as chocs go. Currently using a mostly Mx board but a few of the thumb switches are sunset chocs.
If I had to nit pick they are a little scratchy and having the tactile feel closer to the actual switch activation would be nice. But it's not like there is the wealth of options that exist on the mx side.
Not sure what your picture of anatomy looks like if you think these are in my face... plus what would I be looking at, they keys are blank. Again the real advantage to a spilt is allow for free translation along the X axis and rotation on Z.
If you like having your boards spaced shoulder width great but you are really off about your view of the ergonomics. Take a look at how people use spilts and other one piece ergo boards. Also we work with our hands if front of our chests because of the economics not in spite of it. Working this way doesn't lead to hunched posture...
I feel like you didn't actually read what I wrote... If you were going to mix some cake batter where would you position the bowl/spoon. Naturally you are going to work with it more less centered on your body. Sewing, widdling, tool usage ect... It's not about your shoulders is Ulnar deviation. Why do you think we consider boards like the miryoku or alice style boards as ergomech if they are not shoulder width spaced?
Yeah I've never actually tried non-sculpted caps on a keywell so I'm really just guessing on the difference. I started with sculpted caps on my moonlander and never really touched non sculpted caps since.
The switches as U4 silent tactiles, not the U4t. I'm getting more used to them after a couple days of typing but they still feel a bit scratchy and abrupt. Also some of the keys have a bit of ping to them. Some of this might be due to my swapping the springs with 45g ones. More than the feel though, which again I'm growing more used to (and maybe is improving as they break in), they aren't all that silent. The silent squids which I had on here before by comparison where dead quiet; they just felt a tad mushy. I think I'd rather have true silence with a little bit of mush or just go with non-silent tactiles (like T1 Sunflower's on previous build) with superior tactile feel.
Ulnar deviation is the main ergonomic issue that split keyboards address. You can eliminate this by rotating your splits away from each other so that you don't have any bend in your wrist. Shoulder position doesn't really change much no matter where you position things, only the muscles that are engaged change much and it's actually more work to spread your arms than it is having them point inwards. How common tasks are there that involve working with our hands at shoulder width?
Keywell keyboards will give you less, and more natural finger travel compared to a flat board. Though with only 3 rows the difference isn't really all that much compared to a flat board with good sculpted keys. It's a much bigger deal once you go larger than 3 rows.
For me the major motivation to try out this style of board was the curved thumb cluster. At least in my opinion most thumb clusters you see are pretty terrible from an ergonomics perspective. Even when you get one that doesn't encourage curling your thumb under your fingers a flat arc doesn't really correspond with the thumbs most natural movement. I find curved arc of this thumb cluster more natural and allows for more keys to be comfortably arranged than would otherwise be possible.
Thanks! I actually had Shrimp silents on here previously and I prefer them to the U4's. I'm giving these a chance but I think I'll be swapping these U4s back out for the shrimps unless I end up with something else. I'll have to look at the TTC's.
Hasn't really come up yet, I'm wfh, but yeah I would want to take this with me if I could. Actually bought a hardcase to stick this in should I need to travel with it.
Going back to something flat would be a bit of an exercise. Sculpted alphas would go a long way even on a flat board but the biggest difference would be in the thumb cluster comfort.
I had considered adding integrated wrist rests but I rest my elbows on armrests and it hasn't really been any issue.
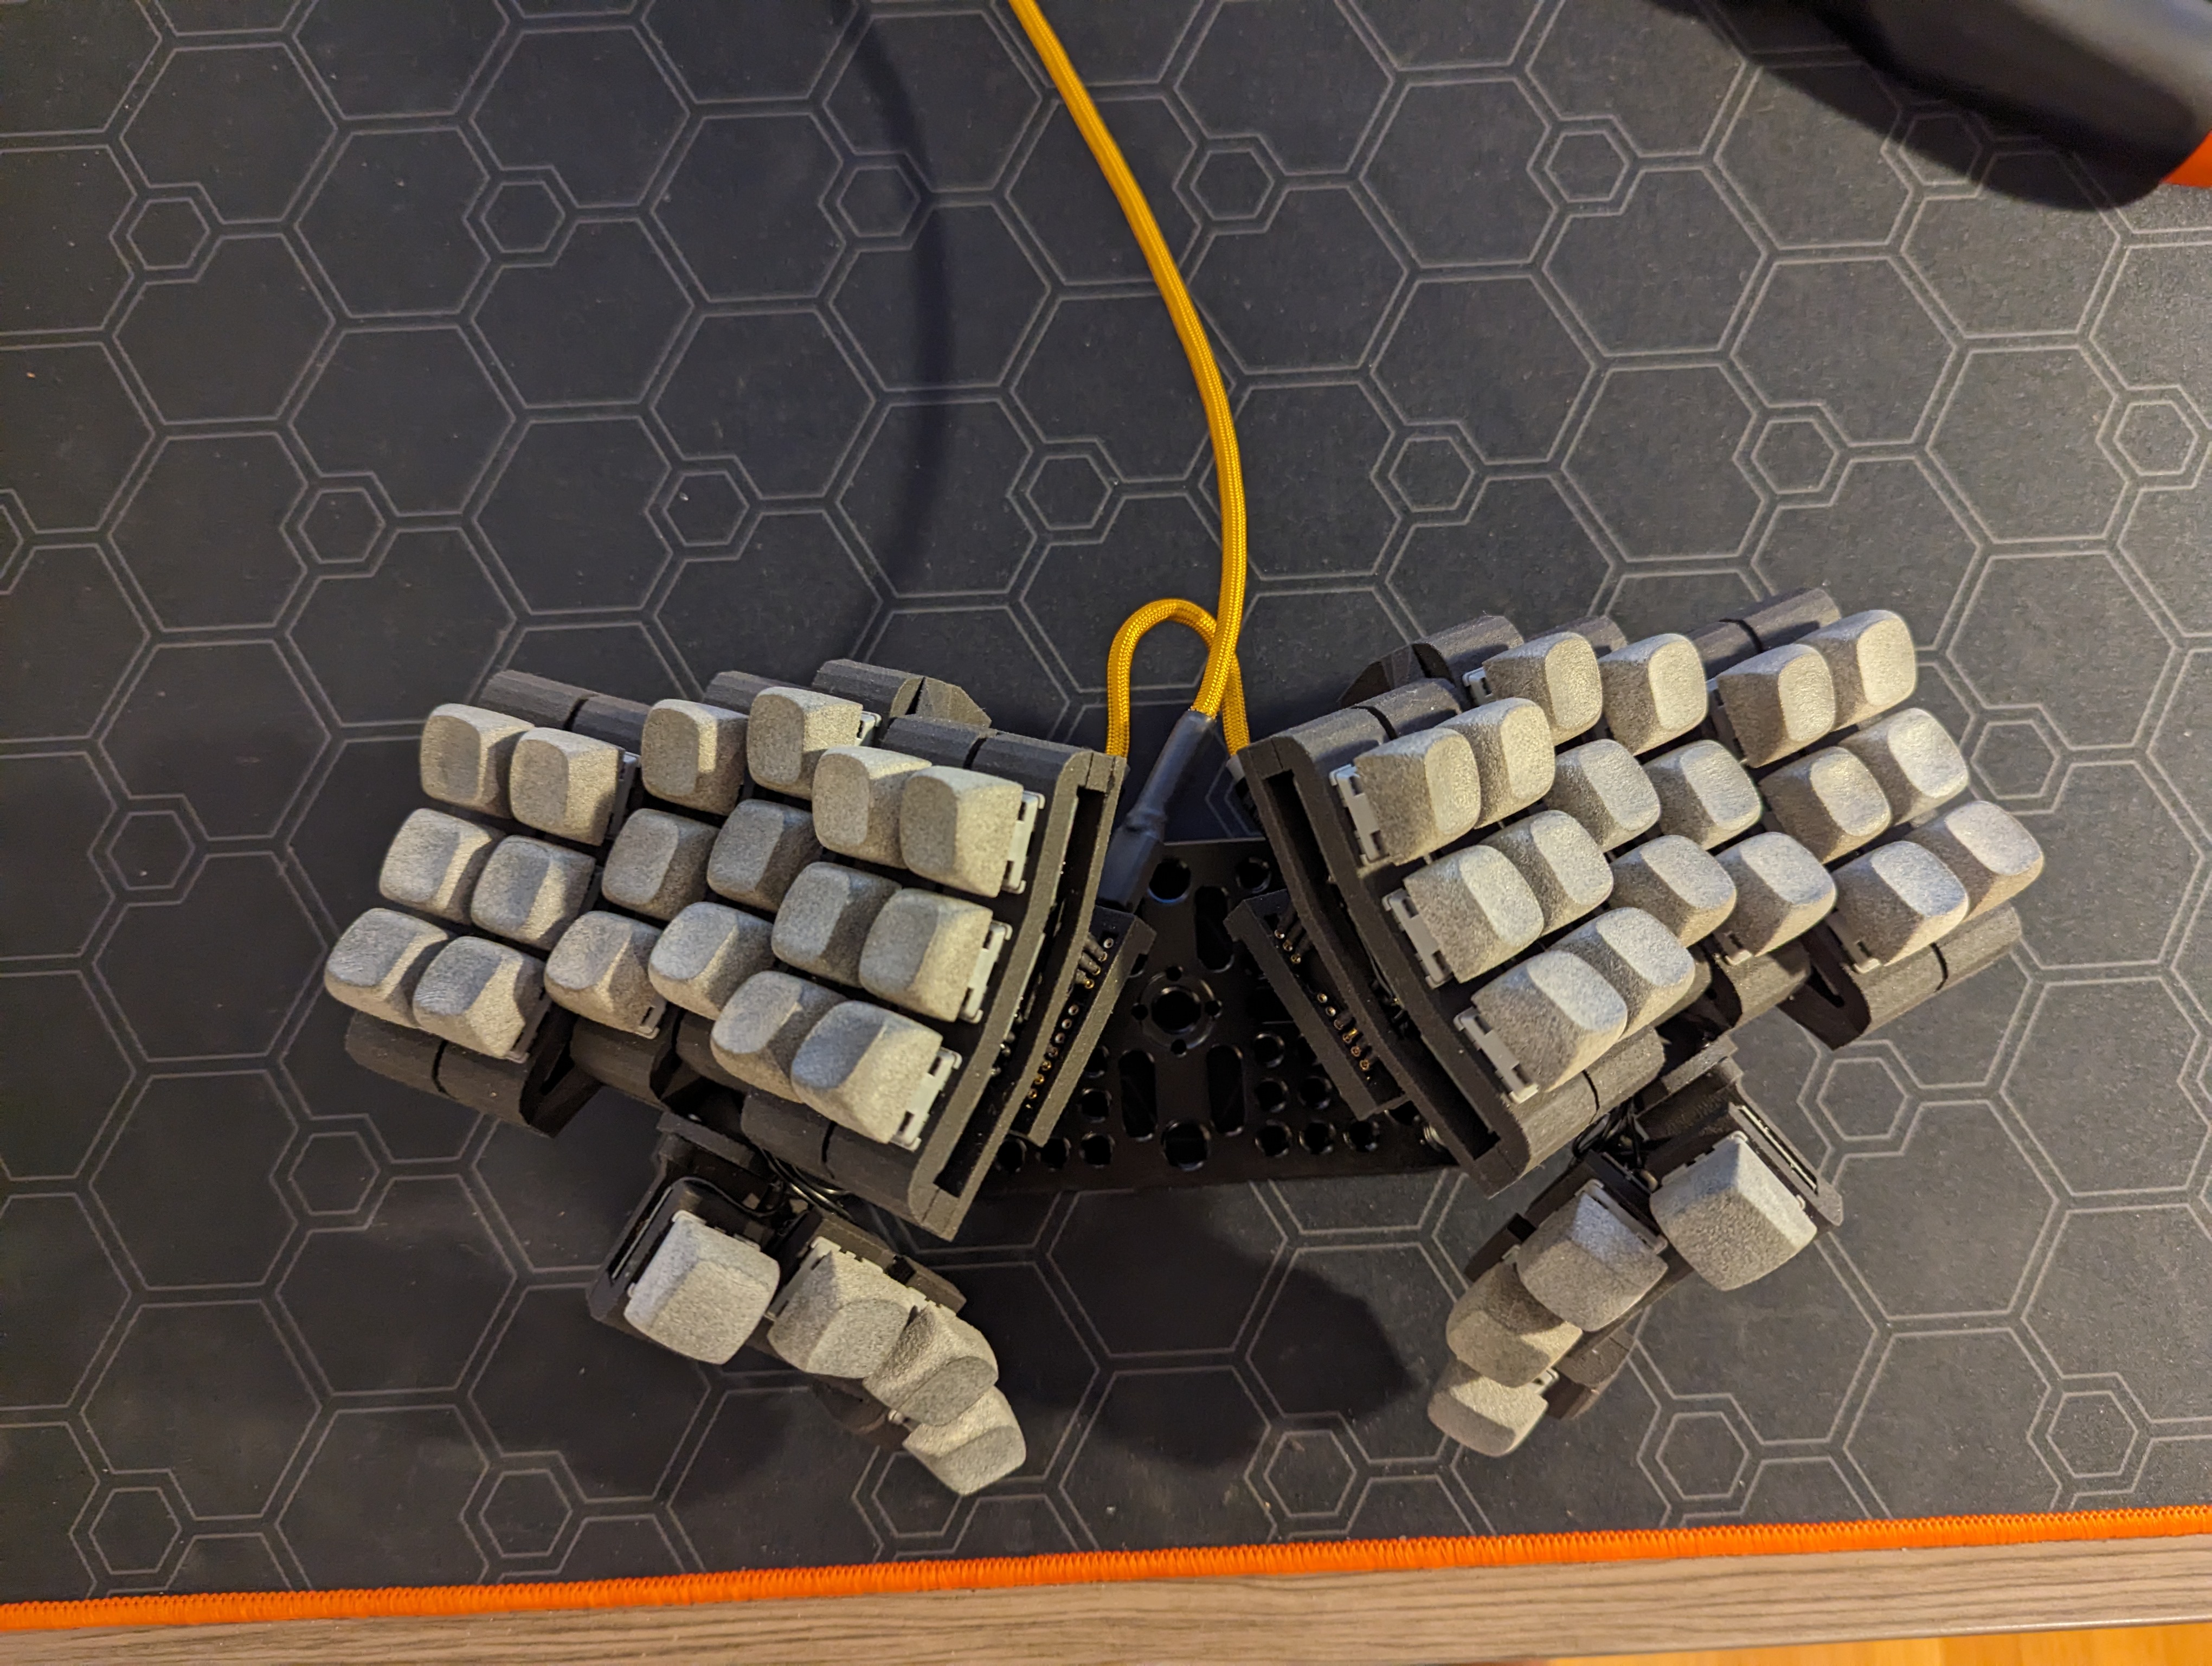
Finally completed my Explorer Pi V2 build. My primary goals for V2 was to adjust economics to fit my hand, improve build quality while reducing total part count, and to create a better thumb cluster. A lot of these changes trade modularity to achieve these goals, which is not a big loss as I get closer to endgame design.
Thumb cluster was my biggest complaint with the original; being modular made the whole assembly too weak and key spacing to large; not to mention inflating the part count. So I made a one piece design with additional mounting support. Also went with a six key, two row design. Finally I make the switch plate compatible with either MX or Choc switches (and swappable). Used my Enigma Dual Hot Swap pcbs for the thumb cluster keys. This thumb cluster is probably going to see some future iterations. I've made things fully modular in case I want to swap it out for a new one later.
I've made quite a few changes to the original to arrive at this point including:
- adjusted stagger of each column
- adjusted splay and height on the pinky columns
- used flexible pcbs (from the BigSkree)
- made the switch plate one piece per side (orig was individual columns)
- added side walls to the switch plate
- added additional support to the thumb cluster so it has less wobble
- one piece, 6 key thumb cluster
- support for both choc and mx switches on thumb cluster
- added ARRI locating holes to the 1/4" mounting point
- reduced total count of required inserts and screws
- reduced diameter of the 1/4" insert hole to better fit the inserts I was able to source
- adjusted 1/4" mount location for better center of balance.
While I originally was planning on taking more build photos and putting together a guide for this iteration I had a bit of a lightbulb moment while assembling this for how to improve the entire build dramatically so that going to be a goal for V3 now.
As a slight aside I came up with a pretty good mounting solution for this board. Each half has a stand using these rubber coated magnets, a low profile hawklock and super low small ballhead mounts. With my v2.5 base plate I modified the 1/4" center of balance so that these stands balance well enough on a non magnetic surface to type on. They are also rubber coated so surface damage as well as sliding are minimized. Then for my main setup to make things even more secure I simply place a piece of sheet steel under my desk pad. I'm liking this enough that I'm starting to wonder about the embedding some steel in the desk permanently. !Imgur
Keycaps:
- DES alphas R2-R4
- 4x DES Thumbs R5x
- 2x DES R5 1.25u
- 2x cDES R5x
- 2x CS 1.25u
- 2x Gravity 1.25u
Switches:
- MX Boba U4
- Choc Sunsets
The Boba U4's are the second switch I've tried on here and still not satisfied. Anyone have some good silent tactile switch suggestions?
Links:
You're welcome, like I said was easy enough to chop off a column.
I'm in more less the same boat as far as printing goes. Either MJF or SLS will be fine. This iteration as MJF previous was SLS. MJF is a little nicer imo. Smoother surface finish and it can be dyed black. SLS is a little cheaper though. I used jlcpcb and didn't ask them to do anything special.
Yes I will share on this sub. Since you are interested though you are welcome take a look at my github early. Added a 3x5 version of the case there as well (not tested printing).
Hand-wiring shouldn't be much more difficult than my first build with per key pcbs. It is pretty thin though and assembly will be a bit tricky regardless of how it's wired. For printing I've only tried with MJF and SLS and I didn't really take into consideration any limitations of Resin or FDM printing. I don't think there is anything that would make printing any of the parts with those techniques (though maybe some parts are a little thin for FDM) so keep that in mind.
I'll be posting with more details on the board once I've consider it finished but happy to share here as well.
As far as modifications I made:
- adjusted stagger of each column
- adjusted splay on the pinky columns
- used flexible pcbs (from the BigSkree)
- made the switch plate one piece per side (orig was individual columns)
- added side walls to the switch plate
- added additional support to the thumb cluster so it has less wobble
- one piece, 6 key thumb cluster
- support for both choc and mx switches on thumb cluster
- added ARRI locating holes to the 1/4" mounting point
Lot of my modifications make the board less configurable but provide an easier and sturdier build. Making this a 5 column build would not be difficult. The original is 5 columns by default and 6 with an extension plate. Modified version is all one piece but modifying the CAD to chop off a column would be no problem.
Currently the thumb cluster has a mix of DES profile caps on MX switches and CS profile caps on choc switches.
Aside from the 3D printed parts build just uses some heat press inserts and screws.
I'll be happy to share the modified files once I've got everything finalized and organized, hopefully that will be later this week.
My heavily modified version of the Explorer RxCT. This current iteration is almost complete, some additional custom keys for the thumb cluster on the way right now and not 100% sold on the current key I've got on here. Thumb cluster angle is adjustable and keys can be swapped for either choc or mx.
Also another iteration on the base plate with modified 1/4" mounting point for better balance is in the works.

Yeah personally I was never able to fully get used to home row mods. Even after a fair bit of tuning I found that invariably home row mods would start to get in the way of typing speed around the ~60wpm mark. People are always so quick to recommend home row mods as the ultimate solution to finger movement that I tried to stick with it for a fair while but finally switched to dedicated keys for mods and couldn't be happier (plus I finally smashed the 60wpm barrier).
Personally I have shift on both thumb clusters and alt-cmd-ctrl on the left most column of my left split (3x6 layout), the keys that used to be there were moved to combos to make space (ESC is two left most keys middle row, TAB is two left most keys of top row). I've got some of the mods duplicated elsewhere on other layers as well just depending on the use case. Also not using home row mods means you can (probably) use auto shift as well which can potentially eliminate the need for a fully dedicated shift key.
There are not nearly as many options for choc keys, particularly if you are mainly interested in ascetics. You can can get dyed mbk caps, off the top of my head I know Clickety Split has them. I'm sure you can find similar for different regions as well.
There is also Asymplex for both a variety of solid color CS profile as well as the occasional batch of artisan keycaps made. Also solid color DES caps with choc stems.
You could try out QMKs swap hands feature. I've not tried using myself but have considered doing so for this use case exactly.
Created a repo for the PCB here: https://github.com/mroukema/enigma-dual-hs
Both the kicad and ready to print gerber files zipped together.
All the 3D printed parts were a just under 95usd. This total could have been lower but due to the modular nature of the keyboard there are a number of small parts that are at or below the minimum volume and thus the cost for printing them ended up getting rounded up to $1 min part cost which added up. I'm working on consolidating some of the parts into larger pieces to limit this and reduce the total parts count for my next build. The down side is of course less modularity but I've already got a good idea of what I want so that is no big deal.
I decided to try out building myself the Explorer RxCT keyboard (posted on that other place shortly before the drama). Since this build is using rp2040 mc I've taken to calling it the Explorer Pi.
Of course I don't have my own 3D printer so I ended up using jlcpcb for the parts using SLS nylon. I'm quite pleased with how they came out.
Quite happy with the keyboard overall. I had being using choc switches for quite awhile so it took a little adjusting but not too bad and very comfortable to type on at this point.
Only thing I will probably change sooner or later is the thumb cluster. The modularity is great for narrowing down preferences but the construction means the keys are further spaced than I would prefer. I'm working on a two piece thumb cluster with tighter spacing at the cost of being a lot less customizable once I'm certain I've figured out what I want.
Loving the cheese plate for the base, I think there is something to be said for having a constant relative positioning between left and right hands. Only issue with it originally was that it would slide around a lot on the desk pad. I came up with a great solution:
Four 3/8" set screws secured in place with four more 1/4" set screws and this thing isn't sliding anywhere anymore. Also possible to use some longer set screws to add some additional Y axis tilting if desired.
Quick disconnect mounts for convince !
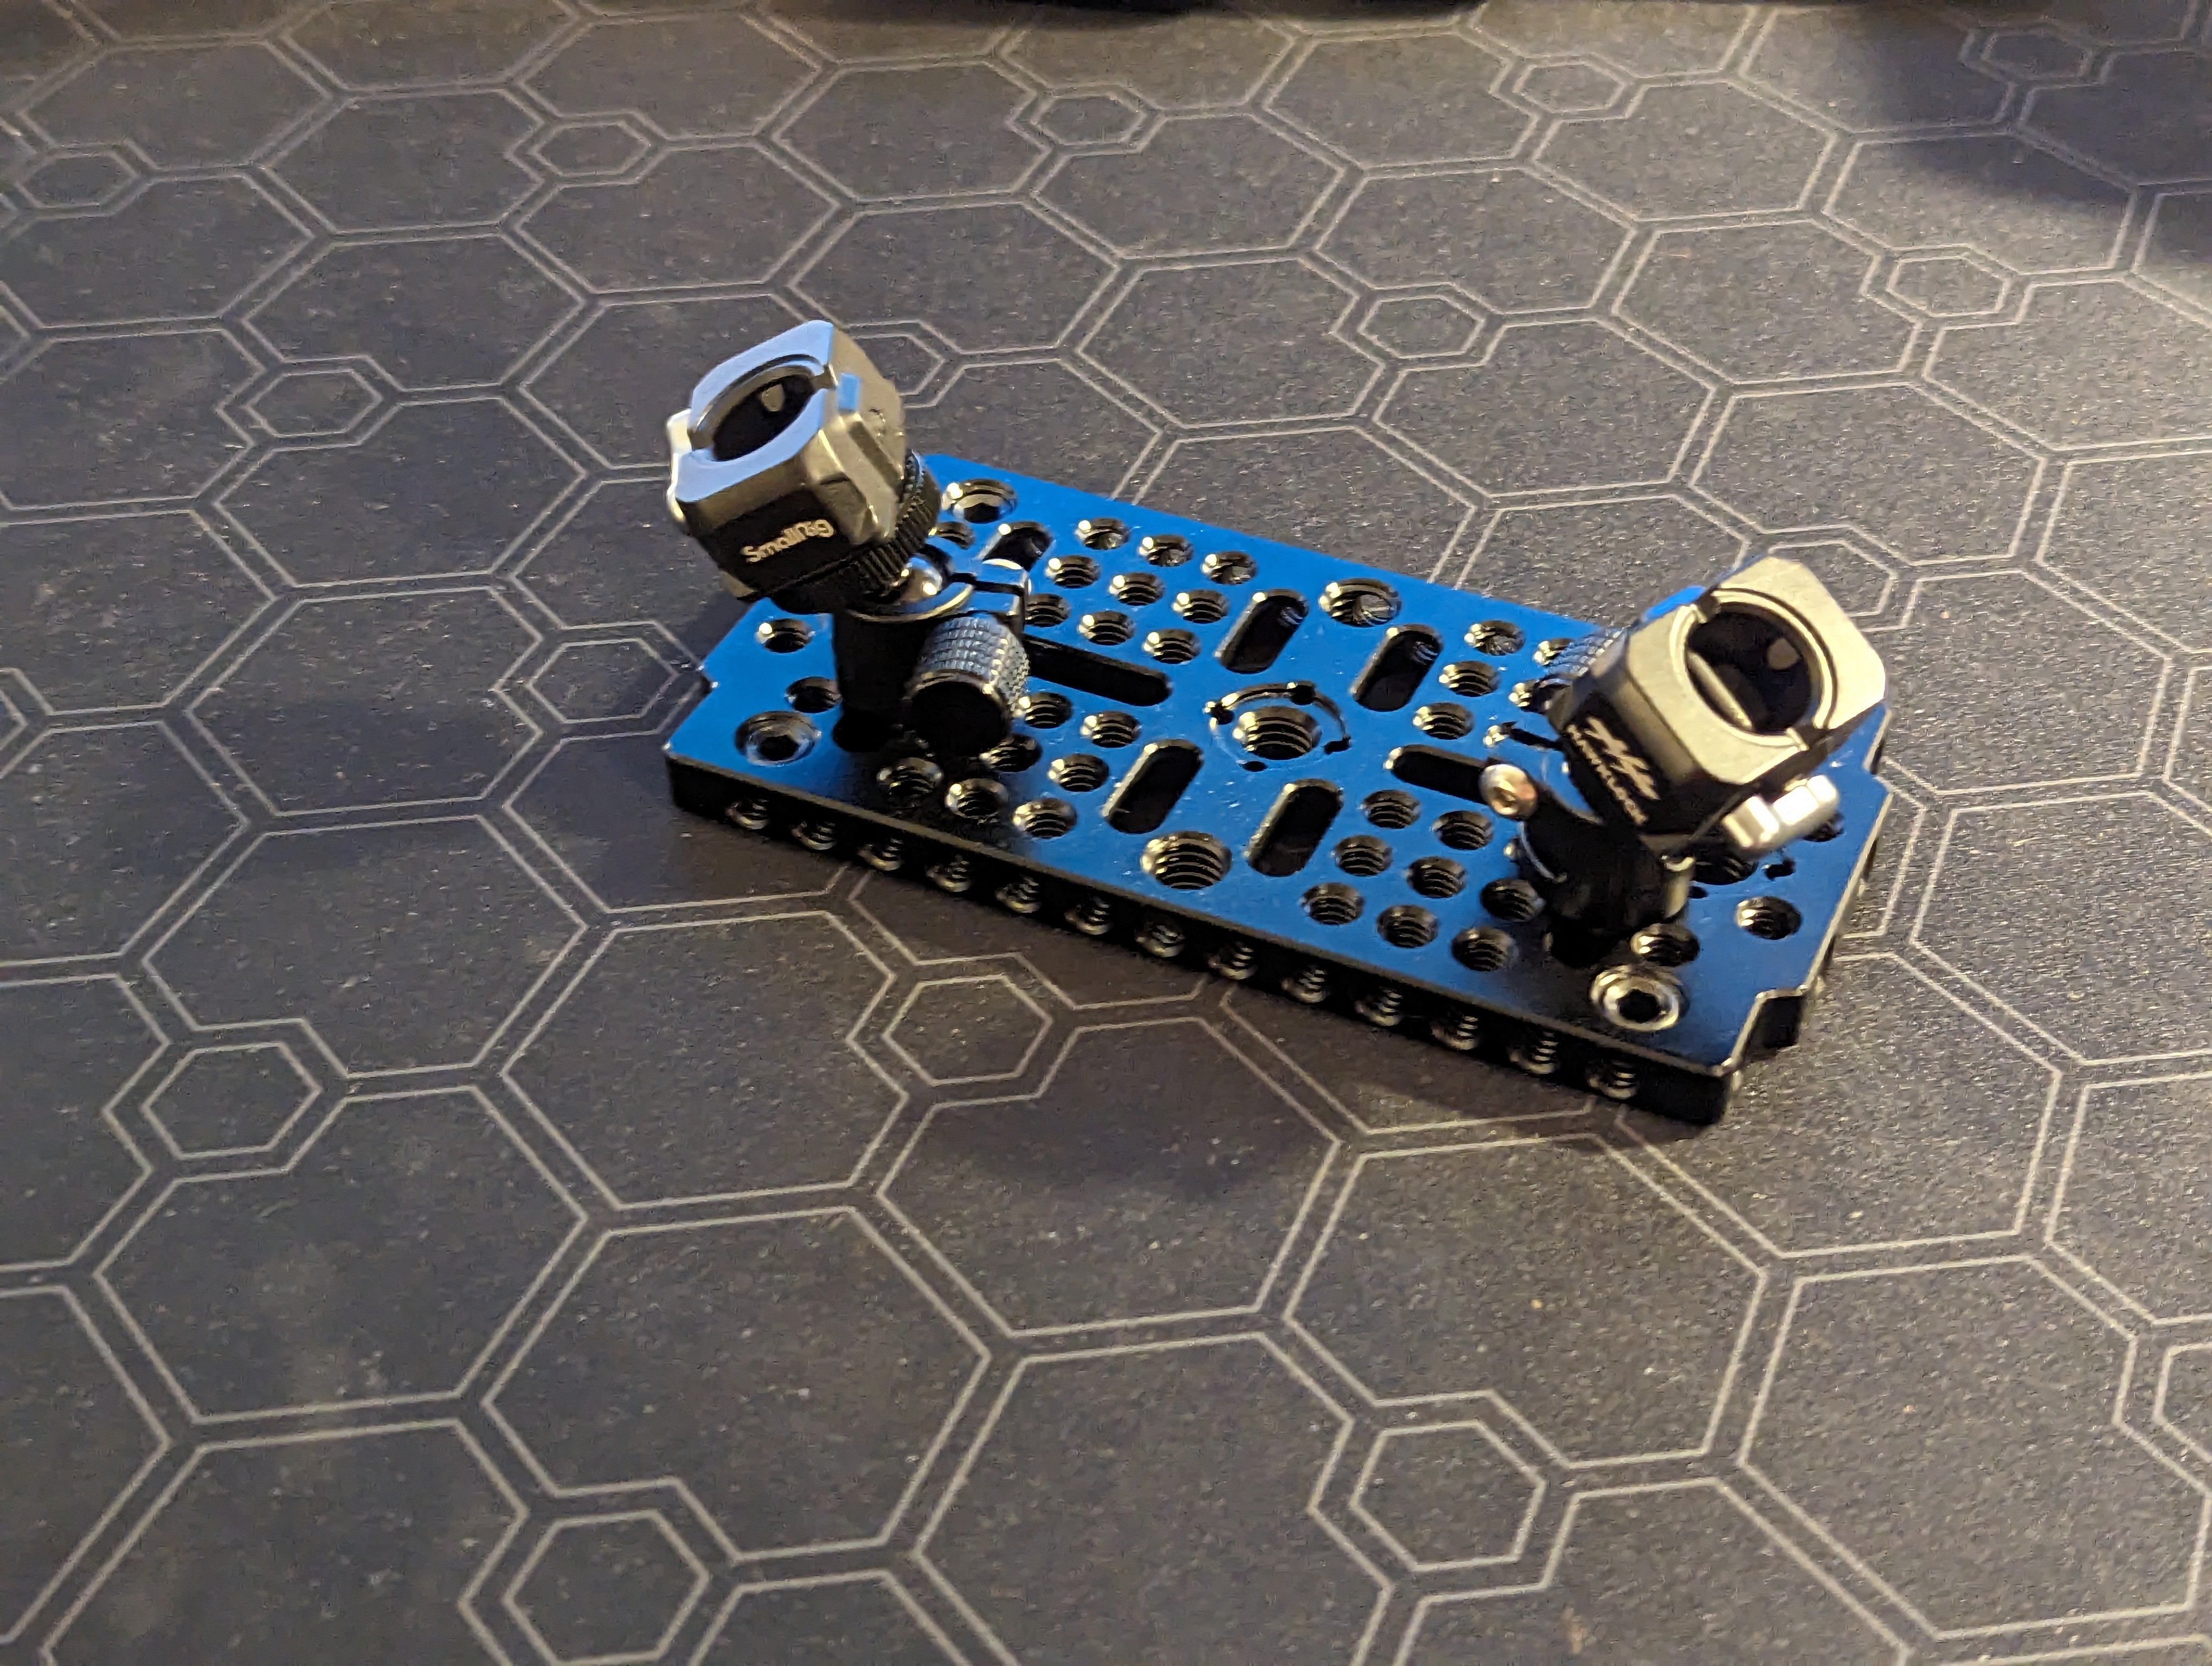
Also worked out a mounting solution for on the go by mounting direct to laptop. !
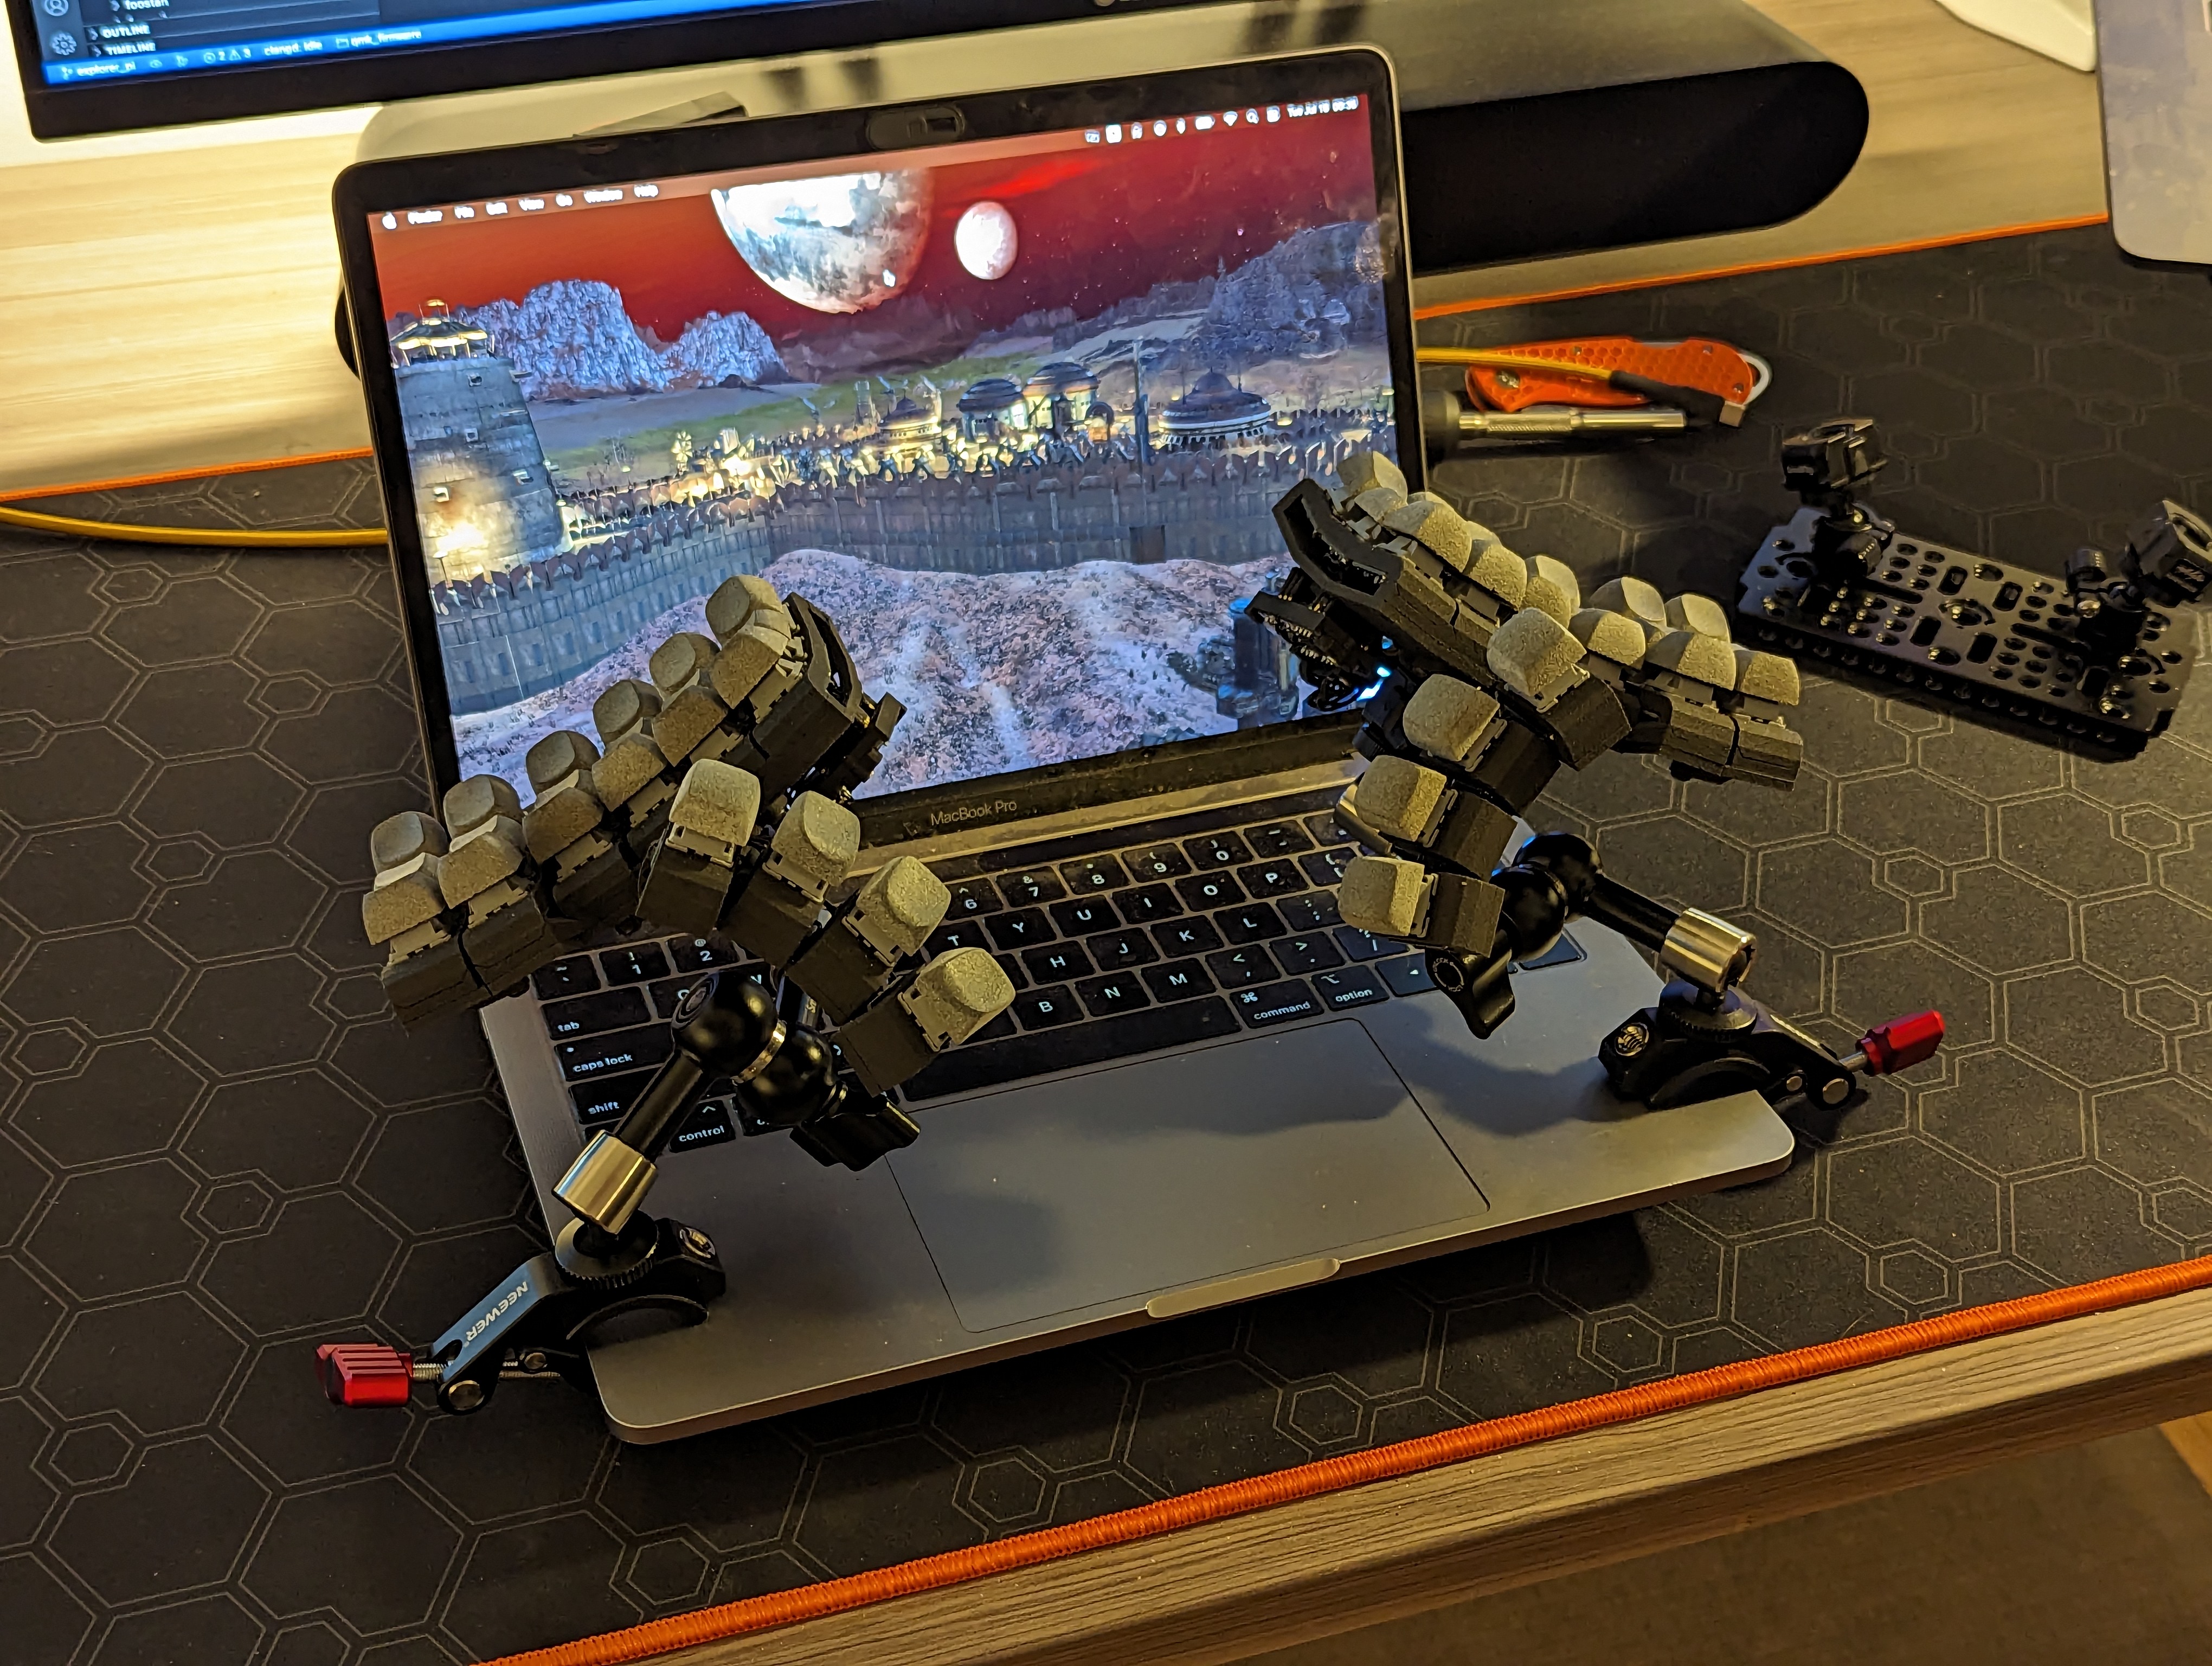
- Switches are Durock Sunflowers, with Spirit Slow II 45g springs
- Keycaps are 3D printed nylon DES from 3dkeycap.com
- Firmware on personal fork
- Personal Keymap
- Pull request for firmware into qmk official
- More photos here