Queue Belford: IM NOT FUCKIN LEAVING!
When viewing a single child comment thread (ie viewing a response to your comment that is already a few comments deep in a thread), you are given two options at the top of the comment section, one to "view full context" of the thread you're in (expected behavior: give context up to the parent comment and show only comments in that thread) and one to "view full comment section".
As of now, at least for me, both options simply give me one additional parent comment above what I can already see (in my previous example, it would show the comment I originally replied to). To get to the full comment section, I have to press the option and reload the comment section over and over until I get to the parent comment, at which point "view full comment section" actually does what it says.
Do some poking around for your printer and slicer - for your printer, you need to know if you have a direct drive or Bowden tube setup, and for your slicer, you need to figure out how to modify the standard gcode.
Looking at some pictures online I'm pretty sure your printer is a direct drive. Again I'm not familiar with your slicer so I don't know what your model looks like, but typically retraction tests will be a tower with different values printed on the side indicating how far the retraction distance is. For a direct drive, these values should be pretty small, likely topping out at just a couple mm at most.
A search for " <slicer name> retraction tower setup" should get you numerous tutorials for your slicer, just follow those guides and input a range appropriate to your setup and should be good to go
I can confirm this. I'm not a wolf expert, or even seen that many wolves really, but I have a dog and I don't think she'd wear a bonnet.
Reg, why'd you just stab yourself in the shoulder?
Ah cmon, ain't ya ever seen a movie?
Well of course I've seen a movie, but what the hell are ya doing?
Every time the guy stabs himself in a movie, it's right before he kicks the piss outta the guy he's fightin'!
Well that don't.. when that happens, the guys gotta plan Reg, what the hell's your plan?
I dunno, but I'm gonna find out!
If it looks good enough, why bother?
good enough
You do understand what community you're in, right? ;)
I don't use orca slicer so I'm not familiar with how it works specifically, but are you sure that the retraction settings are actually changing between different sections? I made the mistake when I first started it just loading the model and letting it print with default settings from my slicer. If the GitHub doesn't specify exactly how to enable the retraction tower settings, I would look up a guide on YouTube. If you've done temp towers, it'll likely be set up in a similar fashion.
If your test starts at 0 and you don't see any difference, it definitely it not working as intended; 0 retraction with result in a huge stringy mess, and going to the next step will be a significant change.
Edit: also maybe make sure that you are using the correct values for testing according to your extruder setup; if you are using a direct drive retraction tower on a bowden setup, the changes will be too small to make any discernible difference, and the lowest setting on a bowden test will likely be too high for a direct drive.
Extrusion works by the motor pushing the filament forward, causing pressure behind the nozzle, and the filament melting and extruding out the end. When your printer wants to stop extruding ( ie moving to a new part or section to print without printing anything in the middle), it makes a retraction to pull the filament back, releasing the pressure behind the nozzle, and stopping the filament from extruding out.
In a perfect world, a full retraction would not be necessary; not pushing the filament forward should stop the pressure buildup, and stop the filament from flowing. However, we don't live in a perfect world, and so backing the filament up a small amount is necessary to stop it from flowing.
Finding out exactly how much you need to back the filament up is the purpose of this test. Back the filament up too much, and you can create clogging issues, extrusion issues caused by the filament not being at the end of the nozzle at the beginning of the extrusion, and (slightly) increased print time; don't back the filament up far enough, and filament will continue extruding out the nozzle, causing stringing.
The test works by having you lower your retraction distance to a very small number ( a lot of tests will have you disable retraction altogether, ie 0 mm), and slowly increase it from there. The idea is that the bottom of the tower will look like hot garbage, and slowly improve as the retraction increases; what's the quality stops improving, you know that that is your ideal retraction distance.
If you have a Bowden tube setup, a good retraction Tower would have values ranging from 0 mm to around 10 mm. Direct drive extruders need far less retraction; 0 to 2 mm in 0.2 mm increments should be good. Again, you're looking for the first setting that gets rid of stringing.
Let me know if you need any help or have further questions! Retraction can be really tricky to understand mechanically, but can be important for improving print quality and reducing the need for post-processing.
Fantastic! My first thought was either a miniature display table or maybe a small parts case-and-table combo.
Nice! This is really impressive for a first prototype print. I've been printing for over a year, designing small brackets and such for maybe 6 months, and most of my designs are just one solid piece. Something with moving parts is awesome!
Can we ask what the project this is for is, or for a link to this model?
Yeh, but unless I uproot my life and move to a different country, I'm stuck doing it, so I can either bitch and moan about how much I hate it, or have the best time I can doing it 🤷🏾♂️
I'm a car guy and far from manly. I drive a loud annoying stick shift because it's fun and life is too short to be bored while driving.
Stealthburner ended up fixing your clog issues entirely?
More or less. You can check my post history, made a lot of fuss about it here trying to get it squared away, in part it was caused by some magically reoccurring issue where my printer boards were reporting incorrect hotend temps (sometimes off by as much as 70°C). But even after fixing that side of things my old setup kept clogging; kept diagnosing back and forth between extruder and hotend, decided why not build a stealthburner and replace both, if that doesn't fix the problem then I'm part way done with building a voron.
Now I'm building the voron anyways, haha
I found this instruction of assembly pretty entertaining. "Break it and try again without breaking it".
Actually have the SB already on the current printer. It was having extrusion issues for the better part of 3 months and I built it as a last ditch effort to save the printer from the closet. After building that I realized how much I loved the voron designs and once the printer started acting up again I made the decision to just start piece mailing a 2.4
I suppose it could be a power issue based on that. That's the same article I linked in the OP; my klippy.log shows that it loses connection with the MCU, then a few lines later I get the EOF error.
Printer is finishing the third 4 hour print with klipperscreen device unplugged. Really leaning towards this route, I'll try swapping my nice power supply in when I get home and see if that helps.
Pi is not OC'ed, but I did just realize that it's running on a power supply that came in a cheap starter kit and not the nicer one I'd ordered, so maybe that's an issue. You would think the Pi would report under voltage if that were the case though, no? When Klipper errors out, the pi doesn't shut off or report any issues.
I will say that I've completed two 4 hour long prints with all external USB devices disconnected, and when I tried a duplicate of one of the completed prints with the klipperscreen device (on a new nice cable) and my webcam (connected but not enabled via crowsnest) it failed after 3 hours.
It's all good. I think there might be some sort of import fee specific to this type of item, most of the Chinese vendors have them for $30-50 with $100+ shipping.
There is a listing on Amazon that's around $85 after one of those coupon things, with free shipping. Seems to be the best deal I can find.
Just as a heads up, in case you ever wanted to order these (or anyone else is viewing this post and is looking to source extrusions), the price for the frame is around $20, the cost for shipping to the US is around $110.
No other printer to test with, no. Coincidentally, the parts I am trying to print are for a voron 2.4, because I'm absolutely tired of dealing with all the issues I've had with this one (see post history).
Hi everyone, a week ago my printer (heavily modified Neptune 3) started randomly shutting down in the middle of prints. I come back to a print with the "Klipper reports: SHUTDOWN / Lost communication with MCU 'mcu'" error message.
The printer has been "under construction" for the last couple of weeks, but it has been in varying states of "working" for most of the time - working well enough for me to print the parts I needed to get it back to "fully operational". During this time, the printer never shut down like it is now.
Only once I started making little cosmetic changes did the problem present itself. I was running a known-good print, and I got the above error twice (first time after ~2 hours, second time after ~1 hour) before I got a successful print off of it. This was last week.
After this successful print, I continued other prints with no issues. After a day or two with no problems, an hour long print threw the error at me four consecutive times between 10-45 minutes into the print. This is when I started looking into my klippy log and found some relevant articles citing things like EMF interference, bad power supplies, faulty cables etc. I realized that one of the changes I had made rerouted the printer USB cable right around the Z-stepper, so I rerouted it to how it was originally and immediately managed a successful print. This was 5 days ago.
After moving that cable I had no issues with printing several-hour long prints... until last night. I had been printing all day, then the problem came back. After one print finished, I queued up another print with a plate full of parts, it failed after 1.5 hours. Tried the same print again, failed in 30 minutes. I re-sliced to only a handful of parts to see if I could get those to print before the error occurs, and it's failing 15 minutes into the print.
The printer power supply is the unit that came with the Neptune, and it isn't powering anything besides stock hardware (exception being the SKR mini board), so I don't think it's that. The pi is on a quality unit. The USB cable has been working for a long time so I also don't suspect that, but I'm probably going to buy a new one today just to be sure. I adjusted my enclosure setup so that the Pi and SKR are able to get cool air (at one point had a personal fan pointing at the open electronics box, still failed).
Here is a link to my most recent klippy log (abridged to the start of the last failed print). I'm not very familiar with reading through this and finding oddities, but I do think it's strange that it seemed to load my preheat script in the middle of printing right before the EOF error. (It should be noted that this preheat script was made 1 or 2 failed prints before this most recent one, so it isn't the source of the error as prints were failing before the script was made). If there's anything I'm missing or something else I can try, please let me know!
Edit: While typing this post, I was running the same failed print without filament and both heaters turned off. It ran for about 45 minutes (most recent failure occurred at 12 minutes) so I cancelled the print and started it again with heaters turned on, still without filament. It again ran for about 45 minutes, so I again cancelled it and started the print again, this time with filament loaded. It failed in 5 minutes.
Edit 2: A test print with heaters on and no filament failed after 1h8m. So it isn't an issue with extruding filament.
Edit 3: New cable with the 5v leads taped off per @SzethFriendOfNimi@lemmy.world's advice. Ran the print without filament until completion. Reloaded the same file with filament, print ran without issue until the 1h14m mark, at which point I tapped my Klipperscreen device to wake up the screen, and as soon as it displayed the status, the printer errored out. This can't be a coincidence, can it? Whenever the print goes unmonitored for a long time, it fails as soon as I do something (load mainsail, turn on the klipperscreen) to check the status of it.
Hi guys, been thinking about this for a couple weeks now but can't seem to find anything online about anyone who has tried it.
I'm considering converting my printer into a voron. However, since I currently have a fully functioning printer, I wondered why I can't print the extrusions rather than purchasing them? Of course they are larger than my printer's volume, but there was this video posted here a while back about a great way to create strong permanent joints for parts just like this:
https://youtu.be/zI8OgRRF5d8
The way I would do this would be to model the extrusions as a solid piece and make cutouts in the areas that bolts are meant to be ran through.
Is this even within the realm of possibility, or is there a specific barrier that has prevented others from trying this? The obvious concern is stability/ rigidity, but if everything is printed at voron part standards or thicker with an infill pattern like gyroid, would the decrease in rigidity be too much for input shaping to compensate for?
Thanks for any ideas or input! If there aren't any major road blocks or examples of this failing I think I'll try it out once I've got the space for it.
Hi guys, it's The Clog Guy, thought I'd try to share something other than problems...
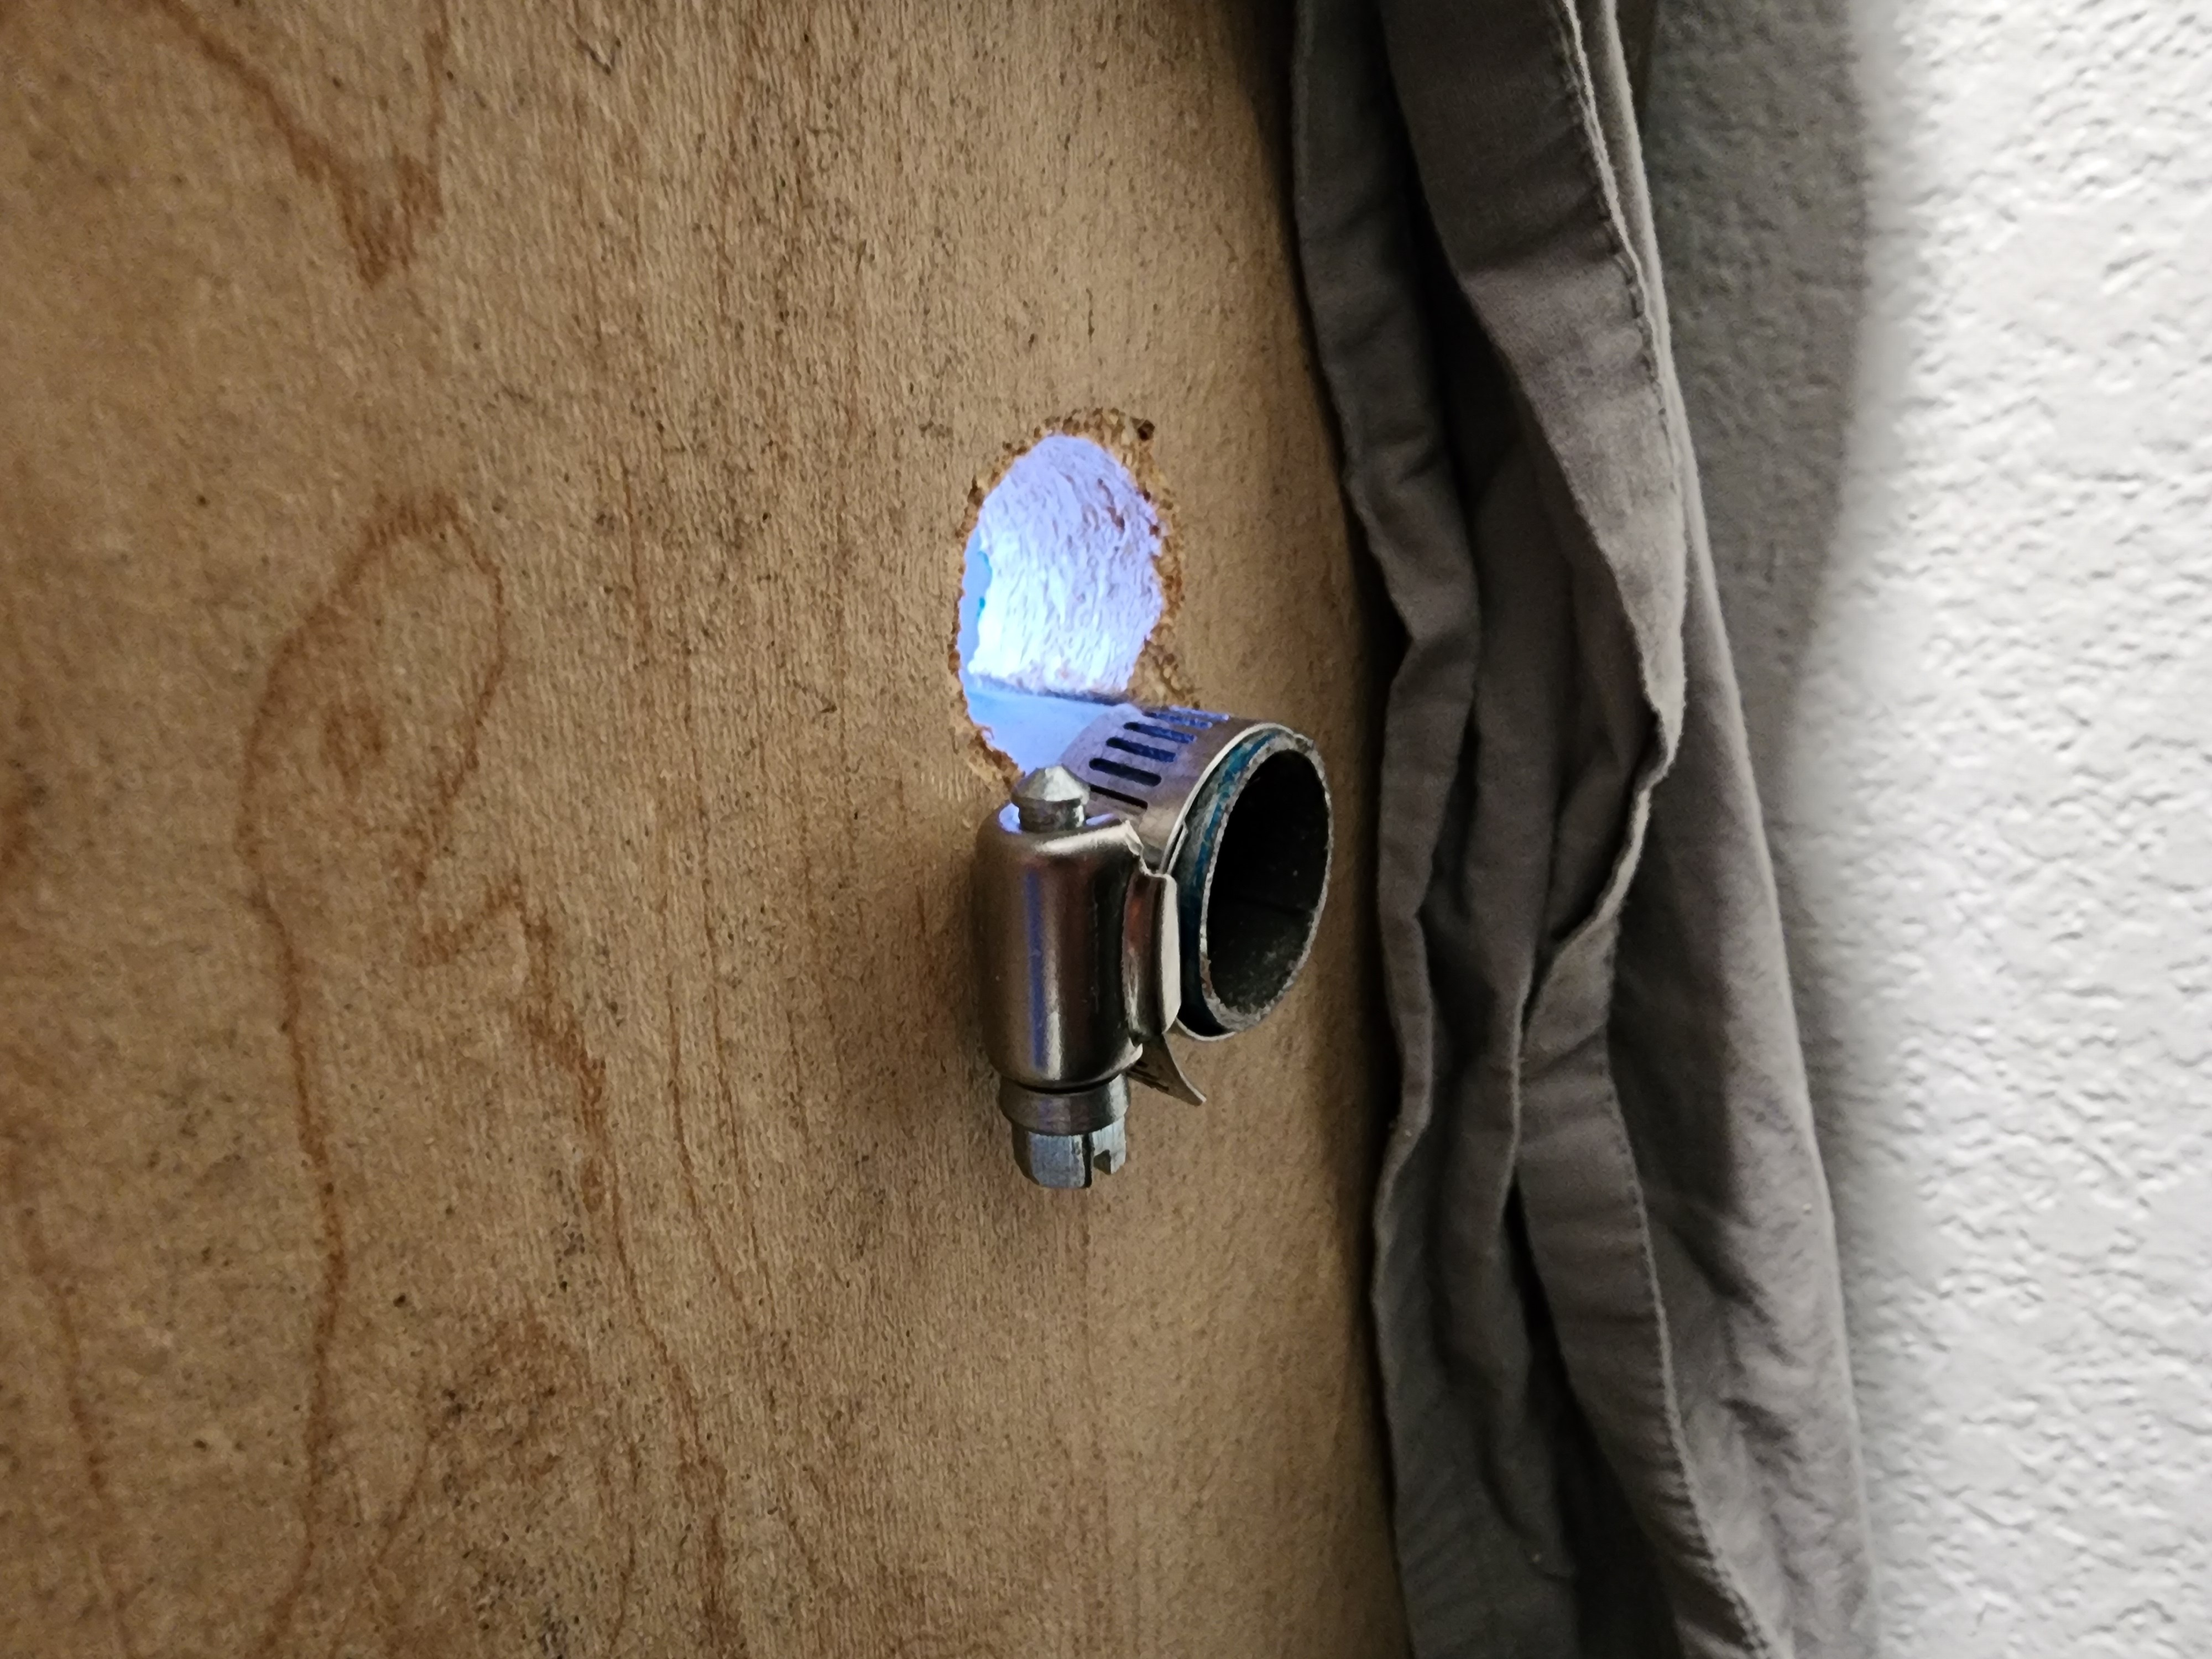
Shortly before my printer went kaput again, I designed and printed a bracket to move my Bowden extruder to the hotend, making my printer a direct drive variant.
This posed an issue: I now needed to feed filament from the top of the printer rather than the side, where I previously mounted my filament holder.
I also have the issue many of you probably do where I am running out of room for my many filament spools.
Enter: The Rod. Two holes on either side of the enclosure, and I can hold probably 8 or so spools within the enclosure.
The Rod slides out on one end to allow for quick spool changes:
And I even had the foresight to put a clamp on one end to prevent it from getting yanked out all the way:
I canabalized the filament guide from the printer to the top of the enclosure with one screw so it would swivel, put those thumb tacks in to keep it from spinning all the way around, and the enclosure is ready to go!
Now if only my printer worked...
Hi guys. Please check my previous post for any background questions, I don't have it in me to go over everything again.
Long story short, I was having issues with clogging that were being caused by my hotend not reaching the reported temp. After a few days of troubleshooting and diagnosing the motherboard and Klipper settings, I gave up and decided the motherboard was faulty (even though I could not perform any tests to determine in) and bought an SKR mini. I got that all set up, and the printer has been working flawlessly since then.
Until now.
Same exact problem; one print goes perfectly fine, next print, failing to extrude by the 4th layer. I removed the clog, restarted the print, now can't even extrude the priming line. Fearing the worst, I disassemble the hotend, try hand feeding filament, and once again I am unable to push more than a few centimeters through before it gets clogged up. A probe thermometer reads ~160C while Klipper reports 200C.
What could possibly be happening here? The board is an aftermarket replacement from a completely different company, so I doubt it's a recurring manufacturer defect, but I have no idea what else can be causing this.
At this point I've spent so much time and money trying to fix this printer that I could almost buy a new one, but at this point I'm not convinced even that would solve the problem.
I couldn't find a great way to describe what I'm seeing. But if you're deep in a comment thread, or viewing a reply to your comment, and have parent comments collapsed, if there are additional comments, choosing to show them adds the number of context indicators (the little lines on the left) that it would have were the parents not hidden.
!Bug
The comment from FlyingSquid was the comment hidden by "show 1 more reply".
OK guys, I finally found what the issue is, or at least kind of where it's coming from.
As some of you (and myself) suspected, my hot end is not reaching the reported temperature. I previously blamed the low readings on my IR thermometer on not being able to point the laser directly at the hotend, but it seems it was reporting accurate readings (around 95C when klipper reports 200C).
Now, here's where things get a little weird. At this point, I've used multiple thermistors, but swapped in a new one anyways. My board also has a pin for a second extruder thermistor, so I plugged it in to that one and changed the pin in my printer.cfg. No change.
I tried switching the bed and hot end thermistors on the board and in printer.cfg, no change.
I changed the thermistor "sensor type" from "EPCOS 100K B57560G104F" (same as the bed) to "Generic 3950", no change.
I found an article about tuning your pullup_resistance value. My cfg file did not have this value specified, so I added a line and started with the default of 4700, which made no difference (I'm assuming this value is loaded from the sensor type by default?). I toyed with the values until my thermometer read ~220C when setting the printer to that temp. However, to achieve this I had to adjust the pullup_resistance from 4700 to 13k+ (far beyond what should be needed) which makes klipper report 6C at room temp (print bed reports 27C). Unsurprisingly, I can hand-feed all the filament I want, but the temp reading is only now only accurate at 220C rather than only being accurate at room temp.
The thermistor, I feel, can be removed from the suspect list, as multiple thermistors exhibit identical properties.
I also feel the motherboard can be removed as well; there are three pins for thermistors, all three show accurate readings for the bed but identically inaccurate readings for the nozzle.
This only leaves software/ firmware, which I find incredibly odd for three reasons. For one, the printer was not even shut off in between "working" and "not working"; I successfully completed a print, and without shutting down, updating any configs, changing any settings etc., I swapped out the nozzle, and the printer hasn't worked since. Second, both the bed and nozzle thermistor are configured exactly the same, so if the nozzle is not set up properly the bed should be wrong too. Finally, Klipper is really straightforward and it's easy to configure things that commonly need configuring, it doesn't seem right that a configuration got changed and I'm completely incapable of finding what happened and fixing it.
As a Temporary FixTM, I'm inclined to get a nice reliable probe thermometer, calibrate a pullup resistance value for common print temps, then updating my cfg whenever I want to change temps more than ~5c. This is obviously not even close to an ideal solution, but I don't know what else to try. Everyone else I've seen with this issue has resolved it either through hardware replacement or fixing settings, and I've tried all I can with both.
First I'd like to say thanks to everyone for looking at these posts and trying to help, and sorry to anyone who may be annoyed. Trust me, I'm not happy either.
I'm jumping back and forth between making this write up and recreating the clog by hand feeding filament into the hotend. This test was already performed earlier today and I got the same clog as I have been, so the extruder can be removed from the list of possible culprits. Anyways, here's the steps I'm following:
1. Verify temperatures are within acceptable range
This is my temp chart upon starting the printer. I used a thermal laser to test both nozzle and bed and they were within the range of accuracy of the laser. The laser is not accurate enough to get a good reading on the heat block; however, a few drops of water on the heat block boils within seconds when the temp is set to 100C, whereas at 90C it does nothing, so the nozzle is accurate at least to this temp.
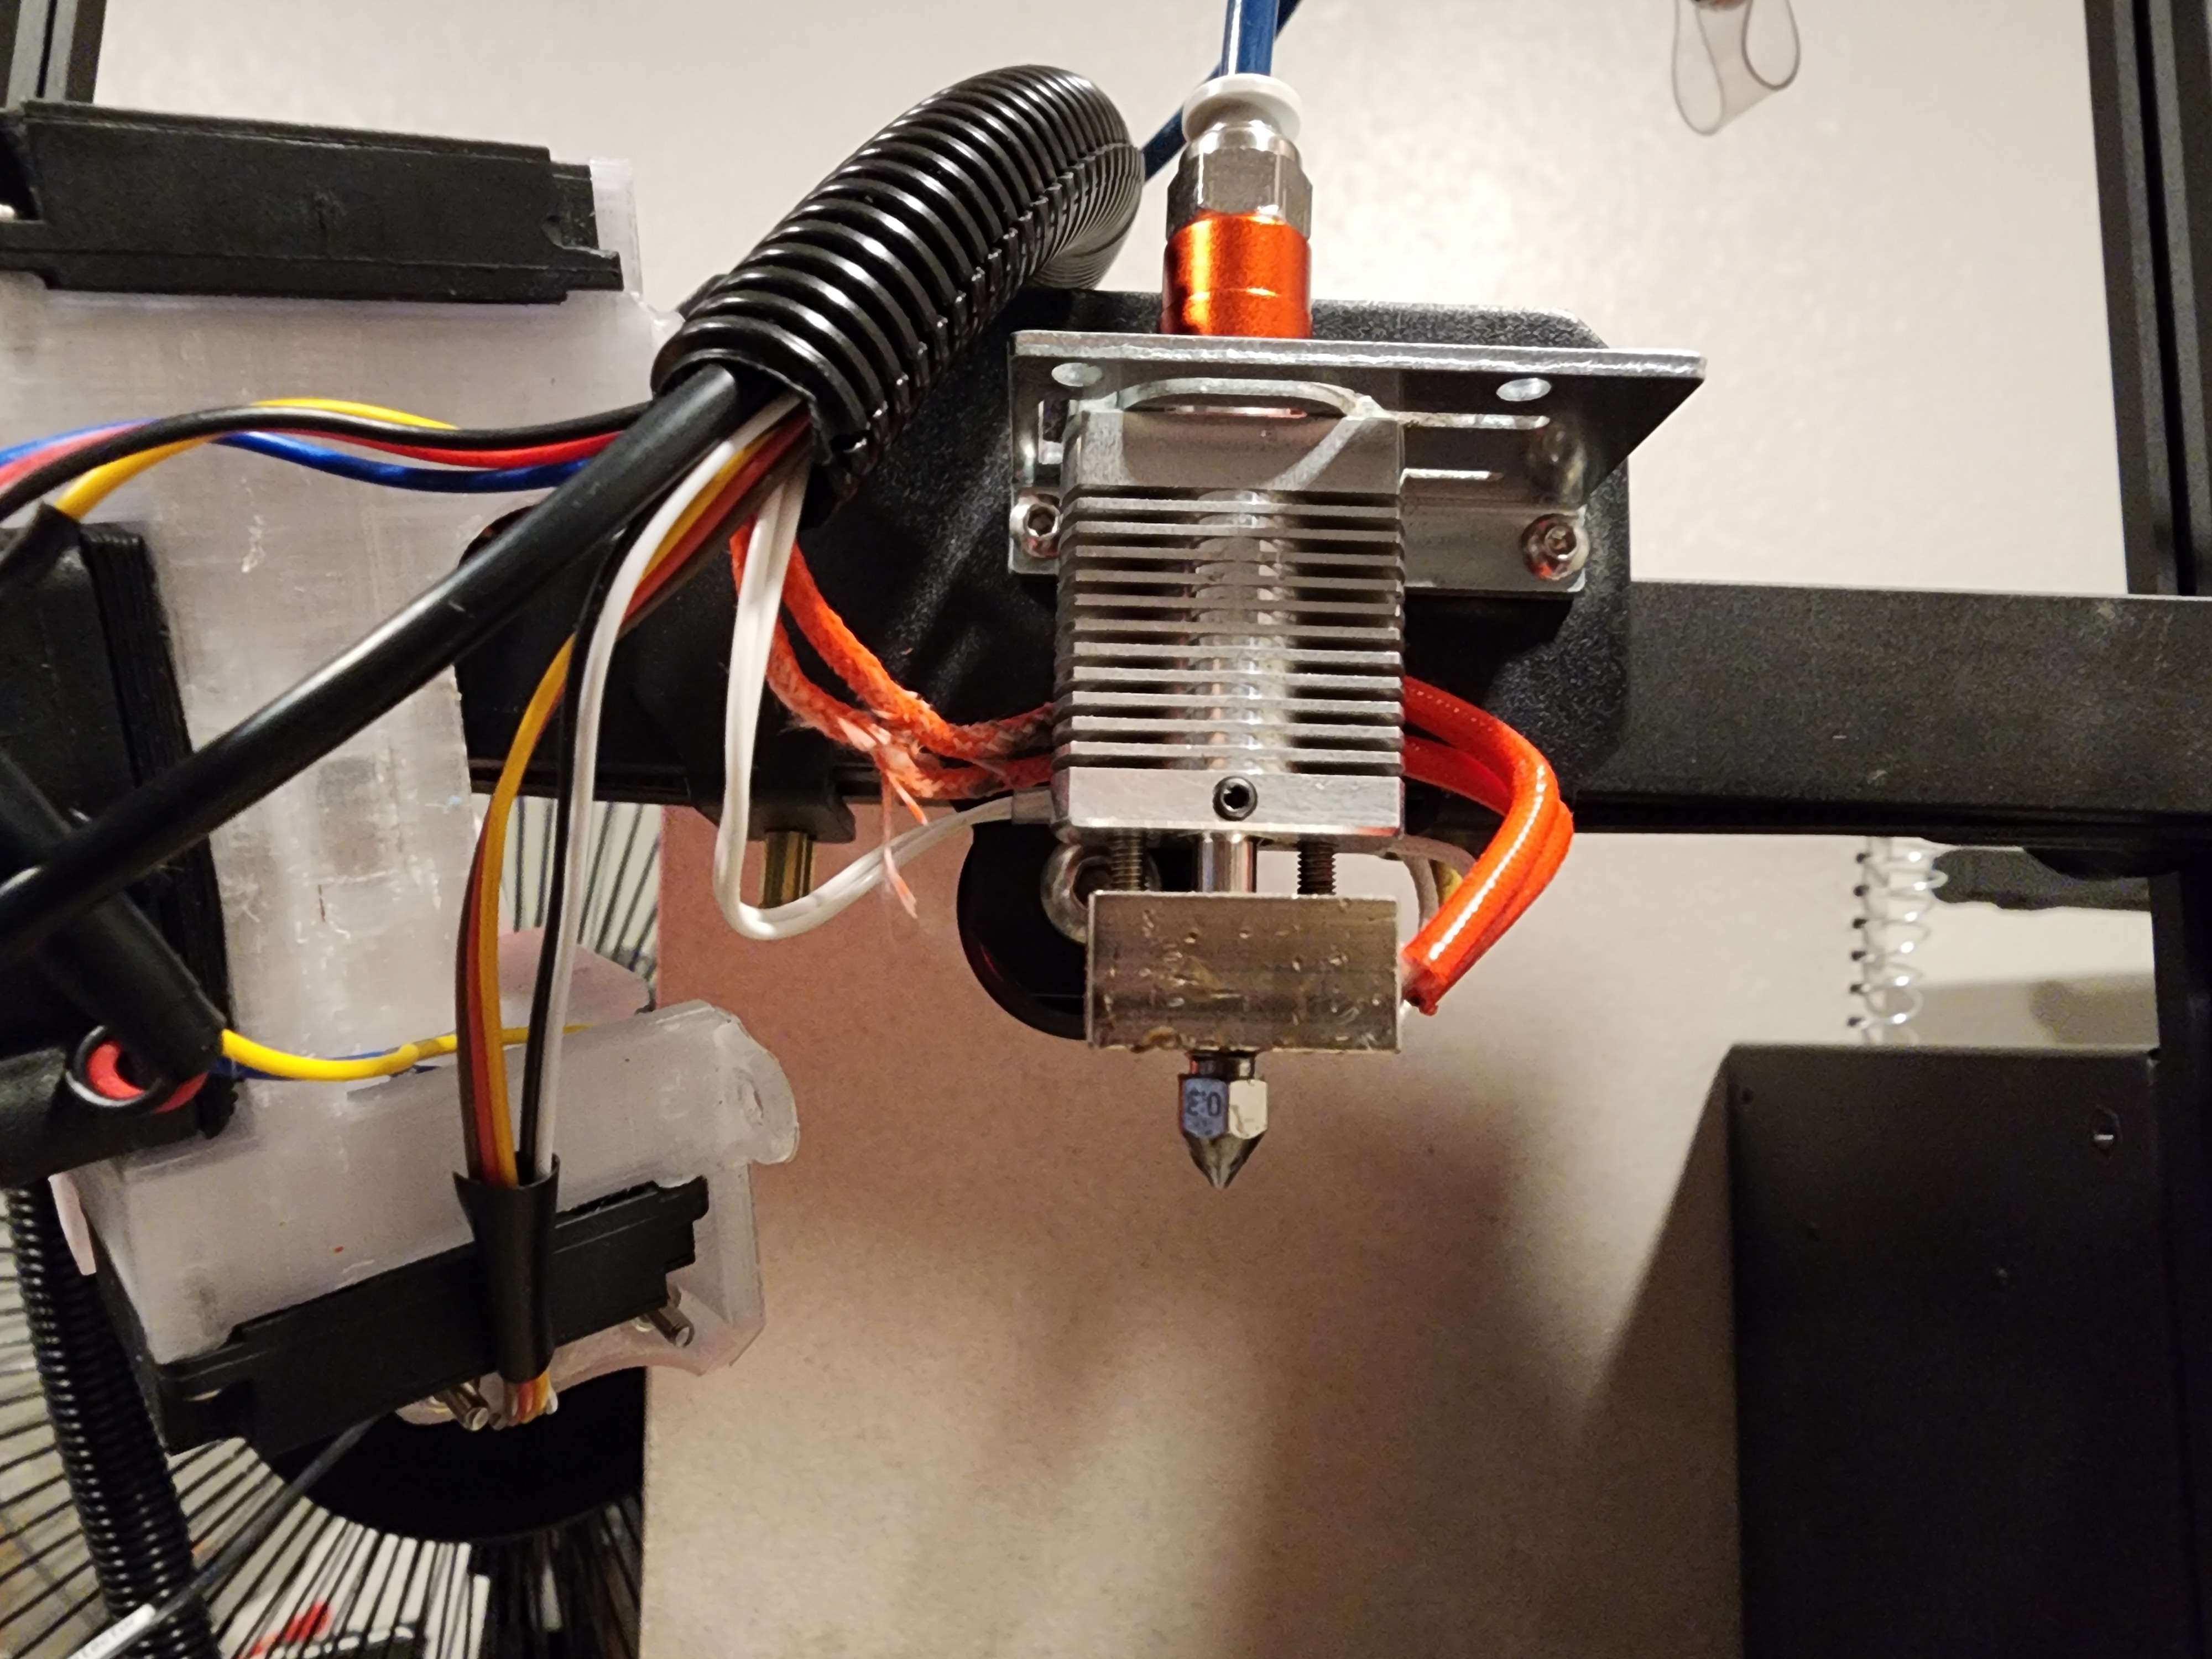
2. Assemble hot end
This is what my hotend assembly looks like without the nozzle or bowden tube. It should be noted that my printer has been modified such that the bowden tube going from the extruder is fed all the way through the heat sink to the nozzle, rather than having a fixed tube inside the heat break. I understand that this modification itself could introduce the issue I'm facing, but the issue started before the mod was done, so I don't think it is the cause.
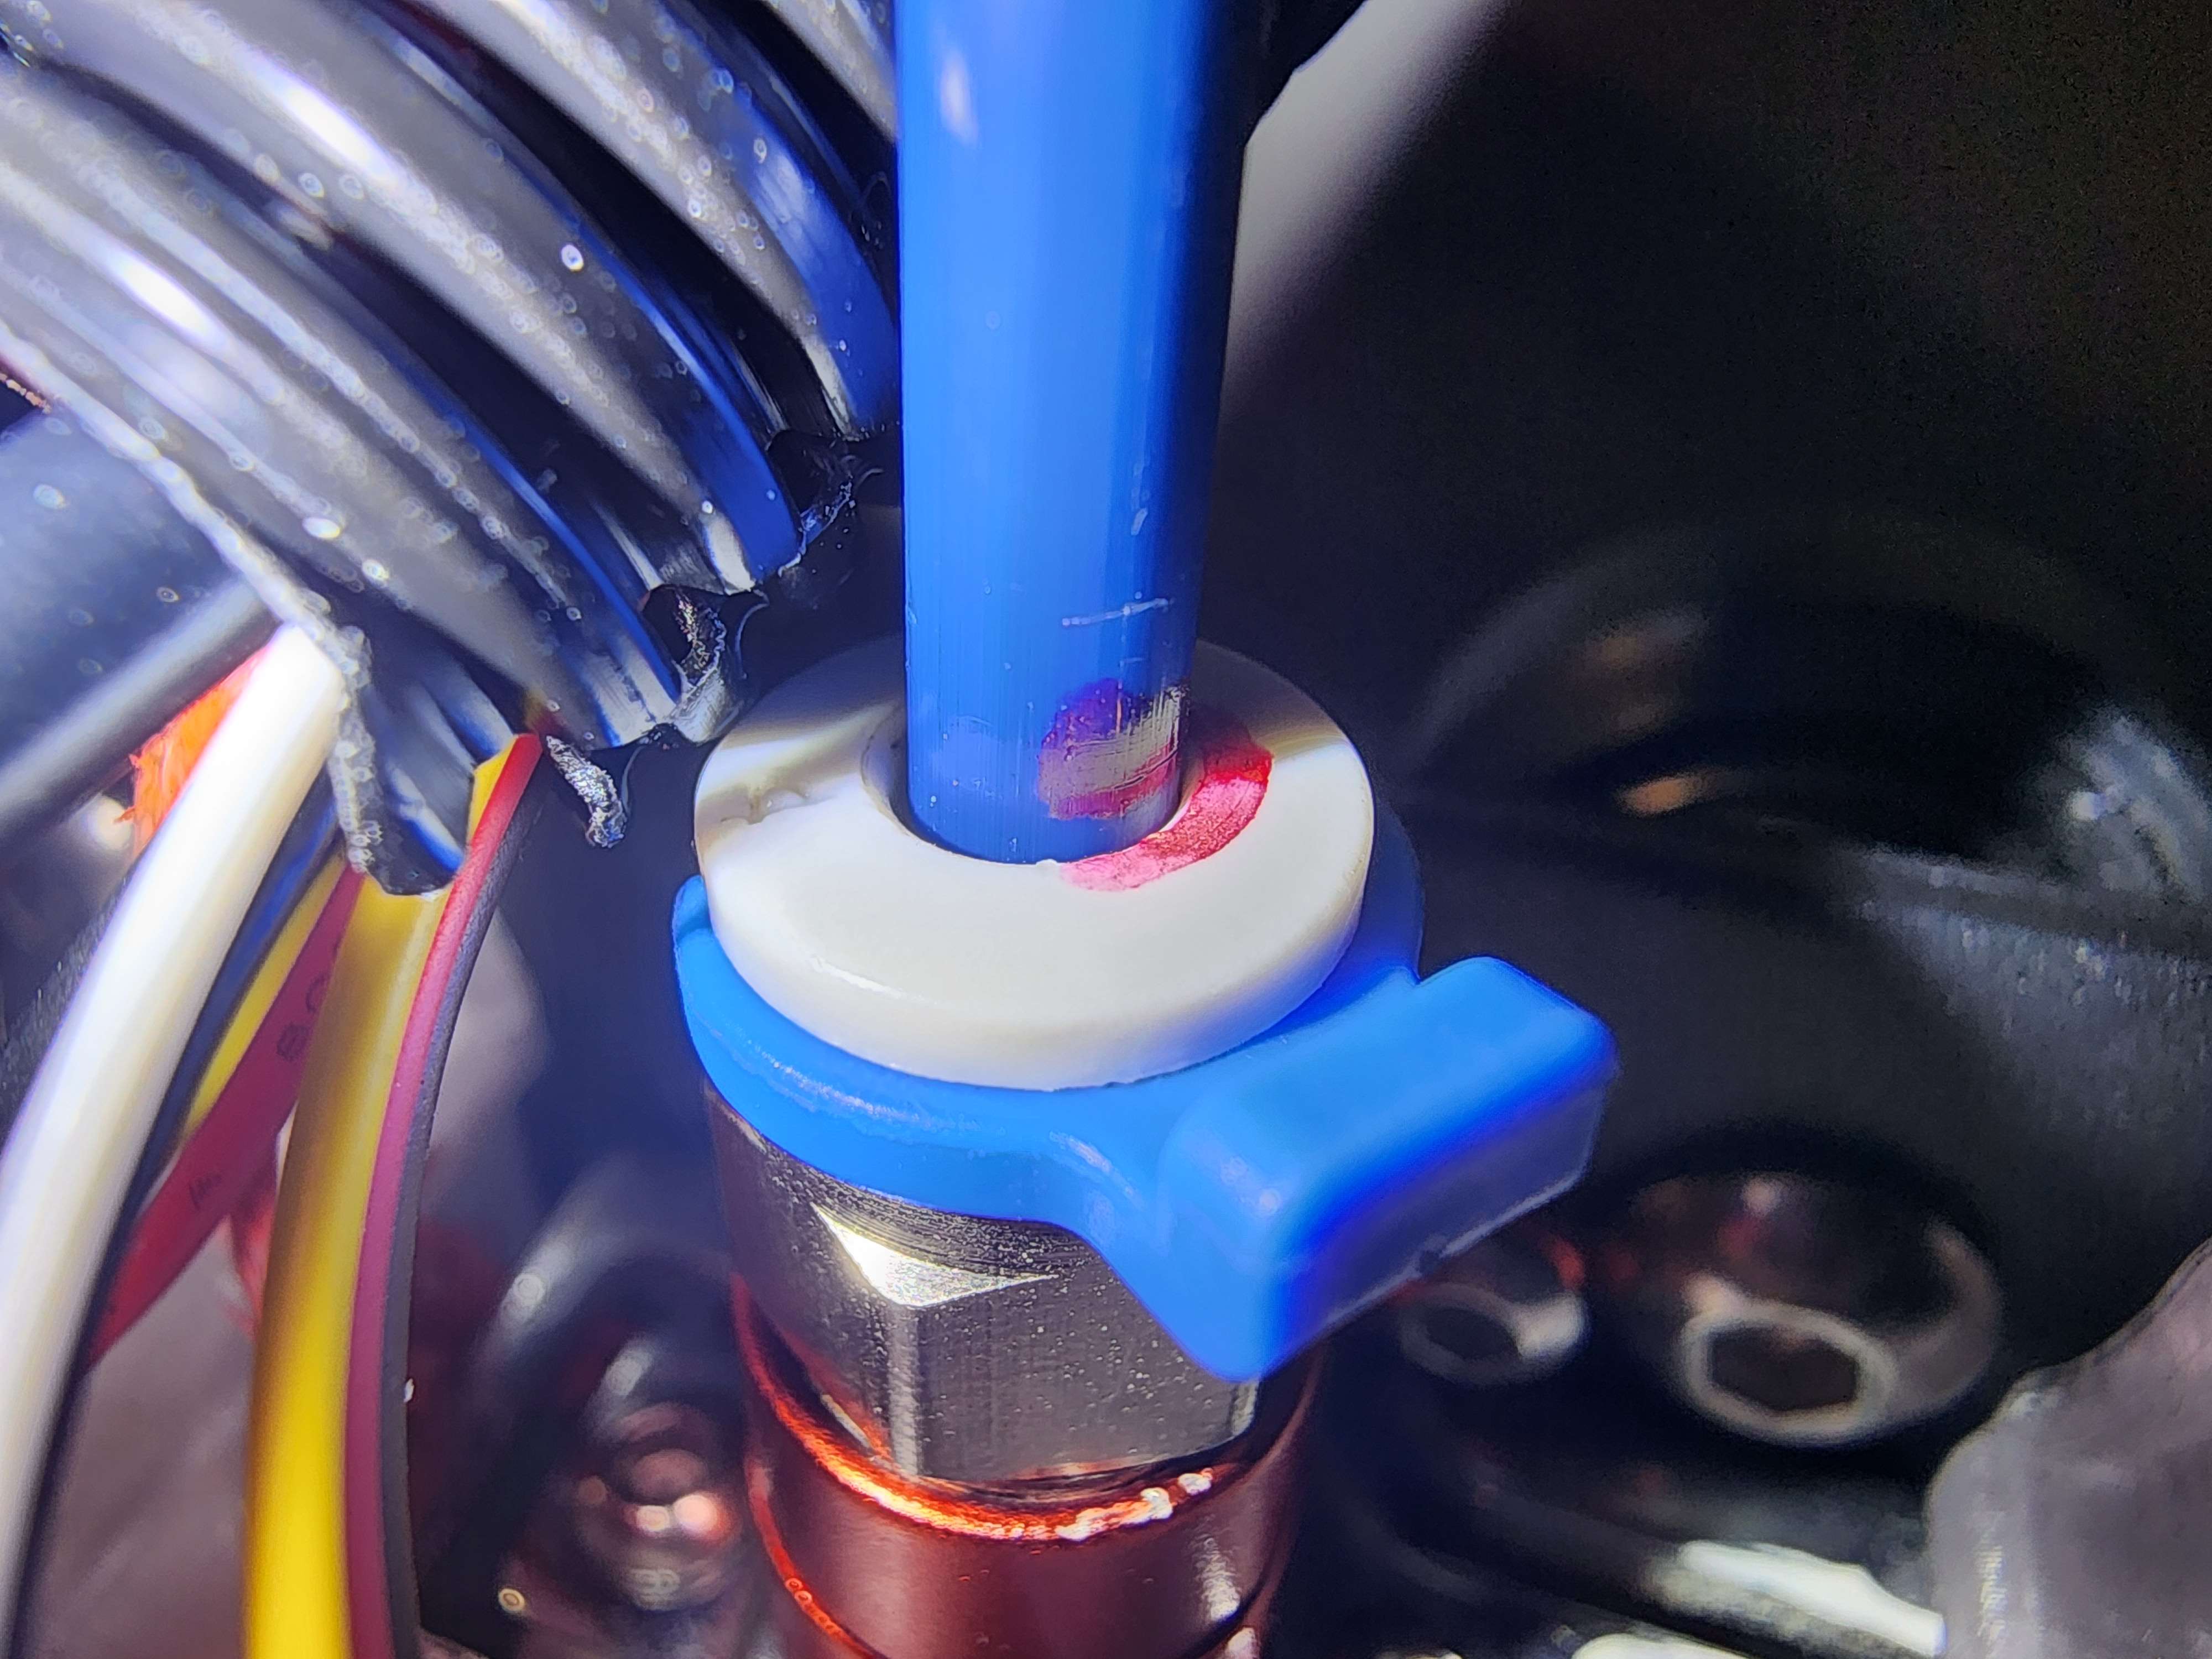
Nozzle cleaned with blow torch and wire brush.
Underside of the heat block. The picture makes the threads look a lot worse than they actually are, in the photo it looks like some sort of gunk or shavings are at the end but after inspecting the block and scrubbing it with a wire brush there isn't anything there. The nozzle also threads in without any issue.
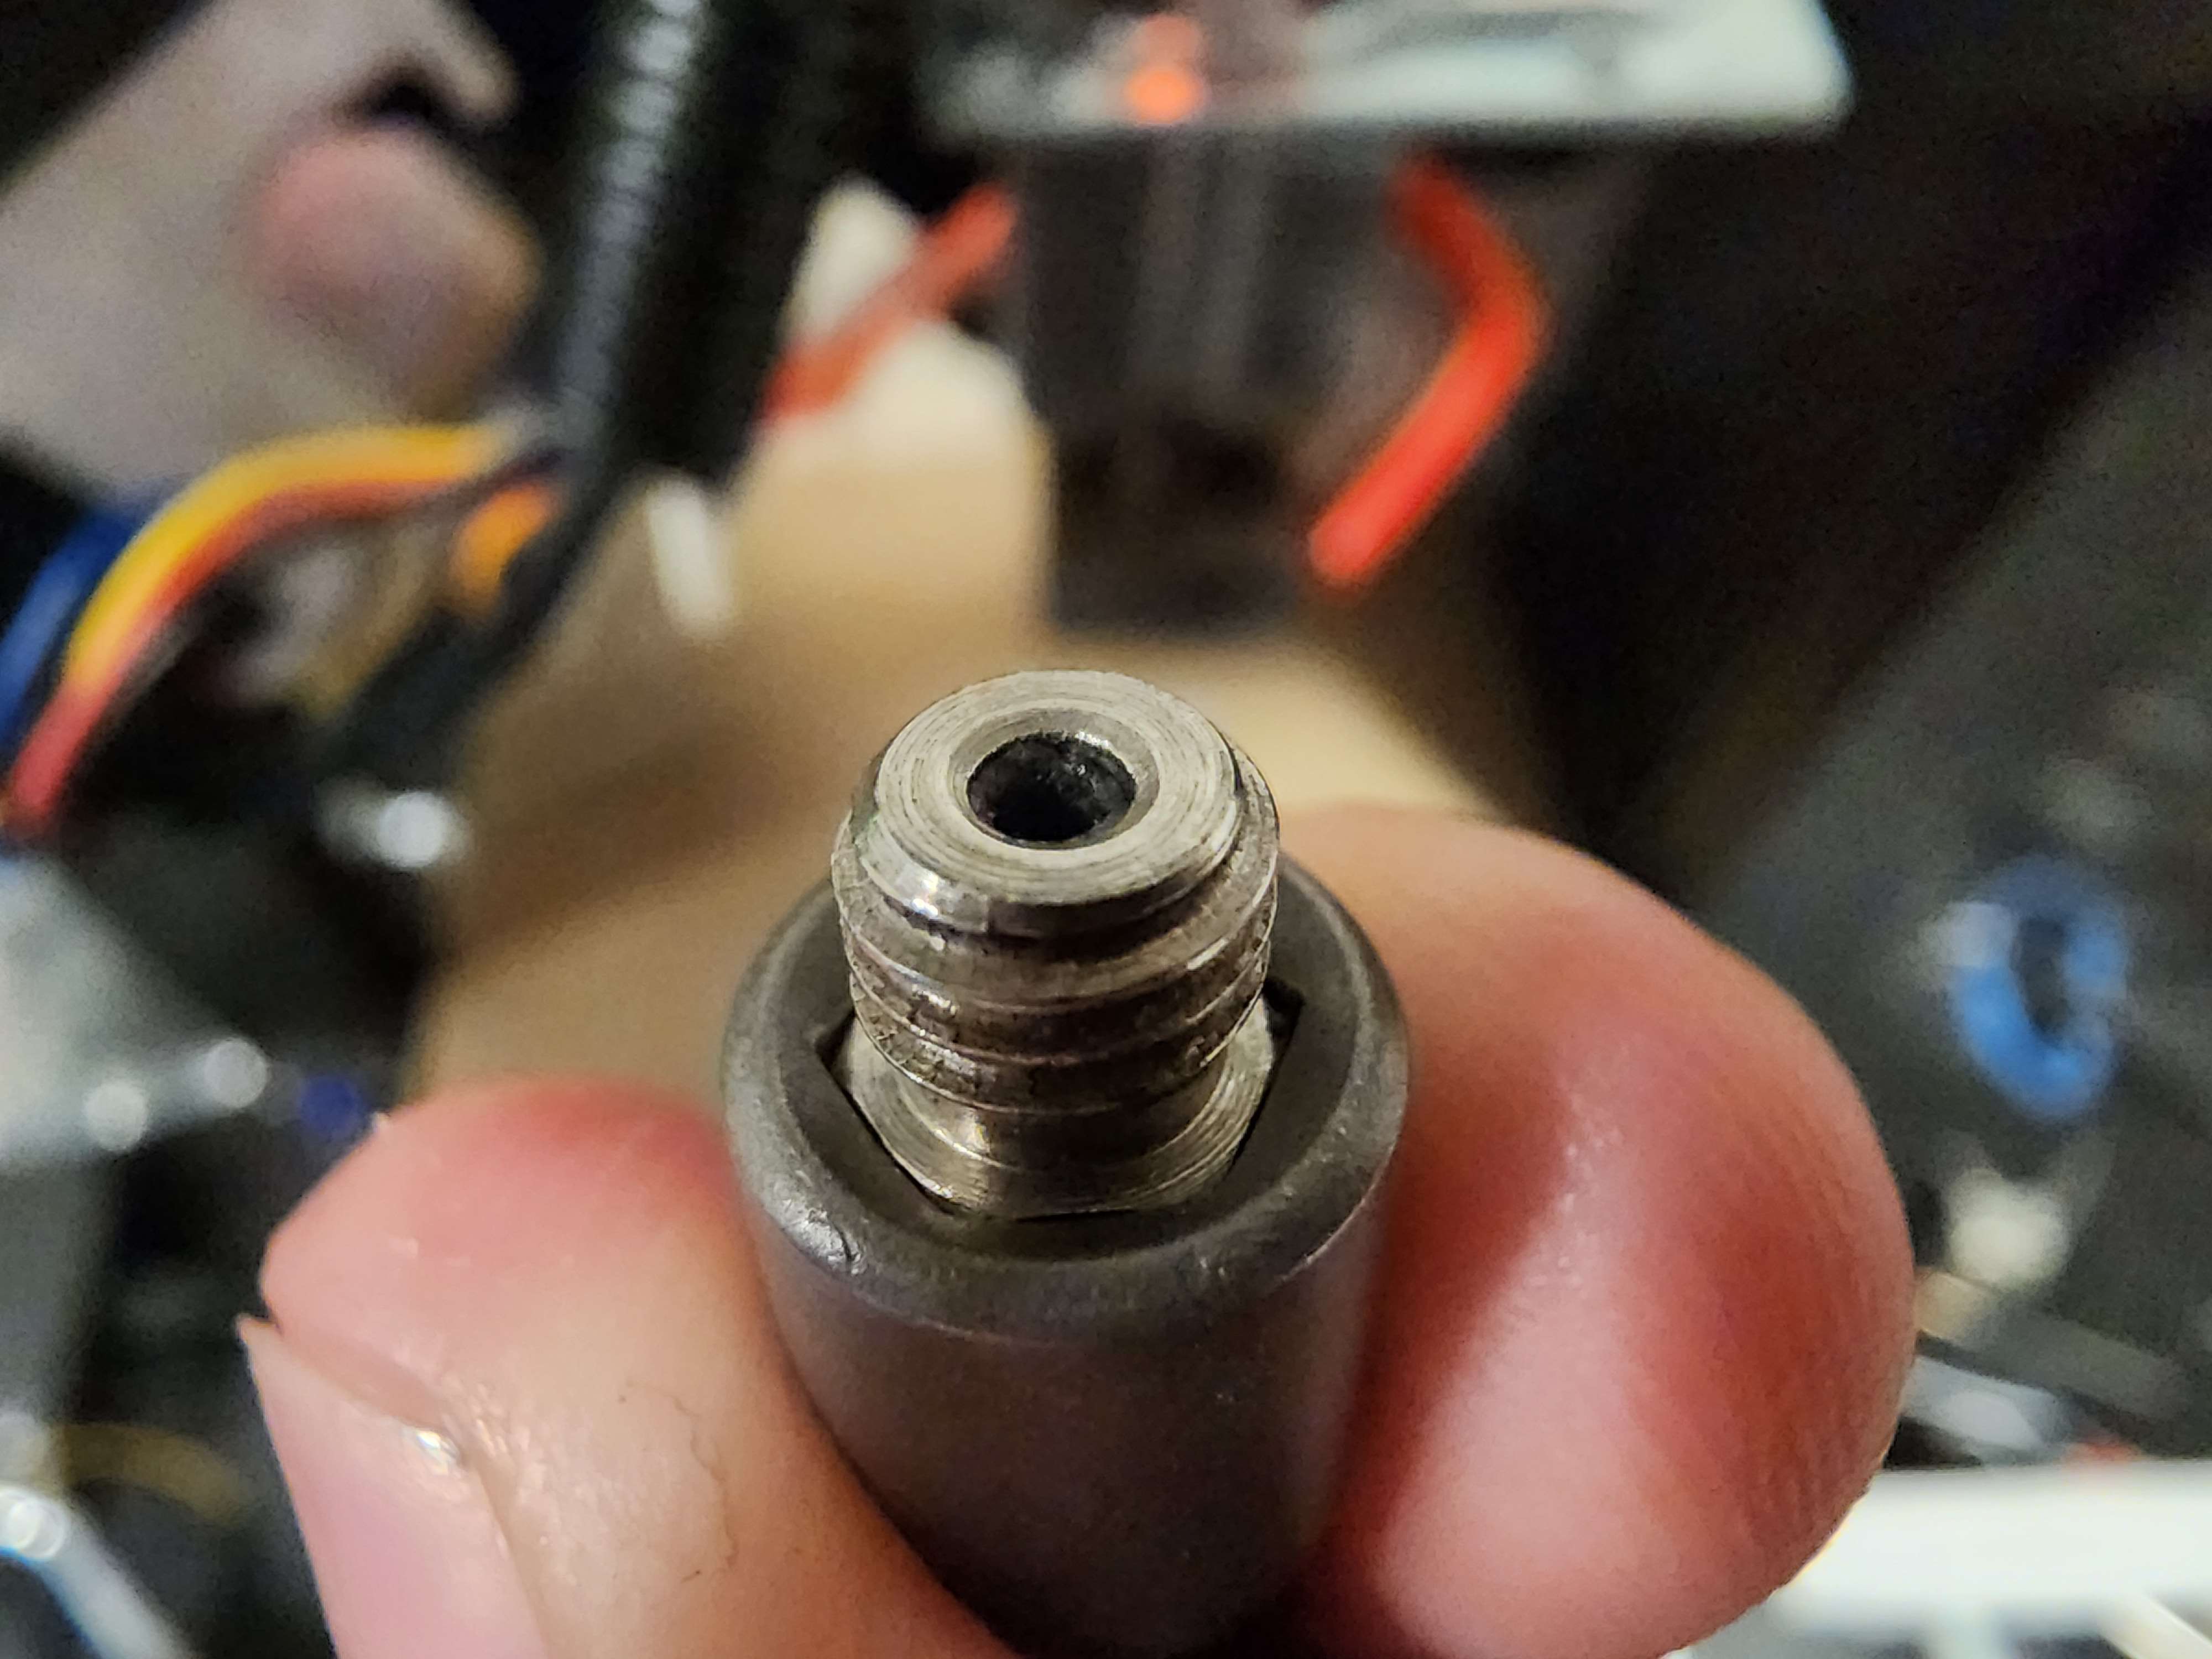
With the heat block at 100C, I first loosely attach the nozzle, then insert the Bowden tube so its against the nozzle. Since I'm hand feeding filament, I'm only using ~10cm of tubing. For photographing purposes, I put a small notch on the tube at the top of the coupling (not visible in this photo). Then, with the coupling depressed, I finger tighten the nozzle, pushing the tube out slightly.
Here you can see that the nozzle is not getting tightened against the heat block (the small gap between the face of the nozzle and block); this verifies the nozzle is flush against the heat break.
I've circled the notch mentioned previously - this shows that the nozzle was indeed pushing the tube out of the coupling, and should verify that there is no space in between the bowden tube and the nozzle inside the heat break. With all this verified, I use a wrench to tighten the nozzle ~1/4 of a turn without depressing the tube coupling. This should ensure a tight mate between the tube and nozzle. I also put another mark on the tube at the coupling to make sure it does not move during the test, and reinstalled the fan shroud.
3. Hand feed filament
I'm quite frustrated because at the time of typing this I've repeated the above steps twice now, because when I went to hand feed the filament it instantly became clogged and I was not able to get any good data, but finally on the third attempt I've got a solid clog. I'm waiting for the hotend to cool off so I can remove it and get some pictures. Meanwhile, I'll explain that the hotend was heated to 200C and I hand fed some filament through it. As stated, the first two times it clogged instantly, but even when I was able to get filament to run on the third try it was incredibly difficult, when it has always been very easy to hand feed PLA at this temp. (When I did this test earlier, I tried increasing the temp to 240C, which made it a little easier to feed and prolonged the clogging slightly, but ultimately ended the same.) Eventually, it got to the point where I was almost breaking the filament trying to force it through, until I couldn't get any more to go at all. I'd guess this was maybe 20cm of filament.
Hotend is cooled off, I managed to removed the nozzle, clog, and bowden tube all in one piece so that is awesome. This is exactly what I've been experiencing over and over again:
A clog forming between the nozzle and bowden tube, filling the diameter of the heat break.
The Bowden tube has been pushed out of the coupling by about the thickness of the clog. It should be noted that the coupling was actually replaced a few weeks prior to the problem starting, but I've since tested both another new coupling as well as the one that was originally replaced, and all three behave the same. I can also support most of the printer's weight by pulling up on the Bowden tube. Thus, I believe the slipping coupling to be a symptom rather than the cause.
This is what my heat block looks like after I repeated the test with some gray PLA. (A different nozzle as well as a different coupling was used for this test.) I noticed when putting the nozzle back on that it was really difficult to do so, and it seems like this could be why: filament making its way into the threads during the clog. (I guess my previous statement of the block being cleaner than it looked was probably false...) During earlier testing, I've soaked and torched the heat block to make sure this buildup wasn't causing the clogging, but again it seems to be a symptom rather than the cause.
The two clogs on the left are from earlier tests using the printer's extruder, the two on the right are from tonight's hand fed tests; note the difference in thickness of the clogs, the extruder is much more capable of pushing through the clog than I am which results in the clog getting much larger before failure. It should be reinstated that this exact result is prevalent across multiple filaments and nozzles. I was not able to get such clear results of what was happening when I had the all metal heat break(s) installed, and unfortunately I don't have the time tonight to swap one in, but it was clogging with more or less the same behavior, so I'd have to assume it was clogging between the Bowden tube and heat break. Before the hotend was modified, all of the common steps were taken to verify the internal bowden tube was functioning properly, and the bowden tube installed now is probably the third one that I've cut off of a brand new Capricorn tube since this problem began. I'm considering re-modifying the hotend to work how it did stock, but again it was clogging when it was set up the original way so I don't think this is the issue. I'll probably try it out tomorrow if nothing else gets me anywhere,
I have to go to bed before I can continue any more testing, but I'll get back to any comments or advice as soon as I can tomorrow. Yesterday was the first day I managed to pull one of those perfect clogs out, now that they've been coming out consistently like that I feel I'm much closer to finding the problem than before. Please let me know if anything needs to be clarified or if I missed anything, my hope is this thread (and my suffering) might help someone with a similar issue.
Hi all. This is an update to this post. I don't know what else the community can do to help, but I figured I'd throw some more content up there and give something bored people to look at.
Since the last update on that post, I tried working on the printer in freezing temperatures (not really but it's cold in this house) with extremely precise practices on assembling the hot end (the same hot end I had haphazardly assembled dozens of times and printed with zero issues) and yielded zero progress. Today, I tried a brand new PTFE lined heat break, along with a brand new Capricorn Bowden tube (I already had one but I needed more tubing for the heat break). Clogging in the same exact way in roughly the same amount of time as every other attempt. It's as if I've not tried anything, literally nothing is effecting the results.
I considered ordering a fancy micro-swiss or ed3 hot end, but at this point, including the stock hardware, I've gone through 6 heat breaks, 3 heat blocks, a half dozen nozzles and a foot of Bowden tubing, none of which did anything to fix my problem (or even make it worse). I would look to the extruder, but I outlined in the previous post the testing I did to rule that out (able to run >1m of filament at high and low speeds through the Bowden tube).
I'm at the end of my wits. Perfectly good printer cranking out multiple high detail prints a day, now completely useless over something so stupid as clogging. Where the hell else can I look? Could it possibly be some sort of software/firmware issue, where Klipper isn't sending or receiving the right commands or something? I know my slicer settings are at least good enough because I've tried both prints that have completed dozens of times as well as new prints with drastically reduced retraction. Do steppers need to be tuned over time? I don't think it makes sense that after a year it'd suddenly become so uncalibrated it's unusable, and when I tried calibrating it before I was just unknowingly calibrating against mild clogs, but I don't know where else to look.
Hi everyone, I'm having constant clogging issues with my printer that sprung up out of nowhere. I'm running out of things to test.
The printer had been running several prints a day for several days when I decided to change nozzles for one print. Ever since then (~2 weeks ago) i have not completed a single print, due to clogging. I have tried:
Replacing the PTFE tubing in my hotend.
Replacing the nozzle. (I've used a handful of nozzles, all with the same results)
Trying different filament.
Replacing the hot end with an all metal hot end, trying three different heat breaks from two manufacturers.
Removing the printer from its enclosure to ensure proper cooling.
Adjusting extrusion tensioner.
All the other basic obvious stuff like making sure there's no blockages anywhere (whole hot end and nozzles have been soaked in acetone, torched, brushed etc).
The printer will seem to work fine for a little while before either slowly failing to extrude until it completely jams, or it completely jams all at once. I don't think it's heat creep, because I tried setting the nozzle to printing temp, letting it sit for half an hour or so and running filament through it and it had no issue, whereas prints usually start to fail within the first 10 minutes. It also doesn't have anything to do with my print settings because I'm able to get it to clog sometimes by just running the extrude command.
I'm completely at a loss here. I don't know what else to try. Does anyone have anywhere else for me to look?
Update: I tried detaching the heat block from the rest of the printer and running filament through the (cold) heat break, and it got clogged. There was a small bit of filament adhered to the inside of the heat break. So it's apparent that's where the clog is forming, it's just a matter of finding out why it's happening. Everything seems to point towards heat creep, but even when I intentionally try to heighten the conditions that to cause heat creep I can't intentionally replicate the clog. I'll keep experimenting down that route, though.
Update 2: After clearing that clog, I noticed the short piece of Bowden tube between the top of the heat break and the top of the heat sink was slightly too short. I modified the heat sink to bypass this short piece altogether; the Bowden tube now goes directly from the extruder into the heat sink to the top of the heat break. I also applied a thin layer of thermal paste to the outside of the heat break to ensure good contact/ heat transfer with the heat sink.
After doing all of this, I ran a PID tune and, with my AC set to lower than average, started extruding filament. After extruding ~300mm of filament, I tried a few nozzle and filament swaps using very careful techniques to avoid leaving any residue. I'm able to pull the filament out in a solid piece to where I can see light through the nozzle afterwards. Then, finally, out of the blue, the clicking returns. Another clog. I wasn't able to remove the filament as cleanly this time to inspect the clog, but I'm strongly suspecting heat creep at this point, despite going above and beyond to mitigate it. It's quite late though and I've got work tomorrow so it'll have to wait until then.
Hi guys, I've dove into the klipper scene with my Neptune 3 and am having a really odd issue.
When I first got klipper/ Fluidd set up, I tried loading the interface in my browser (Chrome) and got an all white screen. At first I thought it just failed to connect, or the process wasn't running, but then noticed the tab was named "Fluidd". I spent an hour or two reinstalling things over and over before I decided to try a different browser (Edge). It loaded up just fine. I pulled it up in Firefox and spent a while configuring it. I had to reinstall the Pi's OS a few times, but each time Fluidd came up in Firefox without issue but failed to load in chrome.
Now, suddenly, it is failing to load in Firefox, but continues to load in Edge. Below is a screenshot from my PC with all three browsers with the same address typed into the bar, with only Edge loading for some reason... Does anyone have any clue what could be causing this? It also loads on the Chrome app on my phone.
Hi all. Yesterday, my printer stopped responding to commands from the touch screen, so I shut the printer off and turned it back on. Now, the printer and screen turn on (power fan spins and screen backlight comes on), but the screen does not display anything, and the printer cannot be reached via USB. Multiple power outlets and cables have been tried, and all cables inside the main chassis are securely connected except for the Z- cable (which has been replaced by a BLTouch). There is a single red LED on the motherboard that lights up when the machine is powered on. Does anyone have any ideas how I can try to diagnose this? I've sent an email to elegoo, but I've heard it can take weeks to get a response, and I'm trying to get things ready for a DnD campaign starting this weekend.. thanks for any tips.
Edit: for anyone finding this post looking for help, you're SOL. Elegoo responded to me, and after sending them a couple pictures, they've determined my motherboard to be dead, and are not willing to provide a free replacement since I'm just outside of warranty. Now I'm torn between getting a new motherboard (waiting on a quote from them) or just saving for a better printer.
Edit 2: after some very light complaining, Elegoo is making right and sending me a new motherboard free of charge.
When clicking on links in comments, I wish that instead of opening the link immediately it would give a sort of context menu so you can at least see where the link goes to or maybe copy/ share the link.
It's incredibly annoying clicking on embedded links to YouTube/ other apps, getting yanked out of Boost and having to close the video, back out of YouTube, reopen Lemmy... All for a link I never would've opened had I been able to see it.
Noticed this the other day, if you upvote a post without opening it, it will be marked as read on a refresh. I upvote posts in c/asklemmy that have an interesting question, but not many comments, so that I'll remember to open them later, but I noticed posts I never opened were being flagged as read when I went looking for these posts.
After ~450 hours in the game, I realized something that I'd been wanting was in the game the whole time, just not explicitly: a way to put your items into "folders".
I often wondered what the purpose was of placing empty backpacks and pouches throughout the game and making them show up in the alt-view. I figured they had items in them at different difficulties or previous versions, or they were simply there for aesthetics (I think most likely option). It only just occurred to me that I could pick them up and store items in them to sort out my stupid long inventory lists.
Gale has a backpack with all his little scrolls. Lae'zel has a backpack that somehow holds 20 daggers, 12 javelins and a spear. And astarion has a pouch with with enough magical arrows to make the Fat Man look like a firecracker. Now the stuff I actually plan on using is much easier to find.
Hello, this is a small QOL change that I think would be useful.
Right now, if someone responds to a post or comment, I will get a notification. When you open the app via the notification, it takes you to your inbox, but defaults to the second tab, "mentions", rather than the primary tab "replies" (where most of my notifications come from).
I think it would be great if opening the notification would take you to the corresponding tab. Of course there's the issue of having responses in multiple tabs; maybe the app could take you to the tab of the most recent or the oldest notification, or there could be a setting to choose which tab is displayed by default.
I'm enjoying the app so far, keep up the good work!