Rubber Scraper/Spatula handle replacement
Rubber Scraper/Spatula handle replacement
Discover topics like woodworking, woodturning, and the magic of the internet at Imgur, a community powered entertainment destination. Lift your spirits with funny jokes, trending memes, entertaining gifs, inspiring stories, viral videos, and so much more from users like jacobcoffinwrites.
For the last few years I've been keeping the parts of any tools or kitchen implements that break with the intent to fix them. We had a rubber scraper/rubber spatula that snapped where the plastic handle thinned to fit inside the rubber head. The actual spatula part was still good, so I turned a new handle for it.
I started with a piece of an oak branch I collected after a storm broke it off a tree in a local park three years ago. Several large (up to 8" diameter) branches came down, and the city took their time in cleaning it up. It was good hardwood that would have just been chipped anyways, so we decided to save them some person-hours and gas and went down with a hand saw one night, cut the branches into manageable pieces, and hauled most of it home.
Once we got it home, I waxed the ends and stripped the bark with a draw knife so it could dry in the basement. The slow (1 year per inch of material is what I've read) drying process seemed impractical at the time but I barely noticed it, getting distracted with other projects.
I cut a piece of one of the smaller dried lengths of oak, and turned it on the lathe until it was similar to the original in dimensions. To be honest, it's a bit more chunky than I'd prefer, but considering that the original plastic handle broke, making the replacement sturdy is probably a good idea.
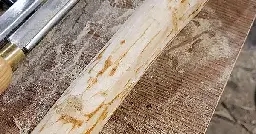
Then I cut off the extra material on either end and carved it down so it would fit the head of the rubber scraper. It's not centered vertically because the scraper was the same thickness as the end of the handle, but the rectangular hole was closer to the back than the front.
This also lined that part up with the heartwood of the branch, which seems like it should help with reinforcing it.
I stained it with two coats of stain, applying the second one while the first was still wet and rubbing it down so there was no extra. The first coat was gunstock (a bright, orange stain) and the second coat was red oak (a darker brown). Then I applied high gloss polyurethane, sanded it lightly, and applied a second coat.
For no extra materials, it's back in use in our kitchen.
Lovely project.
Why stain instead of oil for kitchen stuff?
Honestly? I didn't think of it (though I do have a preference for polyurethane). I've done oil in the past on spoons etc - and it'd definitely have been the more solarpunk version, as the handle would have been fully compostable. The urethane is food safe (after it's had enough time to cure) and it washes well, and I'd been refinishing a lot of other projects, so it was kind of just automatic. Now that you mention it, I definitely wouldn't use it on something like a spoon that was going to be used in a hot pot of soup for example.
In general, I use mineral oil on wood for the kitchen. You can drink it so I'm sure it's food safe. Probably need to re-treat periodically.